Custom Search
|
|
  |
|
|
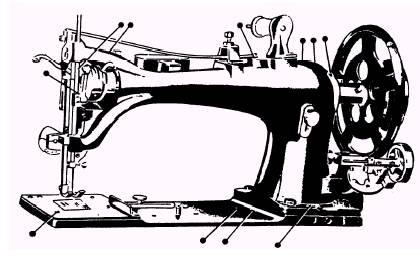
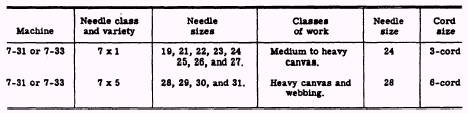
Regulating the Length of a Stitch The length of a stitch can be checked at the time the tension of the stitch is checked, as a trial run of stitches is necessary during both procedures. The length of a stitch is regulated by the thumbscrew in the slot on the front of the uprise of the machine. To LENGTHEN the stitch, loosen the thumbscrew and move the lever DOWN. To SHORTEN the stitch, loosen the thumbscrew and move the lever UP. When the desired length of stitch has been obtained by test running the machine on scrap material, tighten the thumbscrew. Regulating the Pressure on the Material Pressure on the material is regulated by the pressure-regulating thumbscrew on top of the machine face. To increase the pressure, turn the thumbscrew clockwise. The pressure should be just heavy enough to enable the feed dog to move the work along evenly. Removing Work Hand-turn the balance wheel toward you until the thread take-up lever is at its highest position. Raise the presser foot, either by the hand lever or by the knee lift, and draw the work and threads straight behind the presser foot. Cut the threads close to the material, leaving free about 2 inches of bobbin and machine thread. Adjusting the Thread Take-up Spring The thread take-up spring (fig. 9-15) should be set so that when the eye of the needle reaches the material on the downward stroke of the needle bar, the spring will be through acting on the thread, and will rest against the stop of the thread take-up spring regulator. If the thread take-up spring is not correctly set, loosen the setscrew (2) in the arm of the machine and turn the tension adjusting stud to the right for more movement of the spring, or to the left for less movement. When the spring is correctly set, retighten the setscrew. The tension on the thread take-up spring should be just sufficient to take up the slack of the needle thread until the eye of the needle reaches the material on its descent. To increase the tension on the thread take-up spring, loosen the tension adjusting stud and move the take-up spring from the recess in the regulator to the right between the regulator and the tension disks. When the required tension is obtained, securely tighten the tension adjusting stud and move the spring back into its position in the regulator recess. To decrease the tension, move the spring to the left between the regulator and the tension disks. SINGER SEWING MACHINE 7-33 The class 7-33 sewing machine is a lockstitch heavy duty machine, and is intended for use in sewing heavy canvas, webbings, and other material not adaptable to the lighter duty sewing machines. The only difference between the 7-31 and the 7-33 is that the 7-33 has the clutch on the motor, while the 7-31 has the clutch on the balance wheel. The operation and maintenance techniques are identical. The procedure for operating the 7-33 sewing machine is the same as for the 31-15 sewing machine. As on any Singer sewing machine, the balance wheel of the 7-33 should always turn toward the operator. Lubrication The 7-33 machine is oiled at all the oiling points shown in figures 9-17 and 9-18. The machine should be oiled twice daily when it is in constant use. Use a castor base oil as recommended by the manufacturer. Needles and Thread The procedure for ordering needles is the same for the 7-33 machine as for the 31-15 sewing machine. Refer to table 9-2 for the relative sizes of needles and thread.
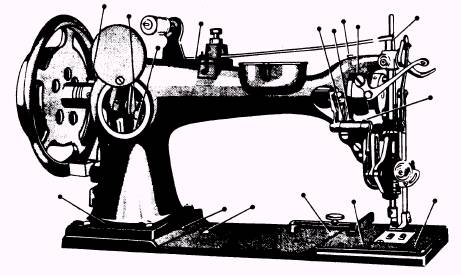
Figure 9-17.-Oiling points at the front of the 7-33 sewing machine.
Figure 9-18.-Oiling points at the back of the 7-33 sewing machine.
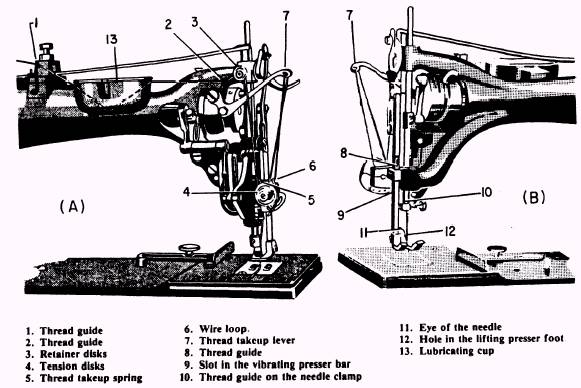
Table 9-2.-Relative sizes of needles and thread Setting the Needle machine as for the 31-15 sewing machines. Threading the Machine Turn the balance wheel toward you until the position (fig. 9-19). Pass the thread from the thread stand to the thread post, right to left through the bottom hole, then right to left through the top hole. Pass the thread through the The same procedure may be followed with this two thread guides (1) and (2). Continue the passage of thread between the retainer disks (3), down and under the tension disks (4). Pass the thread into the loop of the thread take-up spring (5), under the wire loop (6), up, and from back to front through the hole in the thread take-up thread take-up lever (7) moves up to its highest lever (7). Now pass the thread down through the thread guide (8), into the slot in the vibrating presser bar (9), and on down through the thread 239.276
Figure 9-19.-Threading the 7-33 sewing machine. 9-15 guide (10), which is located on the needle clamp. The needle is now threaded from left to right through the eye of the needle (11). After the needle is threaded as shown in figure 9-19, pass the thread down through the hole in the lifting presser foot (12). Draw about 4 inches of thread through the hole in the lifting presser foot with which to begin sewing. Notice that the lubricating cup has been bypassed. No lubricant is used on the threads and cords used in the manufacture or repair of parachutes. |
 |