Custom Search
|
|
  |
|
|
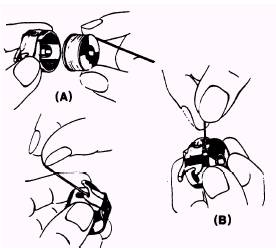
Threading the Bobbin Case Hold the fully wound bobbin between the thumb and forefinger of the right hand with the thread end running over the top toward the right, as shown in figure 9-14, view A. With the left
Figure 9-14.-Threading the bobbin case. hand, hold the bobbin case as shown, with the thread slot near the top. Place the bobbin into the bobbin case and pull the thread into the slot in the edge of the bobbin case (view B). Draw the thread down under the tension spring and into the delivery eye at the end of the tension spring (view C). When the free end of the thread is pulled, the bobbin will rotate clockwise if the bobbin case has been threaded properly. Replacing the Bobbin Case Hold the latch open on the threaded bobbin case with the thumb and forefinger of the left hand, with the latch in a horizontal position. Place the bobbin case on the center stud of the shuttle body. Release the latch and press the bobbin case back until the latch catches the groove near the end of the stud. Preparing for Sewing With the left hand, hold the end of the needle thread, leaving it slack from the hand to the needle. Turn the balance wheel toward you until the needle moves down and catches the bobbin thread. Continue to turn the balance wheel forward until the needle comes up and brings the bobbin thread up with the needle thread. With the thread take-up lever at its highest position, lay both threads back under the presser foot . Commencing to Sew Place the edge of the material beneath the presser foot, lower the presser foot, turn the balance wheel by hand until the needle is in the material, and press lightly on the treadle. To prevent fouling the needle thread in the bobbin case, hold the ends of both threads until the first few stitches are made. While sewing, hold the work flat, but do not pull or push on the material. Let the feed dog carry the work evenly under the presser foot and needle. If the operator pulls on the material, the needle bends, strikes the throat plate, and is either dulled, or more likely, broken. When the needle is about to cross a seam or other unusually thick or uneven place in the work, disengage the clutch, and hand-turn the machine over the rough place; otherwise, the needle may be broken or thrown out of time.
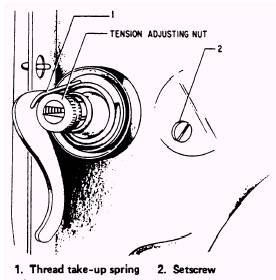
Figure 9-15.-Adjusting the machine thread tension. The tension on the needle thread should be regulated only when the presser foot is down. If the tension of the machine thread is not correct, it should be adjusted by turning the tension adjusting nut, as shown in figure 9-15. To INCREASE THE TENSION, turn the nut clockwise; to DECREASE THE TENSION, turn the nut counterclockwise. The tension on the bobbin thread is regulated by the small screw in the bobbin case tension spring. To increase the tension, turn the screw clockwise; to decrease the tension, turn the screw counterclockwise. This screw is very small and is easily lost if extreme care is not exercised in backing it out when the tension is decreased. If the screw is tightened excessively or is slightly too long, it will penetrate into the inside of the bobbin case and prevent removal of the bobbin. When the tension on the bobbin thread has been properly adjusted for a particular size of thread, it is seldom necessary to change it. A correct stitch can usually be obtained by varying the tension on the needle thread, which is an easier adjustment.
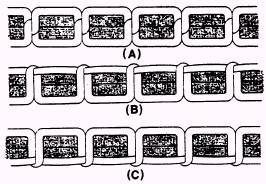
Figure 9-16.-Properly and improperly adjusted tensions. For ordinary stitching, the needle and bobbin threads should be locked in the center of the thickness of the material, as shown in figure 9-16, view A. When adjusting the tensions, you will not have a cross section of the stitch. If the tension on the needle thread is too tight, or if the bobbin tension is too loose, the thread will lie straight along the upper surface of the material and appear as small loops, as shown in figure 9-16, view B. If the tension on the bobbin thread is too tight, or if tension on the needle thread is too loose, the bobbin thread will lie straight along the underside of the material, as shown in figure 9-16, view C. |
 |