Custom Search
|
|
  |
|
|
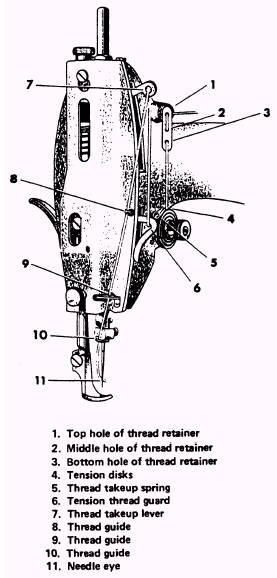
Threading the Machine Threading a machine is a very simple job. The procedure may vary slightly with different models; but after working with the various machines in the loft, the task becomes automatic. The component parts used in threading the 31-15 sewing machine are shown in figure 9-11. Use this figure in studying the procedures that follow. Pass the thread from the thread stand to the thread post on top of the machine, right to left throught the bottom hole, and then right to left
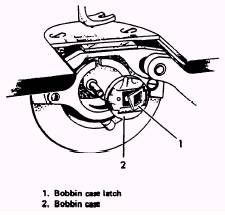
Figure 9-11.-Threading the 31-15 sewing machine. through the top hole. Pass the thread from right to left through the top hole in the thread retainer (1). Pass the thread from left to right through the middle hole in the thread retainer (2). Pass the thread from right to left through the bottom hole in the thread retainer (3). The thread is then passed down and under from right to left between the tension disks (4). Draw the thread up into the thread take-up spring (5), drawing the thread up and beyond the spring end so that it comes out in the center of the spring. The thread is then placed under the tension thread guard (6). Pass the thread up and from right to left through the hole in the thread take-up lever (7). The thread is now drawn down through three thread guides (8), (9), and (10). Pass the thread from left to right through the eye of the needle (1 1). Draw about 2 inches of thread through the eye of the needle to begin sewing. Removing the Bobbin Case Before attempting to remove the bobbin case, turn the balance wheel toward you until the needle moves upward to its highest position. Remove the slide in the bed of the machine so you can see what you are doing. Reach under the table with your left hand, and, using your thumb and forefinger, open the bobbin case latch (fig. 9-12) and lift out the bobbin case. While the latch is held open, the bobbin is retained in the bobbin case. Release the latch, turn the open end of the bobbin case down, and the bobbin will drop out. Winding the Bobbin The bobbin winder is fastened to the table with its driving pulley in front of the sewing machine
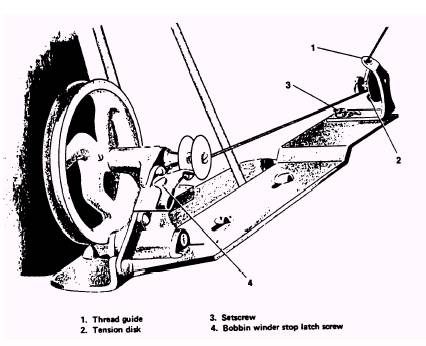
Figure 9-12.-Removing bobbin case. 239.270 Figure 9-13.-Winding the bobbin. belt. The bobbin winder is so positioned to allow the pulley to drop away from the belt when sufficient thread has been wound on the bobbin.
Figure 9-13 illustrates the bobbin-winding operation. The procedure is as follows: Place the bobbin on the bobbin winder and push it on the shaft as far as it will go. Pass the thread from the spool down through the thread guide. Loop the thread around back and through the tension disks. The thread is then wound around the bobbin a few times and the pulley pushed up against the machine belt. The bobbin can be wound while the machine is being used for sewing. If there is no material under the presser foot, make certain that the presser foot is raised and not riding on the feed dog while winding the bobbin. When sufficient thread has been wound on the bobbin, the pulley on the bobbin winder drops back from the machine belt automatically. If the thread does not wind evenly on the bobbin, loosen the setscrew in the tension bracket and move the bracket to the right or left as required; then tighten the bobbin winder stop latch screw. The amount of thread wound on the bobbin is regulated by the bobbin winder stop latch. To wind more thread on the bobbin, turn the screw to the right; to wind less thread on the bobbin, turn this screw to the left. |
 |