Custom Search
|
|
  |
|
|
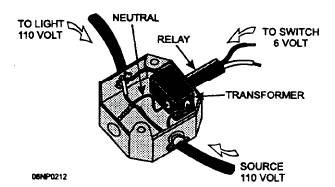
REMOTE CONTROL WIRING Remote control wiring provides a method of controlling standard voltage devices through the use of low voltage. They consists of relays, low-voltage switches, and transformers. A low-voltage conductor cable is used instead of conduit or Romex. Low-voltage wire is available as three, four, and multiple conductor cables. Multiple conductors are color coded to identify them. Roughing in a remote control wiring system uses many of the wiring techniques used with nonmetallic cables. Remote control relays have two coils (on or off) with a common center tap. The use of two coils allows the relay plunger to be moved positively in either direction without the use of springs. When a push button (switch) is turned ON, current will pass through the ON coil and cause the movable core to shift into the ON position. The contacts are closed in the load circuit and the light goes on. The same happens when the OFF button is depressed. The current is passed through the OFF coil and the core moves. The contacts open and power to the light is turned off. The relay will maintain this position until the push button again energizes the ON coil. These relays are capable of controlling 20 amperes of lighting or inductive loads at 110 or 277 volts ac. Relays can be mounted individually in junction boxes as shown in fig, 5-37, or several may be mounted in a centrally located cabinet. Transformers in a remote control system reduce 120-volt line voltage to 24 volts to provide power in the switching/ relay circuit. Wherever transformers are located, they must be accessible and they must be kept
Figure 5-37.- Low-voltage relay and transformer. from excessive heat. They are sized according to the number of relays they will power. In the low-voltage system, as many switches as are required can be installed for any given light, or a master switch can be installed to turn on as many as eight lights simultaneously. There is no necessity for three-way or four-way switches because the switches are connected in parallel. CONDUIT SYSTEMS As a CE, you will be called upon to install all types of wiring systems. Unlike the electricians in civilian life who often specialize in the installation of specific types, you have to be able to install any type. In most locations you will have to install wiring systems that require the added protection provided by conduit. Conduits are of various types, such as rigid, flexible, intermediate metal, PVC, and electrical metallic tubing (thin-wall or EMT). As you read this section, you should become familiar with the different ways of bending, cutting, and threading; the fittings used; and the different locations where they may be used. CUTTING AND THREADING The use of rigid conduit involves a good deal of cutting and threading of lengths. It is best to cut with a hacksaw or special conduit cutter. An ordinary
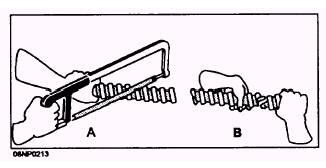
Figure 5-38.- Hacksaw blades, teeth per inch, for different types of conduit. revolving wheel pipe cutter leaves a heavy inside ridge that is difficult to remove and may damage the passing through of conductors. Always ensure that you make a cut at right angles to the axis of the pipe (fig. 5-38). Thin-wall conduit (EMT) and polyvinyl chloride (PVC) should be cut with a hacksaw because pipe cutters may flatten the end of the pipe. The pipe cutters also leave a ridge on the inside of the pipe that is hard to remove. There are tubing cutters made specifically for cutting EMT or PVC, but you need to be sure you have the right cutter for the job. When you are cutting conduit, use a vise to stabilize the conduit. Flexible conduit and tubing should also be cut with a hacksaw. Because of its spiral construction, flex should be cut at an angle so that only one ribbon is cut all the way through. A slight reverse twist will separate the two ends (fig. 5-39). Cutting any type of conduit leaves a sharp edge or burr on the inside of the pipe that must be removed by reaming. Reaming can be done with several tools. To ream rigid and intermediate conduit, you should use a pipe reamer. A rat-tailed file does a good job on any type of conduit. To ream EMT that has been cut with a hacksaw, you should use the heads of a pair of pliers, such as needle nose or side-cutting pliers, and they will do the job. The important thing is to remove any edges, or burrs, in the pipe that might cut the insulation when the conductors are pulled into the conduit. The next step is cutting the thread on the end that was cut off. For the smaller pipe you use a ratchet type of die that turns directly with the handle. On larger pipe you use a die with a mechanical advantage; that is, you use a die that makes only a part of a revolution when the handle makes a complete revolution. Hand-held portable electric and shop type of threading machines are also available. A conduit-threading die, like a plumber's die, makes a tapered thread, so that a coupling starts rather
Figure 5-39.- Cutting flexible conduit. loosely but binds hard as it is set up. This tight connection serves two purposes: it makes a watertight joint and it makes a good electrical connection for a continuous ground throughout the length of the conduit. Rigid polyvinyl chloride (PVC) conduit has been developed by many manufacturers. Some of the advantages of PVC conduit are the light handling weight, high corrosion resistance, ease of installation, leakproof joints, and easy wire pulling (because of the mirror-like walls). Refer to Article 347 of the NEC(c) for installation requirements. Permanent joints are made quickly in PVC conduit by cutting the conduit with a handsaw or hacksaw and removing the burrs with a pocketknife. When joining PVC conduit, always follow the manufacturers' instructions listed on the cement can for best results. A variety of threaded PVC fittings are available from manufacturers. Their use is covered in Article 370 of the NEC(c). The preferred method of installation is by the solvent-welding technique because the joints are waterproof and vapor-proof. * - Romex® is a registered trademark of Southwire Inc.
|
 |
|
|