Custom Search
|
|
  |
|
|
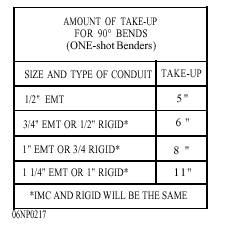
CONDUIT BENDING The NEC(c) Article 346 through 348 applies to electrical conduits. It states that the "bends in conduits will be made so that the tubing will not be injured and that the internal diameter of the conduit will not be effectively reduced." In addition, the NEC(c) has a table that indicates the minimum radius acceptable for various sizes of conduit. It also states that "a run of electrical conduit between outlet and outlet, between fitting and fitting, or between outlet and fitting, will not contain more than the equivalent of 4 quarter bends (360 degrees total) including those bends located immediately at the outlet or fitting." When installing conduit, you will need to make bends to go over or around obstacles. Bends of various shapes will be needed, such as right-angle or 90-degree bends, offsets, and saddles. These bends must be made without reducing the inside diameter of the conduit in the bend. You will make most of these bends on the job as part of the installation procedure. They are called field bends. Factory-made bends may be used instead of field bends; however, they will cause you more cutting and threading, and they increase the cost of the job. Most of the field bends will be done with manual benders or a hot box heater in the case of rigid nonmetallic conduit. Manual benders used to bend rigid conduit and EMT are of two types. These are the rigid bender, called a hickey (fig. 5-40), and the one-shot bender (fig. 5-41). The one-shot bender is normally made for EMT, but some are made to be used for both EMT and rigid. The one-shot bender was given this name because a full 90-degree bend can be made with a single motion. Conduit sizes up to 1-inch rigid or 1 1/ 4- inch EMT can be bent without much trouble with manual benders. Larger sizes are bent with mechanical or hydraulic benders. Hydraulic benders will be discussed at the second-class level. Rigid Nonmetallic Conduit Although a complete line of factory elbows (90, 45, or 30 degree) are available, bending PVC conduit (1/ 2 through 2 inch) is accomplished easily with the use of a PVC hot box. A PVC hot box is nothing more than a heater, enclosed by metal having a mirror finish on the inside with openings on each end. To bend PVC conduit, place the conduit inside the hot box, turn the switch on, rotate the conduit until it becomes flexible, remove the conduit, and bend it to the desired shape. WARNING The hot box is a heater. If you leave the conduit in long enough, it will BURN. You should use gloves when bending PVC. Electrical Metallic Tubing (EMT) Conduit bending is a precise art form. You will use degrees, angles, measurements and prefigured deductions for radiuses and shrinkage. Combine all these calculations correctly and you will get a finished AMOUNT OF TAKE-UP FOR 90 BENDS (ONE-shot Benders) SIZE AND TYPE OF CONDUITTAKE-UP 1/ 2" EMT 5" 3/ 4" EMT OR 1/ 2" RIGID* 6 " 1" EMT OR 3/ 4 RIGID* 8 " 1 1/ 4" EMT OR 1" RIGID* 11" *IMC AND RIGID WILL BE THE SAME 06NP0217
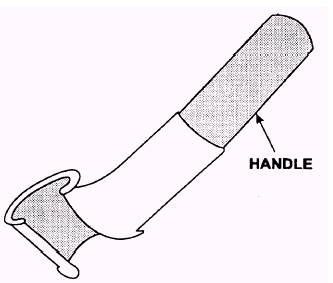
Figure 5-40.- Hickey.
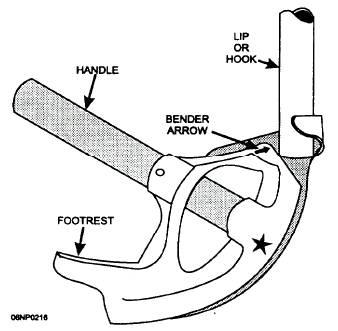
Figure 5-41.- One-shot hender. product that is not only functional but pleasing to the eye, and something to be proud of. 90 DEGREE BENDS.- One of the most common bends you will make in the field is the right-angle bend, more commonly called a 90-degree bend, or just a 90. Anyone can make a 90 in a stick of conduit and then cut it off to make it fit the situation, but this practice wastes time and material. The secret is to bend the conduit in the right place so that you do not have to cut it. To accomplish this, there are some things you have to know. First, you need to know the distance from the end of the conduit to the back of the 90. This distance is called the stub-up. Second, the radius of the bend takes up a part of the stub-up. This part is called the take-up. The amount of take-up depends on the type and size of conduit you are bending. (See table 5-2.) Table 5-2.- Conduit Take-up
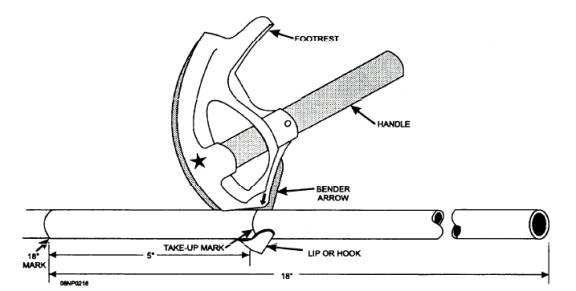
Figure 5-42.- Alignment of arrow and take-up mark for bending a 90. Now, let us see how a 90 is made to fit a specific situation. Suppose you are going to run the conduit from the top of a panel to the ceiling and then horizontally along the ceiling, using 1/ 2-inch EMT and a one-shot bender. The first step will be to measure from the top of the panel to the ceiling. This measurement will give you the stub length. Assume the length is 18 inches. Measure 18 inches from the end of the conduit and make a mark at that point. Next, look at table 5-2 and find the take-up for 1/ 2-inch EMT. The take-up is 5 inches. Now, measure 5 inches back toward the end of the conduit from your first mark and make a second mark. This measurement gives you the take-up. Place the conduit on the floor with the stub in front of you. Align the bender arrow with the take-up mark, as shown in figure 5-42. Put one foot on the footrest and hold the handle with both hands. Apply pressure on the footrest as you pull the handle until the handle is at about a 30- degree angle with the floor, as shown in figure 5-43. You should now have a 90-degree bend with an 18-inch stub. Remember: Heavy foot pressure is critical to keep the EMT in the bender groove and prevent kinked conduit. To check that the bend will fit the situation we started with, you can place it next to anything that you know is a right angle and measure from the floor to the end of the stub. If the bend is not a full 90, place the bender back on the conduit, and pull more bend. If it is more than a 90, place the handle of the bender over the end of the stub, place one foot on the conduit on the floor, and spring the stub back.
|
|
|
|