Custom Search
|
|
 
|
||
|
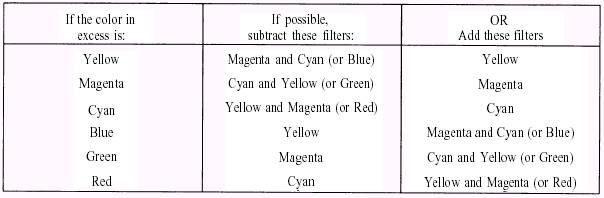
Remember, you must produce a test print with proper density before you change the filtration on your enlarger or printer. Before modifying the filter pack in the enlarger or printer, you must keep in mind what type of printer you are using. Modifying the filter pack for a subtractive type printer is completely opposite from the filter pack adjustment necessary on an additive printer. Subtractive Printers or Enlargers When you have determined what color dominates the test print, that filter or its complement must be added or subtracted from the filter pack Whenever possible, you should subtract filtration. Table 12-1 may be useful in determining what filter adjustment should be made. The following rough guide may also be helpful: When a slight shift in color balance is needed, use an 05 or 10 filter change; when a moderate shift is needed, use a 15 or 20 filter change; and when the shift required is too large to estimate, try a 30 filter change. The filter pack should not contain more than two colors of the subtractive filters (yellow, magenta, or cyan). When all three colors are in the filter pack neutral density results. Neutral density only increases the exposure time required. Neutral density is eliminated by removing the filter color of least density completely and then removing the same amount of density from each of the other two colors. Thus, if you calculated the filter pack to be 30M + 20Y + 10C, you should remove 10 CCs of each color (10C + 10M + 10Y) completely for a filter pack of 20M + 10Y + OC. When you either add or subtract filtration from the filter pack, the intensity of the light also changes. When filtration is added to the filter pack, the intensity of the light reaching the paper is less. When filtration is subtracted from the filter pack, more illumination reaches the paper. Thus you must adjust the exposure time when the filter pack is changed. Fortunately, when dichroic filters are used, little exposure compensation is needed. When these filters are used, no correction is required when the yellow filtration is changed. Only a l-percent change to the exposure time is required for each 01 unit of magenta or cyan Table 12-1. Filter Pack Adjustments for Subtractive Printing
Table 12-2. Exposure Factors for Kodak CC and CP Filters
change to the filter pack. Normally, cyan is not a consideration because it is set at zero in subtractive printing, so neutral density is not created. With experience, exposure adjustments can be estimated accurately when the test print is close to the desired density and color balance. Table 12-2 provides more detailed information on exposure compensations when CC or CP filter changes are made. To use table 12-2, you must first divide the old exposure time by the factor for any filter removed from the pack Then multiply the resulting time by the factor for any filter added. When two or more color filters are changed from the filter pack, multiply the individual factors together and use the product. Additive Printers or Enlargers Additive printers operate completely opposite from subtractive printers. Color correcting may get confusing if you are operating both types of printers. When making corrections to your filter pack on an additive printer, you should make the corrections as you see them; for example, when your test print has too much green, you tell the printer to subtract green from the filter pack When your test print has too much magenta, you tell the printer to add green to the filter pack, and so on. The principles of color in theory are the same in subtractive and additive printing. The difference is that the additive printer uses the primary colors of red, green, and blue. When you make corrections on an additive printer, the printer is actually controlling the time that the additive colors are allowed to expose the paper through either pulsed-xenon tubes or CC filters; for example, when your test print has too much green and you subtract green from your filter pack, the printer is actually allowing more green light to reach the paper, which produces more magenta dye in processing. When the test print has too much magenta and you add green to your filter pack, the printer is actually reducing the amount of green light allowed to reach the paper, which reduces the amount of magenta dyes produced in processing. Most additive printers automatically compensate and change the density when the filtration is changed; however, as in subtractive printing, you must achieve the correct density before making color corrections. |
 |
|
|
||