Custom Search
|
|
 
|
||
|
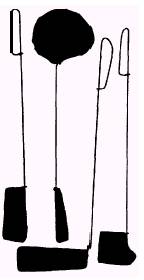
No matter how good your camera work, somewhere in the negative there will probably be areas that do not print correctly. A straight enlargement from a negative is seldom the best possible print. When everything has been done to match the negative with the proper printing filter and still the print is unsatisfactory, you may resort to manipulating the light while exposing the paper. This manipulation may be dodging to prevent part of the image from getting too dark or it may be burning-in to produce detail from a part of the negative that is too dense. Local print control can be used to compensate for uneven lighting of the scene photographed or to provide more prominence to a selected part of the picture. Dodging As discussed before in contact printing, you may often find it necessary to dodge or hold back some parts of images to produce the best print. When projection printing, hold the dodging material in the beam of light, so its location and coverage can be seen and controlled during the printing exposure. The dodging tool is placed between the lens and the printing paper so it prevents light from falling on the area being dodged. The shadow area the dodging tool creates may be small or large. The coverage depends on the size of the tool and the distance from the printing paper where the dodging tool is held. Dodging is generally necessary for only part of the total exposure time. The tool being used must be moved constantly to prevent a sharp line between the area being dodged and other parts of the image. Accurate dodging may be done with your hands or various shaped tools. Your hands, when used as dodging tools, can cast a variety of different sizes and shapes of shadows to hold back unwanted light from the print. Some photographers prefer to use dodging tools, such as a stiff wire with various sizes and shapes of black cardboard or crumpled cellophane attached (fig. 11-14). Another dodging tool is a loop of a thin, stiff wire bent to the desired size and shape. The loop is then covered with black masking tape. Even a plain piece of cardboard can make an effective dodging tool. Because light is held back from an area during dodging, the dodged area receives less exposure than the surrounding image area. Thus the dodged area of the
Figure 11-14. Dodging took. processed print is lighter than it would have been had dodging not been used. Dodging can be used for creative and corrective effects. It is used to hold back shadow areas, thereby preventing these areas from printing too dark and losing detail; for example, part of a person's face may be too much in shadow because of the hat he or she is wearing, while the rest of the face is brightly lighted. You can dodge or hold back some of the light from the shadow area of the face image; this keeps the shadow from printing dark, and a more pleasing and detailed photograph is produced. The amount of time you should dodge can vary widely, depending on the subject, the negative, and the overall exposure time. Even an experienced printer may have to produce several test prints to determine the correct amount of dodging. Remember, to prevent any distinct outline of the dodging tool from reproducing in the print, you must keep the dodging tool in constant motion during the exposure. Use a circular, sideways, or shaking movements to accomplish this. |
 |
|
|
||