Custom Search
|
|
 
|
||
|
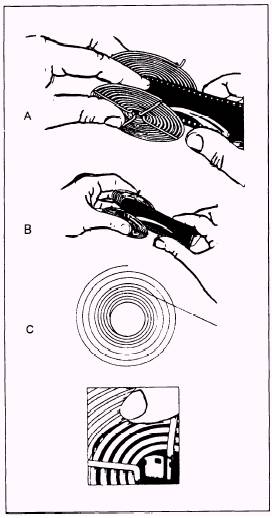
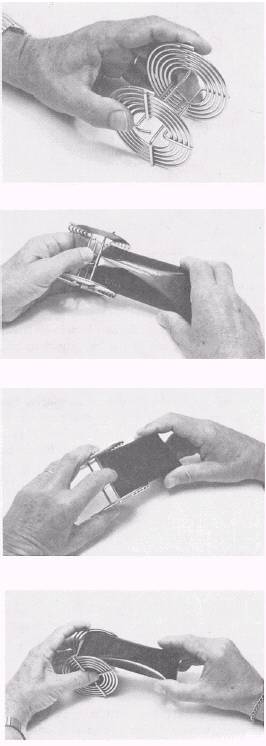
The most convenient and reliable way to hand process roll film is in a small roll-film tank. The construction of tanks and reels differ somewhat among the various manufacturers' models, resulting in differences in loading and use. Generally, the basic unit used in Navy imaging facilities consists of a stainless steel, center feed, spiraled reel to hold the film; a tank with a lighttight cover; and a filler cap. Each reel is constructed for a specific size roll of film; for example, 35mm, 120, and 220. The tank top permits pouring the chemicals in and out of the tank under white light conditions. The tanks come in sizes to hold from one 35mm reel to as many as eight 35mm reels or five 120 reels. Small roll-film tanks of all metal construction (tanks, lids, caps) should be numbered or marked in such a way that prevents mixing different tanks, lids, and caps. The proper loading of a film reel in total darkness can be the most important steps and challenges in processing roll film. When processing roll film with a paper backing, the paper tape sealing the exposed roll should not be broken until the lights have been turned out. Also, for 35mm film, the cassette should not be opened until the lights have been turned out. If a short length of film is left protruding from the 35mm cassette when the film is rewound, you do not have to open the cassette to remove the film. The leader or loading tab on 35mm film can be cut off square while in the light to ease loading of the spiral reel (fig. 10-15). If you are right-handed, the ends of the wire spiral must be positioned on the top and pointing to the right (fig. 10-16, view A). For left-handed people, the ends of the wire spiral reel when positioned at the top must point to the left. Next, bow the film slightly concave to clear the edges of the spiral and clip or hold the film to the core (center) of the reel (fig. 10-16, view B). The film emulsion must face in or toward the reel center. The tension on the film should be firm enough to prevent the film from skipping the spiral grooves, but not so firm it overlaps or falls into the same groove twice. Turn the reel, apply gentle pressure, and keep your thumb and forefinger on the film edges. This pressure produces a slight curl in the film and allows it to pass onto the edges of the reel. As you continue to turn the reel, the film straightens out and fits into the grooved spaces in the reel (fig. 10-16, view C). Apply enough tension to the film so it does not skip grooves. However, too much tension may cause the film to overlap in the same grooves of the reel. Second method. Prepare the film as before. Hold the reel to be loaded on a clean working surface in your left hand with the ends of the wire spiral at the top, pointing toward the right (fig. 10-17, view A). If you are left-handed, hold the reel in your right hand with the ends of the spiral wires at the top, pointing toward the left. Hold the film by its edges in your right hand and bow it between your thumb and forefinger. With your left index finger or thumb, depress the grip clip and gently push the end of the film into the core of the reel (fig. 10-17, view B). When the reel does not have a grip clip, insert the film end about 1/4 to 1/2 inch into the reel core and hold it there with your left thumb and index finger (if right-handed). Remember, always load the reel with the film emulsion facing in, or toward, the reel core. Be sure the film is held straight at the reel center (fig. 10-17, view C). Now turn the reel smoothly in a counterclockwise direction with your left hand, and guide the film into the spiral grooves with the thumb and forefinger of your right hand (fig. 10-17, view D). Third method. Slowly unwind the paper backing from the film until you feel the film with your finger. Do not completely unwind the paper backing from the film.
Figure 10-16. Leading 35mm film on wire reel. There are three ways of loading a center-feed spiral reel. You should practice each method (with a dummy roll), both in white light and in total darkness, and select the method that is most comfortable for you. Then perfect that method. Although the three methods are similar, there are differences that may make one method easier for you. However, before beginning one of these methods, make sure that both the reel and your hands are clean and dry. First method. Remove the film from the cassette (35mm) or separate it from the paper backing (120 or 220). The film must be handled only by the edges to prevent scratches and fingerprints. (When you work with 35mm film, the tongue of the leader must be cut off to make a square end before loading the reel.) For 35mm film, if the film was not completely rewound into the cassette, cut the tongue off and leave the film in the cassette. Hold the reel to be loaded in your left hand with the spiral wire ends at the top, pointing toward the right. Allow about 3 more inches of the paper backing to unroll. Bow the film and place it straight into the reel core. Smoothly and slowly turn the reel counterclockwise, guiding the film onto the reel. Allow the paper backing to unwind as the film is wound onto the reel. When all but about 3 inches of the film is on the reel, you will feel the end of the film taped to the paper backing. With 35mm film in a cassette, the film stops unrolling from the cassette when the end is reached. When you feel the tape or the end of the film is about 3 inches from the reel, carefully separate the film from the paper backing or cut the 35mm film right next to the cassette, being careful not to pull the film from the reel. Finish loading the reel. The paper backing on 220 roll film does not run the full length of the film as does 120 film. The paper backing on 220 film serves as a leader and tailer that are taped to the ends of the film. Therefore, when using the third method described above, you must remove the paper tailer from the film before loading the reel. Before processing film using a reel, you must practice loading it by using a roll of practice film in white light, then repeating the procedure in total darkness until you feel comfortable and do not damage the film. Only after you have the reel(s) loaded properly, should you think seriously about processing. When a roll-film tank is used to process fewer rolls of film than the tank can hold, you must take up the extra space in the tank with enough empty reels to fill the tank. The empty reels go into the tank on top of the reels holding the film. When you are pouring solutions into the tank, completely cover ALL the reels in the tank. When processing with a roll-film tank that has a lighttight cap, you can add or dump the chemicals without removing the cover. Only one tank is needed because the required solutions are poured out of and into the tank through the tank cover during processing. This can be done in white light. The chemicals should be arranged in the darkroom sink from left to right (developer, stop bath, etc.) and be
Figure 10-17. Loading 120 film on reel.
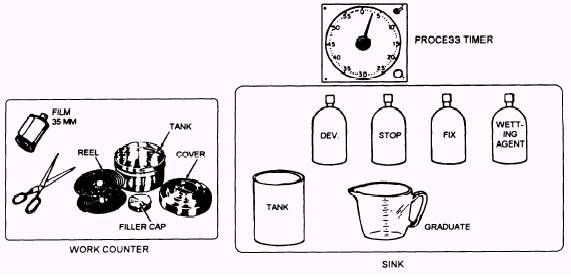
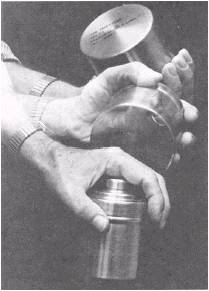
Figure 10-18. Arrangement of materials for processing film. brought to the correct processing temperature in a water bath (fig. 10-18). A clean, dry area should be provided on the work counter for loading the film onto the reels. The following steps are used to process roll film in small tanks: 1. Load the reel or reels with the film to be processed. 2. Place the loaded reels into the tank. If the loaded reels do not come to the top of the tank, add empty reels to take up the space. Place the cover and cap on the tank. The lights may now be turned back on. Once the lights are on and before the film is fixed, be careful not to remove the tank cover or the film will be exposed to light and ruined. 3. Hold the tank in one hand and tilt it slightly; pour the developer directly from the graduate into the tank through the light trap pouring hole. Pour as fast as you can without spilling. As the developer nears the top of the tank, hold the tank level or set it in the sink. Fill the tank to just overflowing. This step should take about 10 to 20 seconds, depending on the tank size. 4. Once the tank is full, immediately start the timer, replace the cap, and strike the tank on the edge of the sink once or twice to dislodge any air bubbles. Now agitate the film by inverting the tank slowly end to end (fig. 10-19). The initial agitation should be 30 seconds. Place the tank in the sink on its bottom (cover up). 5. Once every minute, agitate the film for 5 seconds by slowly inverting the tank end to end. After each agitation cycle, place the tank back in the sink. If you are holding the tank during the entire developing period, the heat from your hands may heat the developer and produce unpredictable results. 6. When only 10 seconds of developing time remain, remove the cap from the tank cover. Immediately start pouring the developer out of the tank through the light trap pouring hole. Dump the chemicals according to local instructions of the imaging facility. This step should take about 10 seconds to complete. 7. When the developer has been emptied from the tank, fill the tank to overflowing with stop bath. The stop bath must be poured into the tank through the light trap pouring hole in the tank cover. Replace the cover cap. Agitate the film in the stop bath for about 30 seconds using the end-for-end method. 8. When the stop bath portion of the process is complete, pour the stop bath through the light trap pouring hole in the tank cover. 9. With the tank cover still in place, pour fixer into the tank and replace the cap. Dislodge the air bubbles and set the timer to the required fixing time. Start the timer and agitate the film using the same agitation as the developer. 10. When the prescribed fixing time has elapsed, remove the tank cover and pour the fixer from the tank back into the bottle from which it came. Never pour the
Figure 10-19. Agitation of a small tank. fixer into the sink. The fixer can be reused and then later saved for silver recovery. 11. The film can be washed either in the tank or in a roll-film washer. When the tank is used, insert a hose down through the center of the reels until it is about 1/2 inch from the bottom of the tank. Adjust the water (at the same temperature the film was processed) so a steady overflow is created. Wash the film for about 20 minutes. When you use a rapid roll-film washer, again, adjust the water temperature and place the reels containing the processed film into the washer. Adjust the rate of water flow until the reels start to turn. When the reels start to turn, adjust the rate of water flow until the reels stop turning. Set the timer and wash the film for about 5 minutes. 12. While the film is washing, rinse the processing tank, tank cover, and cap with clean water. Fill the tank with water (check the temperature) and add the wetting agent. After the film has been washed, place the film, still on the reels, into the wetting agent solution. Replace the tank cover and cap and agitate the film in the wetting solution very S-L-O-W-L-Y for 1 minute. 13. After 1 minute in the wetting solution, remove the loaded film reels from the tank. (Do not save the wetting solution.) 14. To dry the film, attach the end of the film to a film clip in the drying cabinet. Let the film unwind from the reel as you slowly lower the reel. When the film is unwound, depress the grip clip (if the reel has one) or remove the film from the core of the reel. Squeegee the film and attach a second film clip to the lower end of the film. Close the drying cabinet door and dry the film. |
 |
|
|
||