Custom Search
|
|
 
|
||
|
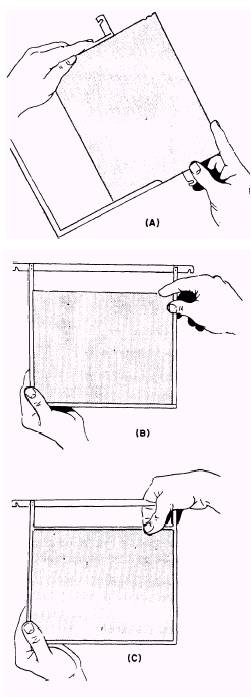
Tank development is the recommended method for hand processing of orthochromatic and panchromatic sheet film. The solutions and the tanks are deep enough to cover the films in the vertical position completely. The films are supported individually in the tanks by the film hangers. Films supported in this way are much less subject to damage. The solutions last longer when used in tanks and can process more films than when they are used in trays. Tank development for sheet film requires tanks to hold the solutions, and racks, reels, or hangers to support the films while in the solutions. The solutions used should have good-keeping qualities, and they should be the type that can be replenished by adding fresh solution or replenisher, so the volume in the tanks can be maintained at the proper working level. The minimum number of tanks that can be used is three: one each for developer, stop, and fixing bath. However, when a predevelopment rinse is used, four tanks are needed. The tanks are arranged in the processing sink submerged in enough water to maintain the solutions at the prescribed processing temperature. Again the process is arranged so you work from the left to right. The film hangers are simply channeled frames suspended below a bar. The bar is long enough to reach across the tank and allow the frame to hang below the surface of the solutions. The frame has channel pieces on the bottom and both sides and a hinged channel across its top. Each hanger holds from one to four films. The hangers accommodate standard film sizes, such as 4x5, 8x10, and so forth. After the films are loaded into the hangers, they may be carried through the entire process without being touched by the hands. The darkroom should be checked using the steps common to all film processing, as explained earlier in this chapter. After you check the solutions and their arrangement, check the temperature of the solutions, and check the safelights. Then arrange an adequate supply of clean, dry, empty film hangers on a rack, and an empty rack to hold the loaded film hangers (fig. 10-l1). If the darkroom is not equipped with racks to hold the film hangers, clean, dry tanks can be used to hold both unloaded and loaded hangers. Set the timer, place the exposed film holders between the empty film hangers and the rack or tank that is used to hold the loaded hangers, and turn out the lights. To load a sheet film hanger, remove one of the sheet films from its holder. Take a hanger in one hand and place the thumb at one end of the hinged channel. Bush the hinged channel up and back with the thumb until the film can be slid along the inside of the end channels to the bottom of the frame. HANDLE THE FILM BY THE EDGES ONLY. Make sure the film is seated properly in the three channels of the hanger. When the film is seated properly in the side and bottom channels, bring the top channel forward and down over its top edge (fig. 10-12). This encloses all four sides of the film in the channeled frame. The hanger should be given a slight shake to ensure that the film is in place. Set the loaded hanger on the rack or in the empty tank to hold it. The film should be loaded onto the hangers with the emulsion side facing you. This prevents the top channel from scratching the emulsion as the film is slid into the frame. Load the other film to be developed in the same manner. However, do not load more hangers than can be handled conveniently in the tanks at one time. When the hangers are loaded, lift all of them by their crossbars and lower them into the predevelopment water rinse, if one is being used. They should be lowered into the tank until the hanger crossbars rest on top of the tank
Figure 10-12. Loading a sheet film holder. The predevelopment water rinse is optional when using the tank method of development, but the water rinse has the following advantages:
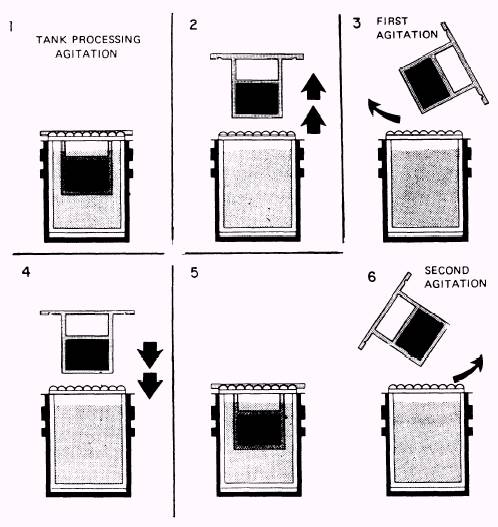
Figure 10-13. Sheet film tank processing agitation. The air bubbles that usually occur when dry film is immersed in a solution can be removed without harmful effects in the predevelopment water rinse. When the water-softened emulsion is placed in the developer, the action of the solution begins uniformly over the entire emulsion. Thus uneven or streaky development is avoided. The predevelopment water rinse removes the antihalation backing dye that interferes with the action of some developers. The predevelopment water rinse brings the temperature of the film and the hangers to the processing temperature. Maintaining constant temperatures in all of the processing solutions is very important. The predevelopment water rinse is given by immersing the loaded hangers in a tank of water and agitating them for about 2 minutes. The temperature of the water should be the same as that of the other processing solutions. The loaded hangers are then lifted out of the water, drained by one comer, and processed in the usual manner. Immerse the hangers in the developer slowly and smoothly to avoid splashing or the formation of air bells. Air bubbles usually result when films are immersed rapidly, especially when a predevelopment water rinse was not used. All the hangers should be immersed simultaneously to assure uniform agitation and development. Strike the hangers sharply against the sides of the tank several times to dislodge any air bubbles that may
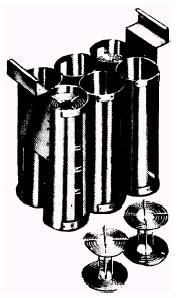
Figure 10-14. Reel processing rack. have formed. Start the timer and agitate the film for 1 minute. After the first minute of development, agitate for 5 seconds at l-minute intervals. The processing tank usually has enough space for several additional hangers. However, this space is needed for proper agitation of the film hangers. Agitation should be accomplished by lifting the hangers out of the tank draining them momentarily from a different comer each time, and replacing them in the solution (fig. 10-13). Hangers should not be agitated too vigorously from side to side. This forces the developer through the holes in the hangers at high speed, causing developing trails near the holes. The objective is to assure an even flow of fresh solution over the surfaces of the films regularly according to a fixed schedule. About 10 seconds before completion of the developing time, lift each of the hangers out of the solution, let them drain for 10 seconds, then lower them into the stop bath. Agitate them several times in the stop bath, drain them, lower them into the fixing bath, and agitate them constantly for 2 or 3 minutes. The fixing and the washing requirements are the same as described previously in this chapter. When washing is complete, place the film hangers and film into a wetting agent; then remove each sheet from its hanger and hang it up by one corner to dry. When the film is dried in the hangers, there is a number of drying marks along the edges of the film, thus reducing the actual usable size of the negative image. It is better to suspend each film individually from a line
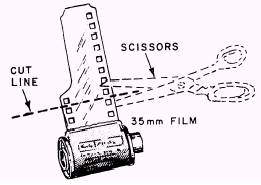
Figure 10-15. Cutting leader tab film 35mm film. with a film clip. Dry the hangers, after washing them in hot water, without film in them. With suitable racks designed to hold reels, roll film can also be processed in tanks (fig. 10-14). |
 |
|
|
||