Custom Search
|
|
 
|
||
|
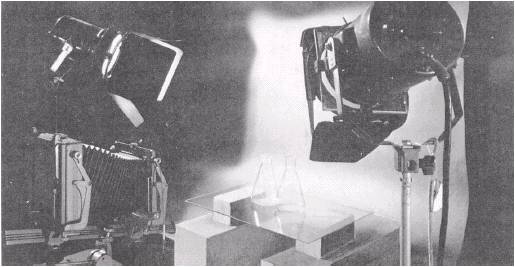
In photographing glass, it is the background and reflections from the background that light the glass. Glass objects can be pictured clearly by lighting them in such a way that they stand out as dark outlined shapes against a light background or as a light outlined shape against a medium or dark background. These techniques of lighting are actually variations of a basic silhouette method. The Set The setup for photographing glass products consists of white seamless background paper. The background paper is curved forward on the floor so it is completely underneath the area containing the setup. Place two supports, such as sawhorses or tables, on the forward part of the background paper. The supports should be spaced to hold a sheet of plate glass. The plate of glass gives you a transparent worktable through which light bounced off the background paper in back of and underneath the glass product will pass. Strips of colored or black paper can be attached, out of camera view, to the background paper for edge effects to the glass products. Because the light reflected from the background is usually the only source of illumination, the film exposure is relatively long. Proper camera equipment and a sturdy tripod are necessary to prevent movement during the rather long exposure. The height or camera angle varies for different subjects and showing the ellipse or oval of the rim adds depth and roundness to the picture, since most glass items you photograph are three-dimensional. Lighting You should be able to darken the studio completely. An overhead light, an exit sign, or even a light leak around a door can cause problem reflections. And not eliminating unwanted reflections results in much time and effort wasted. Lighting glass products (fig. 6-15) is mostly a matter of personal taste. It can be learned by practice and by
Figure 6-15. A typical setup for lighting glassware. studying photographs of glass items. When you are studying pictures of glass objects, notice how all the good pictures were made using variations of basic silhouette lighting. You will find it is easy to produce an infinite variety of effects by simply changing or redirecting the bounce light from the background. In photographing glass there are no hard-and-fast rules for the placement of lights. The lights should, however, be placed with great care. Changing the angle just a little can drastically change the lighting effect and at the same time cause flare problems. When the lights are positioned to cause a great deal of reflection from the background and this reflection is uncontrolled, it may cause lens flare and result in flat negatives. Lens flare can be controlled or eliminated by erecting a black tent to extend from the lens board to the subject. This tent must be kept outside the angle of view of the camera. A focusing cloth draped over wood dowels works well. When photographing glass products, you should always use a matte box over the camera lens. When the lighting produces a true silhouette, some highlights (fig. 6-16) may be desired to add sparkle to the glass. This can be done by using front bounce light from a narrow, diffused light source. To create such a source, attach a piece of white mounting board to one barn door of a floodlight and control the width of the light beam emitted with the opposite barn door. This narrow beam of light can be placed on either side of the camera and should be at camera level or higher. The spacing between highlights on a cylindrical object, created by this method, can be controlled by moving the light closer to or farther from the lens axis. Do not allow highlights to obscure etching on the glass. Exposure To determine the exposure for photography of glass objects, you should take a normal reflected exposure meter reading of the background and increase the indicated exposure by four times. Black-and-white film should be given a shorter than average developing time because the lighting ratio is usually very great, and excessive contrast will result with normal development.
Figure 6-16. Adding highlights to glass products.
Figure 6-17 Sandwiching two negatives to eliminate the background. |
 |
|
|
||