Custom Search
|
|
 
|
||
|
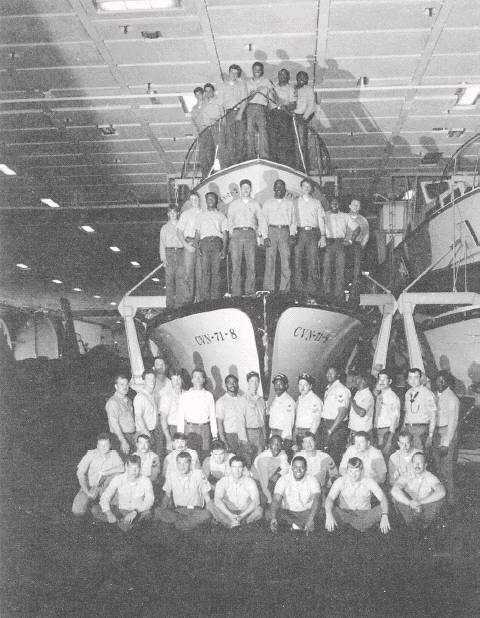
Occasionally, assignments are received to take a picture of a group of people. There is added difficulty when working with a number of people at one time. Each person should be treated as an individual, and, at the same time, each persons relationship to the whole group must be considered. Attention must be paid to every member of the group. Every precaution should be taken
PH3 Borbely 302.274 Figure 6-2. Boat crews aboard the USS Theodore Roosevelt pose with their motor launches. to ensure that each person is shown clearly and that interest is not drawn to one individual by some awkward pose or expression. There are two general types of group pictures: formal and informal. The formal group picture is one in which several people, uniformly dressed for the occasion, are seated or standing in as nearly the same pose as possible. Each member is placed in approximately the same relative position so that attention is not drawn to one person. The informal group picture (fig. 6-2) is intended to depict an action or tell a story about the individuals concerned. Although the position and pose of each member of an informal group is carefully planned, the results must appear casual and realistic. The members may be seated, kneeling, or standing in a variety of positions and do not have to be looking in the same direction. Arrangement of personnel to obtain the best composition is one of the most important factors in group photography. Regardless of the number of persons in a group, they should be arranged to fill the picture in such a way so you get the largest possible image size of each person. One exception to this general rule is when the importance of the background is equal to or greater than the group itself. This often occurs with an informal group when the picture is actually intended to emphasize an object or piece of equipment, rather than the individuals. In this case, locate the camera for the best composition of the object; then arrange the people in the picture to enhance the story being told A formal group of about five people can be composed to fill the picture area very nicely. When six to ten persons are being photographed in a group, it is advisable to arrange them in two rows. For larger formal groups, arrange the people in as many rows as necessary to fill the frame. Avoid stringing out one long, narrow line of people across the frame. When a large group is formed into three or more rows, you must devise some method to prevent the rear rows from being blocked from view. Furthermore, in order to compose the picture properly and fill it from top to bottom, you must see that each row is higher than the preceding one. One method is to arrange the group on the steps of a building, bleachers, or a terrace, so each row is higher than the preceding one. On level ground the first row can be seated, the second standing, and the third standing on benches. Another method that can be used in combination with the first is to elevate the camera so it is pointing down at an angle on the group. This method is useful as an aid in composing and filling the picture area. A higher camera angle can be useful in eliminating an undesirable background. When raising the camera above eye level, you must avoid excessive distortion of the figures and vertical lines by too much elevation. Particularly in formal group photography, the arrangement should be symmetrical. But avoid having an equal number of persons in each tow. Keeping the number unequal permits each person in the second and succeeding rows to stand directly behind the space between the heads in the preceding row. This provides a much better view of each person. The number in each row should differ by one person.
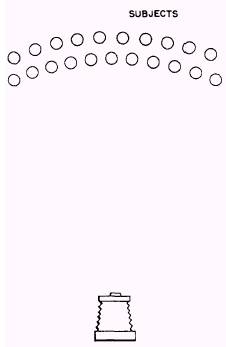
Figure 6-3. Arrange long rows in a semicircle. Customarily, in a formal group, the highest ranking person is located in the center of the first row and other members of the group are arranged alternately to the right and left by grade. When all members of the group are the same grade, arrange them according to height, with the tall ones either in the center or at the ends, or occupying the rear row. When you are arranging a large group in which about twelve or more persons are in each row, it is advisable to form them in a slight semicircle instead of a straight line (fig. 6-3). This places each person approximately the same distance from the camera and keeps the images a uniform size. Instruct each person to turn slightly so he or she is facing directly toward the camera. The shorter the focal length of the lens used, the more pronounced is the distortion effect of apparent bending of a straight row. A proportionally greater distance exists between the center and the ends of a row with a camera having a short-focal-length lens than with one having a long-focal-length lens. When the formal group is arranged and ready to be photographed, ensure each member is in the same relative position, hats are at the same angle, and uniforms are correct and neat. See that the hands and
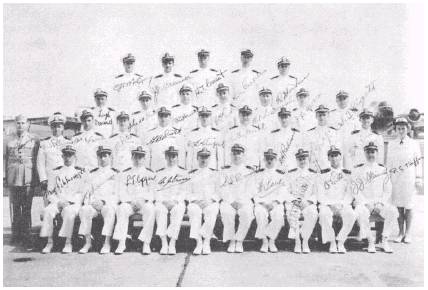
302.275 Figure 6-4. Formal group photo. feet of all members are in the same position. When the front row is seated, the feet may be crossed but all in the same direction. Each person should be looking at the camera, no broad smiles, just pleasant expressions. Nothing should be so different about one person that it draws an excessive amount of attention. Remember, to get maximum depth of field, you should focus the camera one third of the way into the group (if there are nine rows, focus the camera on the third row). As with everything else there is a time and place for formal group shots. What would happen, though, if you stylized the shot just a bit? Instead of always shooting the group setup that clearly identifies each member in the typical lineup by grade or height, why not think of your group picture in terms of your other photographs? Put in some foreground or a background. Use an interesting bit of lighting or a somewhat different setting. After all, do your subjects really have to be shoulder-to-shoulder? Do not forget the frame approach; it can work for group shots too. The group can be placed in a situation that has some relation to it. Foreground objects can be used to create a frame for a group of people in a photograph. Even one of the group members-the squadron commanding officer-can be your foreground; the rest of the officers can be scattered throughout the background. The success of a formal group photograph (fig. 6-4) is dependent on your ability, as a photographer, to direct the members of the group so you can obtain the composition desired. Never hesitate because of grade to request members of the group to change their expression or position or to correct a discrepancy in their uniform. Be diplomatic about it, of course, but do not let the matter go unattended. It is embarrassing and a waste of valuable time to call a group together again to retake a picture regardless of the reason for failure. The most important lesson a novice photographer can learn about photographing groups is how to remain in charge. Unless you are very careful the group will take control, and getting all the members of the group to look at the camera at the same time becomes almost impossible. Unless you are the dominating type, maintaining control is not easy. Remember, you cannot make good group pictures unless you are in control of the situation. To be in control, you should keep talking to members of the group and monitor their behavior. Have your equipment ready so you do not waste time or lose the group's attention while you load film or reposition the camera and lights. When you talk to people, they will naturally look at you, and therefore at the camera. Your directions and patter also prevent them from getting a word in edgewise among themselves. You must be firm when it comes to arranging the group. Do not be afraid of moving people about and telling them where to stand. Remember, you are making the pictures; you can see best what the final result will look like.
PHC Ronald J. Oliver 302.276 Figure 6-5. Damage control trainee struggles to repair a ruptured pipe. |
 |
|
|
||