|
||
|
|
||
| |||||||||||||||
|
|
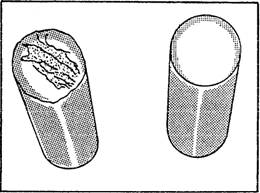
GTA WELDING PREPARATION Although it can produce outstanding results, GTA welding can be expensive. The equipment, electrodes, and shielding gas are costly and the material you weld is usually much more expensive than the material welded by other welding processes. To avoid costly mistakes, you should take the time to prepare for each welding operation fully. Preparation is the key to producing quality weldments. Specific information on the different manufacturers of GTA welding equipment is not provided in this training manual. You should read the manufacturer's instructional pamphlets for specific information on your machine. The following suggestions are considered general and you can apply them to any GTA welding operation: 0 Prepare the joint according to the welding procedure you are performing. Refer to chapter 3 of this training manual for specific information about joint preparation. Clean the metal of all oxidation, scale, oil, dirt, or other foreign matter. Regardless of the type of joint used, proper cleaning of the metal is essential. For best results, use a stainless steel wire brush. Check all electrical circuit connections to make sure they are properly connected and all fittings are tight. Be sure the torch is the right type and capacity for the current at which most of the welding will be done. Some manufacturers offer different torches for different ranges of welding current. Check the size, appearance, and position of the tungsten electrode in the torch. Ensure that the electrode diameter and nozzle size meet the manufacturer's recommendations. The tip should be properly shaped as discussed earlier (refer to figure 8-9). The electrode should extend beyond the end of the gas cup a distance ranging from 1/8 to 3/16 of an inch for butt welding and 1/4 to 3/8 of an inch for fillet welding. Check the electrode for positioning and good electrical contact. The electrode should be clean and silvery. A dirty tungsten electrode can usually be cleaned satisfactorily with a fine emery cloth. If severely contaminated, the electrode should be replaced or the tip broken off and dressed on a grinding wheel. A contaminated tungsten electrode and a good tungsten electrode are shown in figure 8-12. Check the ground cable connections to the workpiece. The connections should be periodically checked after welding begins because they tend to work loose. When this happens, the welding current varies. Set the machine for the correct welding amperage. (Follow manufacturer's recommendations.) Open the cylinder valve and adjust the gas flow. Before welding, check the connections on the gas supply for leaks with soapy water. If using a water-cooled torch, turn on the water. Be sure the water pressure is not higher than recommended by the torch manufacturer. GTA WELDING PROCEDURES As we discussed in chapter 3, the detailed methods and practices used to prepare a particular weldment are called the welding procedure. We also said that the
Figure 8-12.-Contaminated and good tungsten electrode.
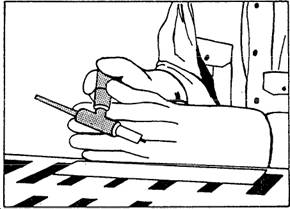
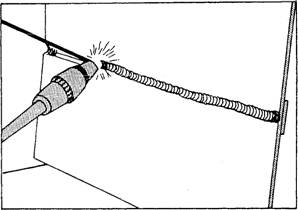
Figure 8-13.-Torch position for the starting swing to strike the arc. procedure for a particular welded joint includes many variables. The same variables that must be considered for other welding processes also must be considered for gas shielded-arc welding. Some of the variables that you must consider include the following: type of base metal, the joint design, the welding position, the type of shielding gas, and the welding machine setting. Starting the Arc Before starting the arc, you should form a ball on the end of the electrode for ac welding. To do this, simply set the current to DCRP and strike an arc for a moment on a piece of carbon or a piece of copper. The ball diameter should be only slightly larger than the original diameter of the tungsten electrode. When starting the arc with an ac high-frequency current, you do not have to bring the electrode into contact with the workpiece. To strike the arc, you must hold the torch in a horizontal position about 2 inches above the work surface, as shown in figure 8-13. Then
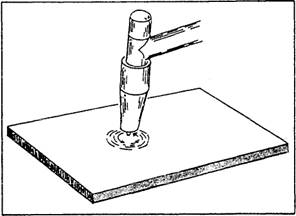
Figure 8-14.-Torch position at the end of the swing when the arc strikes.
Figure 8-15.-Forming a molten puddle with a GTA torch. rapidly swing the electrode end of the torch down to within 1/8 of an inch of the work surface. The high-frequency arc will then jump the gap between the electrode and the plate, establishing the arc. Figure 8-14 shows the torch position at the time the arc strikes. If you are using a do machine, hold the torch in the same position, but touch the plate to start the arc. When the arc is struck withdraw the electrode so it is about 1/8 of an inch above the plate. To stop the arc, quickly swing the electrode back to the horizontal position. If the machine has a foot pedal, gradually decrease the current before stopping the arc. Welded Joints In the following paragraphs the different types of joints and the procedures used to weld them is discussed. BUTT JOINTS.- After you strike the arc, hold the torch at a 90-degree angle to the workpiece surface, and
Figure 8-16.-Addition of filler metal in the flat position. with small circular motions, as shown in figure 8-15, form a molten puddle. After you form the molten puddle, hold the torch at a 75-degree angle to the work surface and move it slowly and steadily along the joint at a speed that produces a bead of uniform width. Move the torch slowly enough to keep the puddle bright and fluid. No oscillating or other movement of the torch is necessary except the steady forward movement. When you must use a filler metal, form the molten puddle as described previously. When the puddle becomes bright and fluid, you should move the arc to the rear of the puddle and add the filler metal by quickly touching the rod to the front edge of the puddle. Hold the rod at about a 15-degree angle from the work. Because the electrode is pointing toward the filler metal or pushing it, it is known as the push angle. Remove the
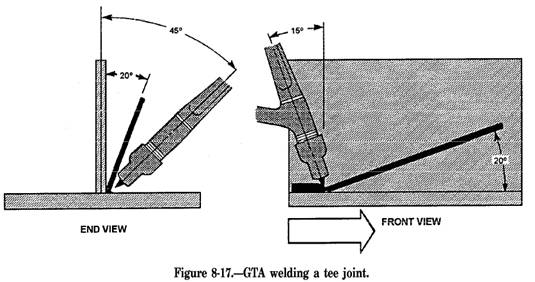
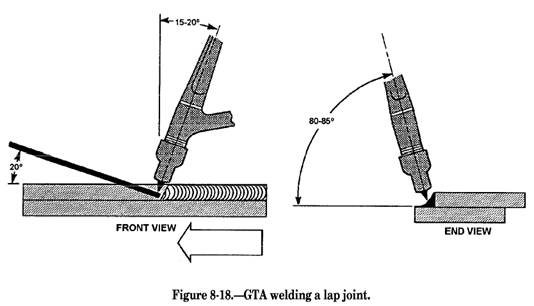
filler rod and bring the arc back to the front edge of the puddle. When the puddle becomes bright and fluid again, you should repeat the steps as described before. Figure 8-16 shows the correct procedures for adding filler metal. Continue this sequence until the weld joint has been completed. The width and height of the weld bead is determined by the speed of travel, by the movement of the torch, and by the amount of filler metal added. In welding practice, it is again stressed that good (GTA welding depends on following this definite procedure-form the molten pool and then feed filler rod intermittently to the leading edge of the pool as you move the torch forward. DO NOT feed the filler rod into the arc. You should practice making single-pass butt welds until you can produce satisfactory welds. LAP AND TEE JOINTS.- In chapter 3, we said that lap and tee joints are welded using the fillet weld. Fillet welds are slightly awkward to make using the GTA welding process because of the gas nozzle. Once you establish the arc, you should pay close attention to the molten puddle. Figures 8-17 and 8-18 show the correct torch and rod angles for the tee and lap joints. In welding a tee or lap joint, the puddle forms a V-shape. The center of the V is called a notch, and the speed at which you fill the notch governs how fast you should move the torch. Do NOT get ahead of the notch. If you do, the joint will have insufficient fusion and penetration. As you weld along the joint, dip the rod in
Figure 8-19.-GTA welding in the horizontal position.
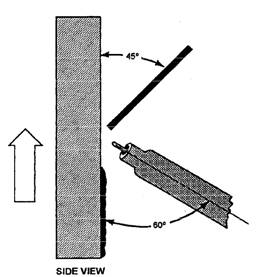
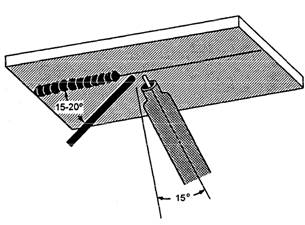
Figure 8-20.-GTA welding vertical downward. and out of the puddle about every 1/4 of an inch of travel. If you add the filler rod to the molten puddle at just the right time uniform welds result every time. Out-of-Position Welding Rules for quality welding in the flat position also must be followed for out-of-position GTA welding. Cleanliness, good joint fit-up, preheat, sufficient shielding gas, and correct welding current are important. In addition, you should not use high welding current or deposit large weld beads. Direct the arc so there is no overheating at anyone area that could cause sagging or undercutting. The adding of filler metal, bead size, and sequence must be done correctly to ensure complete fusion between passes. HORIZONTAL WELDING.- When welding in the horizontal position, start the arc on the edge of the
Figure 8-21.-GTA welding vertical upward.
Figure 8-22.-GTA welding overhead. joint. Then hold the torch at a work angle of 15 degrees and a push angle of 15 degrees. After you establish the puddle, dip the rod into the front edge of the puddle on the high side as you move the torch along the joint (fig. 8-19). Maintain an are length as close as possible to the diameter of the electrode. Correct arc length coupled with the correct speed of travel helps prevent undercutting and permits complete penetration. VERTICAL WELDING.- When welding thin material with the GTA welding process, you should weld from the top, moving downward (fig. 8-20). This helps you produce an adequate weld without burning through the metal. Filler material is not normally needed for welding downward. On heavier materials, you should weld from the bottom, upwards (fig. 8-21). This enables you to achieve adequate penetration. When welding upward, you normally need to use a filler rod. OVERHEAD WELDING.- When GTA welding in the overhead position, you should lower the welding current by 5 to 10 percent of what normally is used for flat welding. This reduced welding current enables you to maintain better control of the welding puddle. Conversely, you need a higher flow of shielding gas. Hold the torch and the rod as you do for flat welding (fig. 8-22). You should try to maintain a small weld puddle to avoid the effects of gravity. Most inexperienced welders find overhead welding awkward; therefore, try to get in as comfortable and relaxed a position as possible when welding. This helps you to maintain steady, even torch and filler rod manipulation. |
|
Privacy Statement - Press Release - Copyright Information. - Contact Us - Support Integrated Publishing |