| Tweet |

Custom Search
|
|
 
|
||
|
LENSATIC
COMPASS The lensatic compass is the most commonly used and simplest instrument for measuring directions and angles in the field. Two varieties of magnetic compasses are standard for military use today: the lensatic compass (fig. 5-26) and the artillery (M2) compass. Since the M2 is a special-purpose compass, it is not discussed in this chapter. In order to use a map effectively in the field for purposes of identification, location, or reporting, you must orient, or align, the map with the ground. A map is oriented when, in a horizontal position, its north points to the north and all map lines are parallel to their corresponding lines on the ground. A map user is oriented when he knows his position on the oriented map. A fast and accurate way to orient a map is with a lensatic compass. When a compass rose (picture of a compass card) appears on the map, place the map on a flat surface and draw the magnetic north line. Open the compass and place it over the magnetic north line so the sight points toward the top of the map and is directly over the magnetic north line that you have drawn. Turn the map, taking care not to move the compass from its position over the north line until the north arrow of the compass is aligned under the index line of the compass. The map is now oriented. For maps that do not have a compass rose, align the compass sights over a north-south grid line. Then rotate the map and compass together until the north arrow of the compass points in the same direction and amount from the grid line, shown in the declination diagram. To orient a map when a compass is not available requires a careful examination of the map and the ground features of the area to find linear features that are common to both the map and the ground. Linear
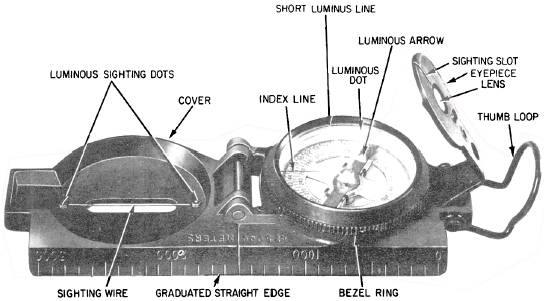
Figure 5-26.-Lensatic compass. Figure
5-27.-A method of holding the compass. features are those that have length. Good examples are roads, railroads, fence lines, power lines, and so forth. By aligning the features on the map with the features on the ground, you can orient the map. The lensatic compass must always be held level and firm when you are sighting on an objective and reading an azimuth (a horizontal angle measured in a clockwise reamer from a north base line). There are several techniques for holding the compass and sighting, but we will discuss only two methods. To sight an objective and read an azimuth with the first method, use the following steps: 1. Open the cover of the compass so it forms a right angle with the compass. Move the eyepiece so the compass dial is visible through the lens, as shown in figure 5-27. 2. Align the slot in the eyepiece with the hairline sighting wire in the cover and with the target. 3. Read the azimuth by glancing down at the dial through the lens. This technique provides a reading precise enough to use for "Intersection" and "Resection" (discussed later in this chapter). The second method has an advantage because it keeps the compass lower and farther away from the steel
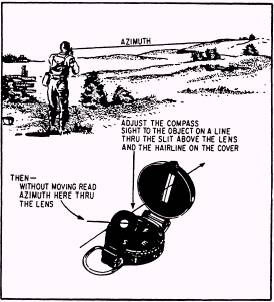
Figure
5-28.-A method of determining the azimuth of a visible object. helmet of the user; but it is less precise than the method just described. To learn the second method, study the following steps: 1. Open the cover until it forms a straightedge with the compass base, as shown in figure 5-26. 2. Pull the eyepiece as far to the rear as possible, perpendicular to the compass base. 3. Place your thumb through the thumb loop, forming a steady base with your third and fourth fingers, and extend your index finger along the side of the compass. 4. Extend the other index finger along the remaining side of the compass and place the remaining fingers around the fingers of the other hand. 5. Pull your elbows firmly into your sides. This places the compass between your chin and your belt. 6. To take an azimuth reading, simply turn your entire body toward the object, pointing the compass cover directly at the object. (See fig. 5-28.) 7. Then just look down and read the azimuth from beneath the fixed, black index line. For night use, special features of the compass are the luminous markings and the 3 bezel serration and clicking device. Turning the bezel ring to the left causes an increase in azimuth, while turning it to the right causes a decrease. The bezel has a stop and spring that allows clockwise and counterclockwise turns at 3 intervals per click and holds the bezel ring in any desired position. One method for determining compass directions at night is as follows: 1. Rotate the bezel until the luminous line is over the black index line. 2. Hold the compass with the left hand and continue to rotate the bezel ring with the right hand in a counterclockwise direction for the number of clicks required. The number of clicks is determined by dividing the value of the required azimuth by 3. For example, for an azimuth of 51, the bezel ring is rotated 17 clicks counterclockwise. 3. Turn the compass until the north arrow is directly under the luminous line on the bezel. 4. Hold the compass open and level in the palm of the left hand with the thumb along the flat side of the compass. In this manner, the compass can be held consistently in the same position. Position the compass approximately halfway between the chin and the belt, pointing directly ahead of yourself. A little practice in daylight should make you proficient in pointing the compass the same way every time. Looking directly down into the compass, turn your body until the north arrow is under the luminous line. Then move forward in the direction of the front cover luminous sighting dots (fig. 5-26). Certain precautions about the care and use of a lensatic compass are important because they assure, within reason, that a compass works when and where you need it. 1. Handle the compass with care. The dial is set at such a delicate balance that a shock could damage the compass. 2. Close and return the compass to its special container when it is not in use. In this way, it is not only protected from possible damage but is readily available for use when needed. 3. When the compass is to be used in darkness, an initial azimuth should be set, whenever possible, while light is still available. With this initial azimuth as a base, you can read any other azimuth that is a multiple of 3 by using the clicking feature of the bezel. 4. Compass readings should NEVER be taken near visible masses of iron or electrical circuits. The following are suggested as approximate safe distances to ensure proper functioning of the compass: High tension power lines . . . . . . . . 55 yards Field gun, truck, or tank . . . . . . . . 18 yards Telegraph and telephone wires and barbed wire . . . . . . . . . . . . . . . 10 yards Machine gun . . . . . . . . . . . . . . 2 yards Helmet or rifle . . . . . . . . . . . . . 0.5 yards Nonmagnetic metals and alloys do not affect compass readings. 5. Practice by using the compass at regular intervals. This is to help you become competent in its use during an emergency. |
||
|
||