Custom Search
|
|
  |
|||||||||||||||||||||||||
|
Table 1-2 illustrates an interesting point about multimeters. It was mentioned earlier in this chapter that both voltmeters and ammeters have an effect upon the circuits they measure. Table 1-2. - Multimeter Movements
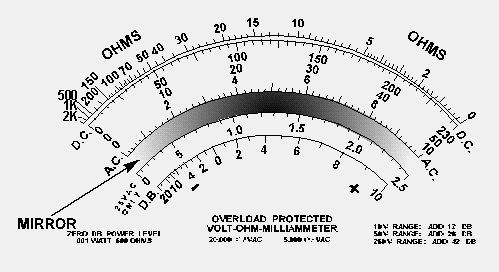
To keep this effect to a minimum, it is necessary that the voltmeter have a high resistance (sensitivity expressed in ohms per volt) and the ammeter have a low resistance compared to the circuit being measured. Table 1-2 shows the figures associated with three meter movements available for use in multimeters. The last two columns indicate the value of shunt resistance and the overall resistance of the shunt and meter movement necessary to compensate all three movements to an ammeter sensitivity (full-scale current) of 1 milliampere. Notice that as the voltmeter sensitivity increases, the resistance of the ammeter decreases. This shows how a meter movement used in a voltmeter will have a high effective resistance and the same meter movement used in an ammeter will have a low effective resistance because of the shunt resistors. PARALLAX ERROR Most multimeters (and some other meters) have a mirror built into the scale. Figure 1-39 shows the arrangement of the scale and mirror. Figure 1-39. - A multimeter scale with mirror.
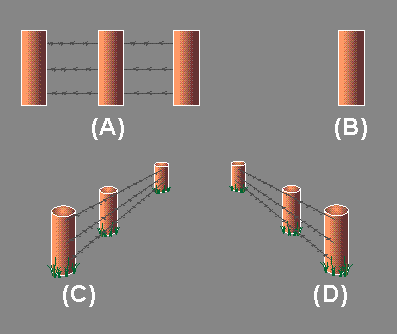
The purpose of the mirror on the scale of a meter is to aid in reducing PARALLAX ERROR. Figure 1-40 will help you understand the idea of parallax. Figure 1-40(A) shows a section of barbed wire fence as you would see it from one side of the fence. Figure 1-40(B) shows the fence as it would appear if you were to look down the fine of fence posts and were directly in line with the posts. You see only one post because the other posts, being in line, are hidden behind the post you can see. Figure 1-40(C) shows the way the fence would appear if you moved to the right of the line of posts. Now the fence posts appear to the right of the post closest to you. Figure 1-40(D) shows the line of fence posts as you would see them if you moved to the left of the front post. This apparent change in position of the fence posts is called PARALLAX.
Figure 1-40. - Parallax illustration (barbed-wire fence).
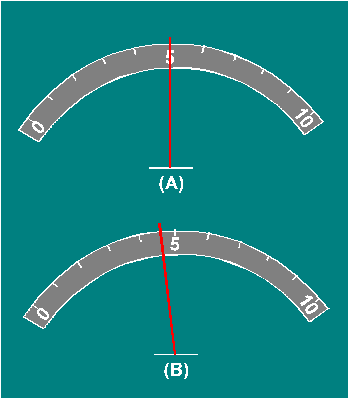
Parallax can be a problem when you are reading a meter. Since the pointer is slightly above the scale (to allow the pointer to move freely), you must look straight at the pointer to have a correct meter reading. In other words, you must be in line with the pointer and the scale. Figure 1-41 shows the effect of parallax error. Figure 1-41. - A parallax error in a meter reading.
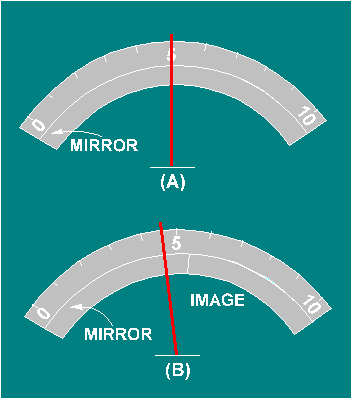
Figure 1-41 (A) shows a meter viewed correctly. The meter reading is 5 units. Figure 1-41(B) shows the same meter as it would appear if you were to look at it from the right. The correct reading (5) appears to the right of the pointer because of parallax. The mirror on the scale of a meter, shown in figure 1-39, helps get rid of parallax error. If there is any parallax, you will be able to see the image of the pointer in the mirror. If you are looking at the meter correctly (no parallax error) you will not be able to see the image of the pointer in the mirror because the image will be directly behind the pointer. Figure 1-42 shows how a mirror added to the meter in figure 1-41 shows parallax error. Figure 1-42(A) is a meter with an indication of 5 units. There is no parallax error in this reading and no image of the pointer is seen in the mirror. Figure 1-42(B) shows the same meter as viewed from the right. The parallax error is shown and the image of the pointer is shown in the mirror. Figure 1-42. - A parallax error on a meter with a mirrored scale.
MULTIMETER SAFETY PRECAUTIONS As with other meters, the incorrect use of a multimeter could cause injury or damage. The following safety precautions are the MINIMUM for using a multimeter.
Q.57 What is the reason for having a mirror on the scale of a multimeter? |
|||||||||||||||||||||||||
|
|
Integrated Publishing, Inc. - A (SDVOSB) Service Disabled Veteran Owned Small Business
|