Custom Search
|
|
  |
|
|
In the above example, 125 volts applied between one set of plates would deflect the beam 1 inch on the screen. This means that the deflection caused by small signals would likely not be observed. For this reason, the deflection plates are connected to amplifiers that magnify the signals applied to the vertical input of the scope. Assume, for example, that a peak-to-peak value of a known voltage applied to the oscilloscope indicates that each inch marking on the graticule is equal to 60 volts. Each of the 10 subdivisions will, therefore, equal a value of 6 volts. Most oscilloscopes have ATTENUATOR controls to decrease or GAIN controls to increase the strength of a signal before it is placed on the deflection plates. Attenuator and gain settings must not be disturbed after the calibration has been made. For maximum accuracy, you should recalibrate the graticule each time a voltage is to be measured. CRT DESIGNATIONS Cathode-ray tubes are identified by a tube number, such as 2AP1, 2BP4, or 5AP1A. The first number identifies the diameter of the tube face. Typical diameters are 2 inches, 5 inches, and 7 inches. The first letter designates the order in which a tube of a given diameter was registered. The letter-digit combination indicates the type of phosphor (glowing material) used on the inside of the screen. Phosphor P1, which is used in most oscilloscopes, produces a green light at medium PERSISTENCE. Persistence refers to the length of time the phosphor glows after the electron beam is removed. P4 provides a white light and has a short persistence. If a letter appears at the end, it signifies the number of the modification after the original design. OSCILLOSCOPE CONTROL COMPONENTS Although the CRT is a highly versatile device, it cannot operate without control circuits. The type of control circuits required depends on the purpose of the equipment in which the CRT is used. There are many different types of oscilloscopes. They vary from relatively simple test instruments to highly accurate laboratory models. Although oscilloscopes have different types of circuits, most can be divided into the basic sections shown in figure 6-13: (1) a CRT, (2) a group of control circuits that control the waveform fed to the CRT, (3) a power supply, (4) sweep circuitry, and (5) deflection circuitry. Figure 6-13. - Block diagram of an oscilloscope.
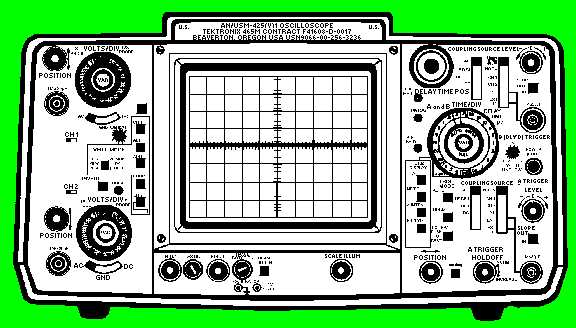
Q.14 List the circuits that all oscilloscopes have in common. Figure 6-14 is a drawing of the front panel of a dual-trace, general-purpose oscilloscope. Oscilloscopes vary greatly in the number of controls and connectors. Usually, the more controls and connectors, the more versatile the instrument. Regardless of the number, all oscilloscopes have similar controls and connectors. Once you learn the fundamental operation of these common controls, you can move with relative ease from one model of oscilloscope to another. Occasionally, controls that serve similar functions will be labeled differently from one model to another. However, you will find that most controls are logically grouped and that their names usually indicate their function. Figure 6-14. - Dual-trace oscilloscope.
The oscilloscope in figure 6-14 is called DUAL-TRACE because it can accept and display two vertical signal inputs at the same time - usually for comparison of the two signals or one signal and a reference signal. This scope can also accept just one input. In this case, it is used as a SINGLE-TRACE OSCILLOSCOPE. For the following discussion, we will consider this to be a single-trace oscilloscope. The oscilloscope in the figure is commonly used in the fleet. You are likely to use this one (model AN/USM-425) or one very similar to it. Let's now look at the front panel controls. COMPONENTS USED TO DISPLAY THE WAVEFORM The CRT DISPLAY SCREEN is used to display the signal (figure 6-15 ). It allows you to make accurate measurements using the vertical and horizontal graticules, as discussed earlier. Figure 6-15. - CRT display and graticule.
COMPONENTS USED TO ADJUST CRT DISPLAY QUALITY The controls in figure 6-16 allow you to adjust for a clear signal display. They also allow you to adjust the display position and magnify the horizontal trace by a factor of 10 (X10). Keep in mind that the controls may be labeled differently from one model to another, depending on the manufacturer. Refer to figure 6-16 as you study the control descriptions in the next paragraphs. Figure 6-16. - Quality adjustment for CRT display.
INTEN (Intensity) Control The INTEN (intensity) control (sometimes called BRIGHTNESS) adjusts the brightness of the beam on the CRT. The control is rotated in a clockwise direction to increase the intensity of the beam and should be adjusted to a minimum brightness level that is comfortable for viewing. FOCUS and ASTIG (Astigmatism) Controls The FOCUS control adjusts the beam size. The ASTIG (astigmatism) control adjusts the beam shape. The FOCUS and ASTIG controls are adjusted together to produce a small, clearly defined circular dot. When displaying a line trace, you will use these same controls to produce a well-defined line. Figure 6-17, view A, shows an out-of-focus beam dot. View B shows the beam in focus. Views C and D show out-of-focus and in-focus traces, respectively. Figure 6-17. - Effects of FOCUS and ASTIG (astigmatism) controls.
|
 |
|
|
Integrated Publishing, Inc. - A (SDVOSB) Service Disabled Veteran Owned Small Business
|