Custom Search
|
|
  |
|
|
ICO MEASUREMENTS Adjust the METER ZERO control for a zero meter indication. Plug the transistor to be tested into the jack, or connect the test leads to the device. Set the PNP/NPN switch to correspond with the type of transistor under test. Set the function switch to ICO and the RANGE switch to X0.1, X1.0, or X10, as specified by the transistor data book for allowable leakage. Read leakage on the bottom scale and multiply by the range setting figure as required. ELECTRODE RESISTANCE MEASUREMENTS Connect the in-circuit probe test leads to the transistor with the yellow lead to the emitter, the green lead to the base, and the blue lead to the collector. Set the function switch to the OHMS E-B position and read the resistance between the emitter and base electrode on the center scale of the meter marked OHMS. To read the resistance between the collector and base and the collector and emitter, set the function switch to OHMS C-B and OHMS C-E, respectively. These in-circuit electrode resistance measurements are used to correctly interpret the in-circuit beta measurements. The accuracy of beta times 1 and 10 range is 15 percent only when the emitter-to-base load is equal to or greater than 300 ohms. DIODE MEASUREMENTS Diode in-circuit quality measurements are made by connecting the green test lead to the cathode and the yellow test lead to the anode. Set the function switch to DIODE IN/CKT and the RANGE switch to times 1 position. Ensure that the meter has been properly zeroed on this scale. If the meter reads down-scale, reverse the polarity switch. If the meter reads less than midscale, the diode under test is either open or shorted. The related circuit impedance of this test is less than 25 ohms.
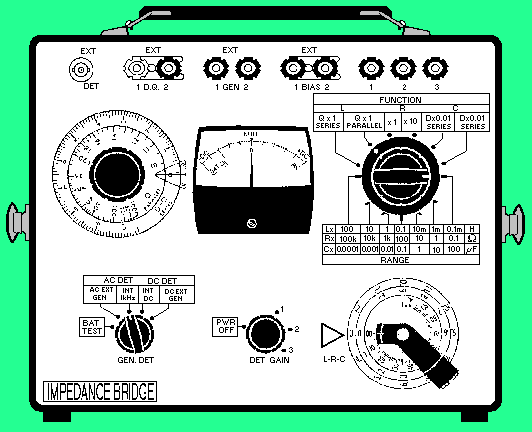
RESISTANCE-CAPACITANCE-INDUCTANCE (RCL) BRIDGES Resistance, capacitance, and inductance can be measured with precise accuracy by alternating-current bridges. These bridges are composed of capacitors, inductors, and resistors in a wide variety of combinations. These bridges operate on the principle of the Wheatstone bridge; that is, an unknown resistance is balanced against known resistances and, after the bridge has been balanced, the unknown resistance is calculated in terms of the known resistance. The universal Impedance Bridge, Model 250DE (shown in figure 4-18 ) is used to measure resistance, capacitance, and inductance (RCL) values. It is also used to make other special tests, such as determining the turns ratio of transformers and capacitor quality tests. This instrument is self-contained, except for a source of line power, and has an approximate 500-hour battery life expectancy. It has its own source of 1,000-hertz bridge current with a sensitive bridge balance indicator and an adjustable source of direct current for electrolytic capacitor and resistance testing. The bridge also contains a meter with suitable ranges to test for current leakage on electrolytic capacitors.
Figure 4-18. - Resistance-capacitance-inductance bridge.
CONTROLS Figure 4-18 is a panel view of the model 250DE bridge switches, dials, controls, and connections. Refer to the figure as we briefly discuss some of the switches and dials below. The FUNCTION switch selects the type of bridge circuit that will measure resistance, capacitance, or inductance.
CONNECTIONS L, R, and C terminals 1, 2, and 3 are used to connect unknown resistors, inductors, and capacitors to the bridge. Resistors and inductors are connected between terminals 1 and 2, and capacitors are connected between terminals 2 and 3. EXT BIAS terminals are normally connected with a shorting lug. They allow insertion of a dc voltage or current to bias capacitors or inductors. EXT DET connector is a BNC coaxial socket that allows an external detector to be used with the instrument. It is connected to the bridge at ALL TIMES. EXT D-Q terminals are normally connected with a shorting lug. They allow an external rheostat to extend the range of the D-Q dial. EXT GEN terminals provide a connection to the bridge for an external generator. When the GEN-DET switch is in the AC EXT GEN position, the terminals connect an isolation transformer so that a grounded external generator can be used. When the GEN-DET switch is in the DC EXT GEN position, the terminals are connected directly to the bridge. BATTERY The model 250DE bridge has a battery supply consisting of four 1.5 V dc batteries with an expected life of 500 hours. The battery power supply should be checked before each day's operation. Turn DET GAIN control to 1 and set GEN-DET switch to BATT. TEST (battery test). If the meter deflects beyond the BAT OK mark, the battery is good. Resistance is usually measured with direct current for maximum accuracy. The model 250DE bridge can be used to measure resistance with alternating current, but external reactance compensation is usually required. On high-resistance ranges, care should be taken to avoid leakage across a resistor under test. Insulation with a resistance of 109 ohms, which is adequate for most purposes, will cause a measurement error of 1 percent if it shunts a 10-megohm resistor. Using the following steps, you will be able to measure dc resistance ONLY:
CAPACITANCE MEASUREMENTS Capacitance is measured in terms of a two-element equivalent circuit consisting of a capacitor in series with a resistor. The internal ac generator and detector of the model 250DE bridge are tuned to 1 kilohertz. Other frequencies can be used, but an external generator and detector are required. The D and Q ranges of the bridge can be extended by use of an external rheostat connected to the terminals provided. The measured capacitance is the product of the L-R-C dial setting times the setting of the RANGE switch. Using the following steps, you can make a standard capacitance measurement:
Inductance is measured in terms of a two-element equivalent circuit consisting of an inductance either in series or in parallel with a resistance. The internal ac generator and detector of the model 250DE bridge are tuned to 1 kHz. Other frequencies can be used, but like capacitance measurements, an external generator and detector are required. When inductance is being measured in ac or dc, it should be realized that iron-core inductors are sensitive to current variations. Quantitative measurements of dc effects can be made by supplying current to the unknown inductor through the EXT BIAS terminal. Use the following steps to make inductance measurements:
|
|
|
|
Integrated Publishing, Inc. - A (SDVOSB) Service Disabled Veteran Owned Small Business
|