Custom Search
|
|
  |
|
|
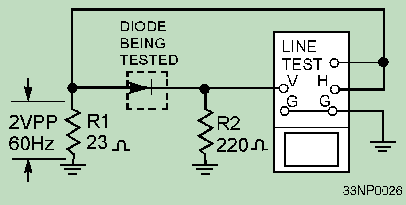
Testing Diodes with an Ohmmeter A convenient test for a semiconductor diode requires only an ohmmeter. The back-and-forward resistance can be measured at a voltage determined by the battery potential of the ohmmeter and the resistance range at which the meter is set. When the test leads of the ohmmeter are connected to the diode, a resistance will be measured that is different from the resistance indicated if the leads are reversed. The smaller value is called the FORWARD RESISTANCE, and the larger value is called the BACK RESISTANCE. If the ratio of back-to-forward resistance is greater than 10 to 1, the diode should be capable of functioning as a rectifier. However, keep in mind that this is a very limited test that does not take into account the action of the diode at voltages of different magnitudes and frequencies. (NOTE: This test should never be used to test crystal mixer diodes in radars. It will destroy their sensitivity.) Testing Diodes with Oscilloscopes An oscilloscope can be used to graphically display the back-and-forward resistance characteristics of a crystal diode. A circuit used in conjunction with an oscilloscope to make this test is shown in figure 2-15. This circuit uses the oscilloscope line-test voltage as the test signal. A series circuit (composed of resistor R1 and the internal resistance in the line-test circuit) decreases a 3-volt, open-circuit test voltage to a value of approximately 2 volts peak to peak. Figure 2-15. - Testing semiconductor diodes with an oscilloscope.
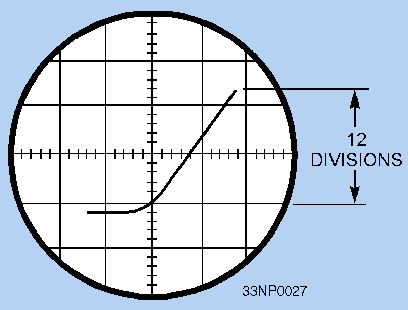
The test signal applied to the crystal diode is also connected to the horizontal input of the oscilloscope. The horizontal sweep represents the voltage applied to the diode under test. The voltage developed across current-measuring resistor R2 is applied to the vertical input of the oscilloscope. Because this voltage is proportional to the current through the diode being tested, the vertical deflection will indicate crystal current. The resulting oscilloscope trace for a normal diode is similar to the curve shown in figure 2-16.
Figure 2-16. - Characteristic curve of a semiconductor diode.
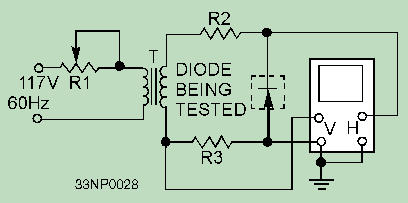
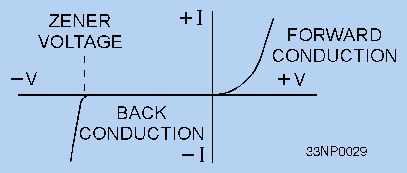
To test Zener diodes, you must use a higher voltage than the oscilloscope line-test signal. This test can be made with a diode test set or with the circuit shown in figure 2-17. In this circuit, rheostat R1 is used to adjust the input voltage to a suitable value for the Zener diode being tested. Resistor R2 limits the current through the diode. The signal voltage applied to the diode is also connected to the horizontal input of the oscilloscope. The voltage developed across current-measuring resistor R3 is applied to the vertical input of the oscilloscope. The horizontal sweep represents the applied voltage, and the vertical deflection indicates the current through the diode being tested. Figure 2-18 shows the characteristic pattern of a Zener diode. Note the sharp increase in current at the Zener voltage (avalanche) point. For the Zener diode to be usable, this voltage must be within limits specified by the manufacturer. Figure 2-17. - Testing a Zener diode.
Figure 2-18. - Zener diode characteristic curve.
Most transistorized equipments use printed circuit boards on which components are neatly arranged. This arrangement makes the transistors and other components easy to reach while you are troubleshooting and servicing the equipment. While investigating with test probes, however, you must be careful to prevent damage to the printed wiring. One of the outstanding advantages of transistors is their reliability. Tube failures account for over 90 percent of the failures in electron-tube equipments. Transistors, however, are long lived. This factor, among others, decreases maintenance required to keep transistorized equipment operating. The techniques used in testing transistorized equipment are similar to those for maintaining electron-tube circuits. Basically, these techniques include several checks and inspections. Power Supply Checks When using test equipment to localize a trouble, you should check the power supply to see that its output voltages are present and of the correct values. Improper power supply voltages can cause odd effects. You will prevent many headaches by checking the power supply first. Visual Inspection Visual inspection is a good maintenance technique. Occasionally, you will find loose wires or faulty connections, making extensive voltage checks unnecessary. Transistor Checks Transistors can be checked by substitution. Transistors, however, have a characteristic known as leakage current, which may affect the results obtained when the substitution method is used. The leakage current may influence the current gain or amplification factor of the transistor. Therefore, a particular transistor might operate properly in one circuit and not in another. This characteristic is more critical in certain applications than in others. As the transistor ages, the amount of leakage current tends to increase. One type of transistor checker used is the semiconductor test set. This test set can be used either for in-circuit or out-of-circuit tests or for collector leakage current or current gain. You should use extreme care when substituting transistors. More and more transistors have specific current and breakdown voltage requirements that may affect how they operate within a given circuit. Q.12 As a transistor ages, what happens to the leakage current? |
 |
|
|
Integrated Publishing, Inc. - A (SDVOSB) Service Disabled Veteran Owned Small Business
|