Custom Search
|
|
 
|
||
|
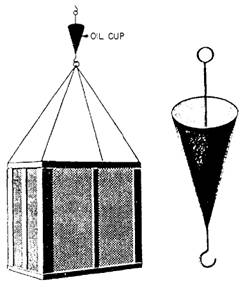
Storage of Food If you are to stay in one place for several days or more, you must provide storage facilities. If you do not have mechanical refrigeration in temporary camps, you may place food in water containers and put these containers in springs or streams. It is also possible to keep food items in the ground for a short time. This takes advantage of the insulating and cooling qualities of the moist earth beneath the surface. This also protects stored food from the elements. Dig a hole, line it with burlap sacks and boards, then place the food, in its original container, in the hole. Once this is done, cover it with soil, straw, or leaves. For small amounts of food you can use a food box screened with wire or cloth netting suspended from the branch of a tree. This is called a swinging food box 11-3 . The oil cup keeps insects from crawling down the wires to the box. The root cellar has one of the advantages of a mechanical walk-in refrigerator. It makes foods easier to handle, especially when the foods are in bulk form. The height of the root cellar permits personnel to carry foods in or out of the cellar without stooping or bending. You can construct a root cellar if the terrain is hilly and a location is found that slopes upward at a sharp angle. The size of the excavation will vary according to the storage space required. Once the excavation is complete, reinforce the sides and line with waterproof material. Level the floor, cover it with dunnage, and grade away the entrance. Use heavy boards or logs to form the roof, then cover with a tarpaulin. Provide top
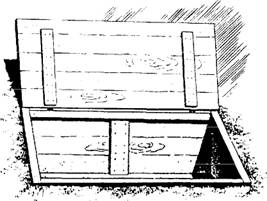
Figure 11-3.-Swinging food box. ventilation by making openings at the tops of the cellar sides. Fit the entrance with a door large enough to permit easy passage for personnel carrying food in the largest expected bulk form. Always keep the door closed and covered with a canvas flap when it is not in use. Fill all the spaces between exposed logs or boards with wet earth. You can construct an underground food box when the terrain is flat or when you need more space. The simplest kind consists of a packing box and a hole dug to fit it. After you dig the hole, lower the box into it. Then shovel loose earth into the spaces between the box's outside walls and the sides of the hole. Next, pack this earth into a tight fit. Fashion the top of the box into a door. Line the underside of the top with canvas or some similar material. This will help make it airtight. (See i . 11-4 )
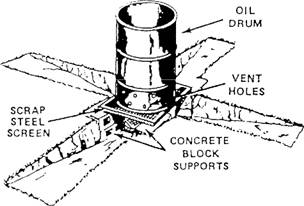
Figure 11-4.-Underground food box. To make a double-walled type of food box, use one large packing box and one that is slightly smaller. Drill holes in the bottom of the larger box and cover its outer walls with waterproof paper or some similar material. Convert the top into a door with hinges. Then dig the pit slightly larger than the box and fill the bottom with about 4 inches of stone or gravel. Sink the box inside the larger one, allowing for a space of from 3 to 4 inches between the sides of the two boxes all the way around. Stuff sawdust, straw, or grass between the two boxes to serve as insulation. For best results, always keep this material damp. Camouflage the box, when necessary, by placing a wet blanket over it and covering the blanket with leaves. The natural refrigeration provided by both the root cellar and the food box is supplemented by the thawing of the frozen meats within the storage space. Frozen meats will help refrigerate other perishables during the period required for them to thaw. If ice is available, you can partition off one end of the food box to form an ice compartment. Garbage is best disposed of by burying or burning. To bury garbage, dig a trench 4 feet deep or more. Dump the garbage into the pit, packing it down in layers. Then cover the exposed layer with a few inches of dirt each day. When you abandon the garbage site, cover it with a minimum of 2 feet of mounded earth. To incinerate garbage, you must first remove all excess moisture. The cross-trench incinerator . 11-5 provides one of the best methods of burning garbage. To construct such a trench, dig two trenches 8 feet long, 1 foot wide, and 1 foot deep, that cross at their centers. The
Figure 11-5.-Cross-trench incinerate. bottom of each trench should taper up to the level of the ground toward the ends. A grate made of a piece of scrap iron or pipe about 24 inches long is built over the centers. At the intersection of the trenches, build a coal or wood fire. When the fire has become hot enough, add rubbish or drained garbage as fuel. This incinerator functions best if three of the four sides of the trenches are blocked off, with the open side facing into the wind. This type of cross-trench fire can be used for cooking as well as incinerating. Two cross-trenches provide enough cooking facilities to prepare meals for 100 people and six of them provide enough cooking facilities to prepare meals for 500 people. To dispose of cans, you can wash them and use them as substitutes for cooking and eating utensils. You also can open both ends, flatten them, and bury them with the garbage. Glass jars also can be used as substitute eating utensils. When disposing of glass jars, break them up and bury them with the garbage. Liquid wastes, such as grease, may be burned or buried with the garbage. The exception is any usable grease that can be used for cooking. Other wastes are best disposed of in the soakage pit . This pit should be at a minimum of 25 feet from the kitchen area. |
 |
|
|
||