Custom Search
|
|
 
|
||
|
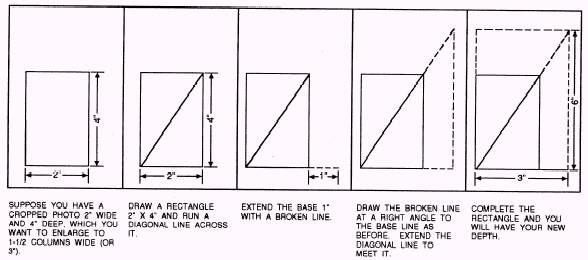
SCALING Scaling is the act of either enlarging or reducing a cropped photograph or artwork to fit a hole on a newspaper page. Since you must first know the cropped dimensions, you cannot scale a photograph before you crop it. Once you know the dimensions, then you can scale the photograph to fit that hole snugly. In scaling a photograph, you are trying to determine either the reproduction depth or the reproduction width. As you enlarge or reduce the photograph to reproduction width, the reproduction depth will change proportionately. Consequently, when you scale for reproduction depth, the reproduction width will change proportionately. The two simple ways to scale a photograph or artwork to size areas follows: l The diagonal method l The proportional scale method The Diagonal Method The diagonal method of scaling a photograph or artwork is a mechanical procedure that does not require great mathematical skill or special tools. Diagonally
Figure 8-12. - Scaling for reduction.
Figure 8-13. - Scaling for enlargement. scaling for reduction (fig. 8-12) includes five steps as follows: 1. On a separate sheet of paper, draw a rectangle that has the same dimensions as the cropped photograph/work. 2. Draw a diagonal line from the lower left corner through the upper right corner of the rectangle. 3. Measure from the lower left corner along the base line, the width desired for the picture. Make the base line extend to that point. 4. Draw a broken vertical line at a right angle from it to the diagonal line. Stop where the broken line and diagonal line intersect. 5. Complete the rectangle and measure the space. This is the area your photograph will occupy when it is reduced. Diagonally scaling for enlargement (fig. 8-13) is slightly different from the procedure used for reduction. It contains the following five steps: 1. On a separate sheet of paper, draw a rectangle that has the same dimensions as the cropped photograph/artwork. 2. Draw a diagonal line from the lower left corner through the upper right corner of the rectangle. 3. Extend the base line with a broken line to the width desired for the picture.
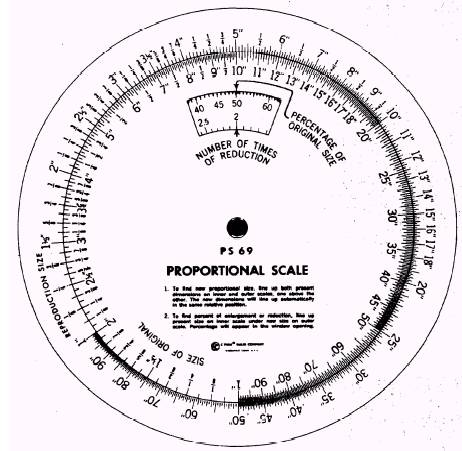
Figure 8-14. - Proportional scale. 4. Draw a broken vertical line at a right angle from it to the diagonal line as before. Extend the diagonal line to meet the broken line. 5. Complete the rectangle and measure the space. This is the area your photograph will occupy when it is enlarged. The Proportional Scale Method Perhaps the most common way of scaling is the proportional scale method. The proportional scale (fig. 8-14) has a movable inner disk with a window mounted on an outer disk. Both disks have unit graduations from 1 to 100. Any unit of measurement can be used with the proportional scale. To use the scale, you need to know three of the four measurements involved in scaling. You must know the cropped width, cropped depth and reproduction width (or the reproduction depth if you are establishing a reproduction width. Use your proportional scale to determine the reproduction depth in the following example: PHOTOGRAPH DIMENSIONS: The cropped width is 18 picas and the cropped depth is 4 inches. It will be used in a one-column, 13.5 -pica-wide space. STEP 1: Align the cropped width (18 picas) on the inner disk, with the reproduction width (13.5 picas) on the outer disk. STEP 2: Find the cropped depth (4 inches) on the inner disk and read the reproduction depth opposite it on the outer disk. The reproduction depth is 3 inches. The window on the inner disk displays the "percentage of original size." In the preceding example, the photograph will be reduced to 75 percent of the cropped size. Percentages less than 100 indicate a reduced size; those higher than 100 mean the photograph will be enlarged. If you work for a CE or funded newspaper, your printing contract may stipulate maximum reduction and enlargement percentages and sizes. Marking Photographs Photographs or other artwork must be marked appropriately so the publisher will know exactly what you want. Instructions are usually printed on the reverse of a photograph with a china marker. For instance, you mark a photograph "1-A, reduce to 24 picas by 5 inches" (width is always given first in art sizes). The "1-A" is a way of letting the publisher know you want the photograph to appear on page 1, fitted into a space designated "A" on the layout. It also tells the publisher that you have scaled the photograph, and when reproduced, it will occupy a space 24 picas wide and 5 inches deep; or you might simply use slugs to match a story with a related head, art and cutline. Usually, an editor devises the "key" system to be used. |
||
|
||