Custom Search
|
|
 
|
||
|
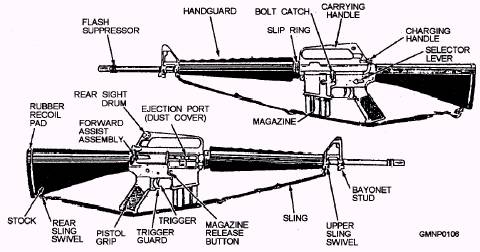
M16A1 RIFLE The M16A1 rifle (fig. 3-32) is a 5.56-mm (about .223-cal.) magazine-fed, gas-operated, air-cooled
Figure 3-32.-5.56-mm M16A1 rifle, left-and right-side views. 3-20
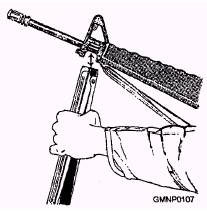
Figure 3-33.-Attaching the clothespin bipod to the M16A1 rifle. shoulder weapon. It is designed for either semiautomatic or fully automatic fire through the use of a selector lever. The original Ml 6 rifle was introduced for service in Vietnam by the U.S. Army in 1966 and was adopted by the Marine Corps in 1968 after the addition of the Al upgrade. The M16A1, which is the current version in use by the Navy, incorporates a forward assist mechanism. The forward assist was added to allow the operator to close the bolt completely should it hang up while feeding. Heavy use in dirty conditions with the close tolerances of the bolt mechanism combine to cause many such feeding problems. A "clothespin" bipod shown in figure 3-33 is used in the prone and foxhole positions. The bipod is attached to the barrel directly beneath the front sight between the bayonet lug and the front sling swivel. Clearing the M16A1 Rifle The first consideration in handling any weapon is to make it safe by clearing it. To clear the M16A1 rifle,
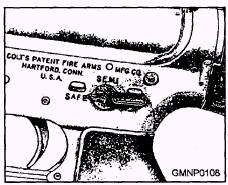
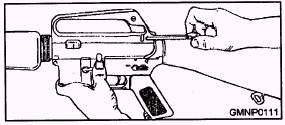
Figure 3-34.-Selector lever pointing to SAFE.
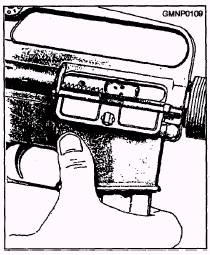
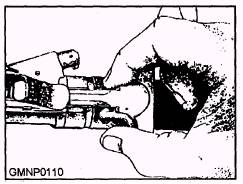
Figure 3-35.-Removing the magazine. place the butt against the right thigh and proceed as follows: 1. Attempt to point the selector lever toward SAFE, the position shown in figure 3-34. If the weapon is not cocked, the selector lever cannot be pointed toward SAFE. If this is the case, do not cock the weapon at this time; instead, goon to the next step in clearing. 2. Remove the magazine, as shown in figure 3-35. Grasp it with the right hand (fingers curled around the front of the magazine). Place the thumb on the. magazine catch button, apply pressure on the magazine catch button with the thumb, and pull the magazine straight out of the weapon. 3. Lock the bolt open, as shown in figures 3-36 and 3-37. Grasp the charging handle with the thumb and forefinger of the right hand, depress the charging handle latch with the right thumb, and pull to the rear (fig. 3-36). When the bolt is at the rear, press the bottom of the bolt catch with the thumb or forefinger of the left hand
Figure 3-36.-Pulling the charging handle rearward.
Figure 3-37.-Locking the bolt open. (fig. 3-37). Allow the bolt to move slowly forward until it engages the bolt catch, and then return the charging handle to its forward position. 4. Inspect the receiver and chamber of the weapon by looking through the ejection port to make sure these spaces contain no ammunition. 5. Check the selector lever to make sure it points toward SAFE, and then allow the bolt to go forward by depressing the upper portion of the bolt catch. CAUTION The selector must be in the SAFE position to prevent damage to the automatic sear. |
||
|
||