| Tweet |

Custom Search
|
|
 
|
||
|
Cure Date A cure date is as applicable to natural or synthetic O-rings as it is to rubber hoses. This date is the basis for determining the age of O-rings. It is extremely important that the cure date be noted on all packages.Shelf Life and Expiration Date All elastomers change gradually with age; some change more rapidly than others. The shelf life for rubber products is contained in MIL-HDBK-695. Check the age of natural or synthetic rubber preformed packings before installation to determine whether they are acceptable for use. Make a positive identification, indicating the source, cure date, and expiration date. Ensure that this information is available for all packing used. Shelf life requirements do not apply once the packing is installed in a component. The expiration date is the date after which packing should not be installed. The expiration date of all packings can be determined by adding the shelf life to the cure date.
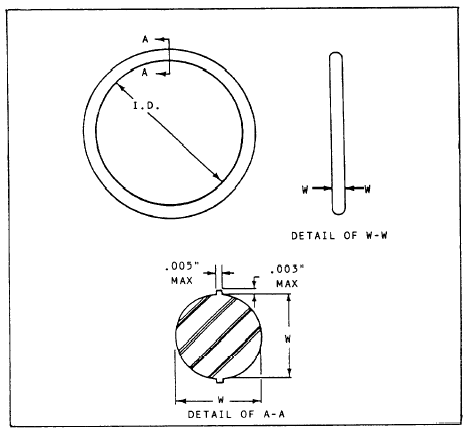
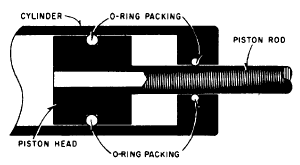
Figure 7-7.Critical dimensions of an O-ring. Replacement Figure 7-8 shows a typical O-ring installation. When such an installation shows signs of internal or external leakage, the component must be disassembled and the seals replaced. Sometimes components must be resealed because of the age limitations of the seals. The O-ring should also be replaced whenever a gland that has been in service is disassembled and reassembled. Often a poor O-ring installation begins when an old seal is removed. O-ring removal involves working with parts that have critical surface finishes. If hardened-steel, pointed, or sharp-edged tools are used for removal of O-rings or backup rings, scratches, abrasions, dents, and other deformities on critical sealing surfaces can result in seal failure which, in turn, can result in functional failure of When removing not use pointed or the equipment. or installing O-rings, do sharp-edged tools which might scratch or mar component surfaces or damage the O-ring. An O-ring tool kit is available in the supply system for O-ring in-stallation or removal. If these tools are not on hand, special tools can be made for this purpose. A few examples of tools used in the removal and installation of O-rings are illustrated in
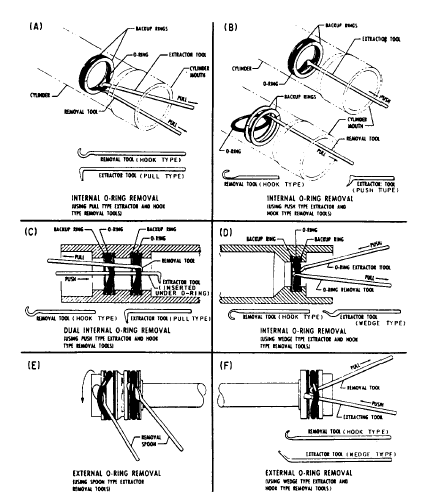
Figure 7-8.Typical O-ring instalation. figure 7-9. These tools should be fabricated from soft metal such as brass or aluminum; however, tools made from phenolic rod, wood, or plastic may also be used.Tool surfaces must be well rounded, polished, and free of burrs. Check the tools often, especially the surfaces that come in contact with O-ring grooves and critical polished surfaces.Notice in figure 7-9, view A, how the hook-type removal tool is positioned under the O-ring and then lifted to allow the extractor tool, as well as the removal tool, to pull the O-ring from its cavity. View B shows the use of another type of extractor tool in the removal of internally installed O-rings.In view C, notice the extractor tool positioned under both O-rings at the same time. This method of manipulating the tool positions both O-rings, which allows the hook-type removal tool to extract both O-rings with minimum effort. View D shows practically the same removal as view C, except for the use of a different type of extractor tool.The removal of external O-rings is less difficult than the removal of internally installed O-rings. Views E and F show the use of a spoon-type extractor, which is positioned under the seal. After the O-ring is dislodged from its cavity, the spoon is held stationary while the piston is simultaneously rotated and withdrawn. View F is similar to view E, except that only one O-ring is installed, and a different type of extractor tool is used. The wedge-type extractor tool is inserted beneath the O-ring; the hook-type removal tool hooks the O-ring. A slight pull on the latter tool removes the O-ring from its cavity.After removing all O-rings, cleaning of the affected parts that will receive new O-rings is
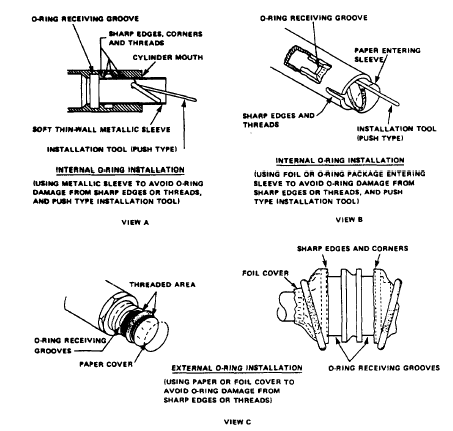
Figure 7-9.O-ring tools and O-ring removal. mandatory. Ensure that the area used for such installations is clean and free from all contamination. Remove each O-ring that is to be installed from its sealed package and inspect it for defects such as blemishes, abrasions, cuts, or punctures. Although an O-ring may appear perfect at first glance, slight surface flaws may exist. These are often capable of preventing satisfactory O-ring performance. O-rings should be rejected for flaws that will affect their performance. By rolling the ring on an inspection cone or dowel, the inner diameter surface can be checked for small cracks, particles of foreign material, and other irregularities that will cause leakage or shorten its life. The slight stretching of the ring when it is rolled inside out will help to reveal some defects not otherwise visible. A further check of each O-ring should be made by stretching it between the fingers, but care must be taken not to exceed the elastic limits of the rubber. Following these inspection practices will prove to be a maintenance economy. It is far more desirable to take care identifying and inspecting O-rings than to repeatedly overhaul components with faulty seals. After inspection and prior to installation, lubricate the O-ring, and all the surfaces that it must slide over with a light coat of the system fluid or a lubricant approved for use in the system. Consult the applicable technical instruction or Naval Ships Technical Manual for the correct lubricant for pneumatic systems.Assembly must be made with care so that the O-ring is properly placed in the groove and not damaged as the gland is closed. During some installations, such as on a piston, it will be necessary to stretch the O-ring. Stretch the O-ring as little and as uniformly as possible. Avoid rolling or twisting the O-ring when maneuvering it into place. Keep the position of the O-ring mold line constant. O-rings should not be left in a twisted condition after installation.If the O-ring installation requires spanning or inserting through sharp-threaded areas, ridges, slots, and edges, use protective measures, such as the O-ring entering sleeve (fig. 7-10, view A). If
Figure 7-10.O-ring installation. the recommended O-ring entering sleeve (a soft, thin wall, metallic sleeve) is not available, paper sleeves and covers may be fabricated by using the seal package (glossy side out) or lint-free bond paper (see views B and C of fig. 7-10). After you place the O-ring in the cavity provided, gently roll the O-ring with your fingers to remove any twist that might have occurred during the installation. After installation, an O-ring should seat snugly but freely in its groove. If backup rings are installed in the groove, be certain the backup rings are installed on the correct side of the ring.BACKUP RINGS Backup rings, also referred to as retainer rings, antiextrusion devices, and nonextrusion rings, are washer-like devices that are installed on the low-pressure side of packing to prevent extrusion of the packing material. Backup rings in dynamic seals minimize erosion of the packing materials and subsequent failure of the seal. At lower pressures, backup rings will prolong the normal wear life of the packing. At higher pressures, backup rings permit greater clearances between the moving parts. Normally, backup rings are required for operating pressures over 1500 psi. Backup rings can be made of polytetra-fluoroethylene, hard rubber, leather, and other materials. The most common material currently used is tetrafluoroethylene (TFE). Backup rings are available as single-turn continuous (uncut or solid), single-turn (bias) cut, and spiral cut. See figure 7-11. Leather rings are always furnished in solid ring form (unsplit). Rings of TFE are available in all three types. |
||
|
||