Custom Search
|
|
  |
|
|
Differentials in a properly operated vehicle seldom cause any maintenance problems. By maintaining the proper lubrication level and occasionally changing a seal or gasket, the assembly will normally last as long as the vehicle. The first hint of existing trouble is generally an unusual noise in the axle housing. To diagnose the trouble properly, you must determine the source of the noise and under what operating conditions the noise is most pronounced. Defective universal joints, rough wheel bearings, or tire noises may be improperly diagnosed by an inexperienced mechanic as differential trouble. Some clue may be gained as to the cause of trouble by noting whether the noise is a growl, hum, or knock; whether it is heard when the vehicle is operating on a straight road, or on turns only; and whether the noise is most noticeable when the engine is driving the vehicle or when it is coasting with the vehicle driving the engine.
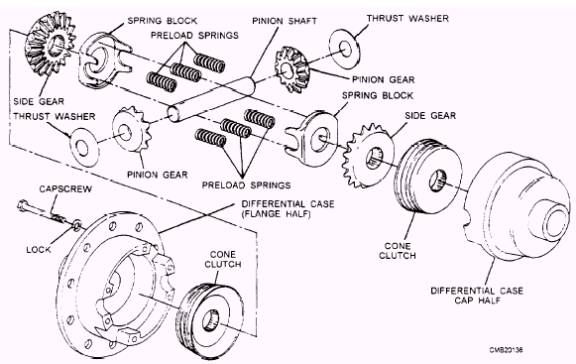
Figure 5-18.- Cone clutch limited slip differential. It is very easy to mistake tire noise for differential noise. Tire noise will vary according to the type of pavement the vehicle is being operated on, while differential noise will not. To confirm a doubt as to whether the noise is caused by tire or differential, drive the vehicle over various pavement surfaces. If the noise is present in the differential only when the vehicle is rounding a comer, the trouble is likely to be in the differential case. If the backlash (clearance) between the ring and pinion is too great, a CLUNKING sound is produced by the gears. For example, when an automatic transmission is shifted into drive, the abrupt rotation of the drive shaft can bring the gears together with a loud thump. The ring and pinion gears can become worn, scored, out of adjustment, or damaged. The problems can result from prolonged service, fatigue, and from lack of lubricant. You need to inspect the differential to determine whether adjustment or part replacement is required. A differential identification (ID) number is provided to show the exact type of differential for ordering parts and looking up specifications. The number may be on a tag under one of the carrier or inspection cover bolts; it also may be stamped on the housing or carrier. Use the ID number to find the axle type, axle ratio, make of the unit, and other information located in the service manual. Differential Lubricant Service When the manufacturer recommends that the differential fluid be replaced, remove the drain plug located on the bottom of the differential housing. Some differentials require the removal of the inspection cover to drain the lubricant. With all the fluid drained, replace the drain plug or inspection cover and refill with the proper lubricant. NOTE Always install the correct type of differential lubricant. Limited slip differentials often require a special type of lubricant for the friction clutches. Differential Removal, Disassembly, and Reassembly Procedures for removal, disassembly, and reassembly vary depending on the type of differential, make, and model. Always refer to the manufacturer's service manual. However, there are several procedures that relate to almost any type of differential. To remove a separate carrier differential, perform the following: Remove the drive shaft. Unbolt the nuts around the outside of the carrier. CAUTION To remove an integral differential, perform the following: Remove the drive shaft. With the cover off, inspect and MARK the The procedure for repairing a differential will vary with the particular unit. Always refer to the service manual. When using a service to repair a differential, remember the following: Check for markings before disassembly. The carrier caps, adjustment nuts, shims, ring and pinion, spider gears, and pinion yoke or flange should be installed exactly as they were removed. If needed. punch mark, label, or scribe these components so they can be reassembled properly. Clean all parts carefully and inspect them closely for damage. Rotate the pinion and case bearing by hand while checking for roughness. Inspect each bearing and race. Replace the bearing and race as a set if faulty. If the pinion gear has a collapsible spacer (device for preloading the pinion bearings), always replace. it. To avoid seal damage, use a seal driver. Coat the outside of the seal with a nonhardening sealer. Lubricate the inside of the seal using the proper grade of differential fluid. Make sure the seal lip faces the inside of the differential. When tightening the pinion yoke nut, clamp the yoke in a vise or use a special holding bar. Replace the ring and pinion gears as a set. Mesh and align the gear timing marks (painted lines or other markings) on the ring and pinion gears. This will match the proper teeth that have been lapped together at the factory. Torque all fasteners to specifications. Refer to the service manual for torque values. Use new gaskets and/ or approved sealer. Align all markings during reassembly. If you install the carrier caps backwards, for example, the caps can crush and damage the bearing and races. The differential could fail soon after it is returned to service. Use the service manual for detailed directions. |
|
|
|