Custom Search
|
|
  |
|
|
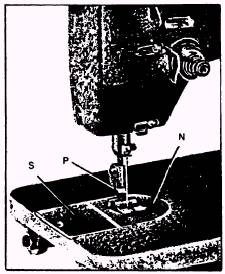
Straight and Zigzag Sewing Be sure that stops S1 and S2 are set at the extreme ends of their slot. If not, use a screwdriver to loosen them about one turn, and then tighten them in their extreme positions. Turning the zigzag regulating knob Z clockwise as far as it will go causes the machine to sew with a straight stitch. Turning this knob counterclockwise produces a zigzag stitch. The zigzag becomes wider the more this knob is turned in a counterclockwise direction. The widest zigzag stitch is sewn when knob Z cannot be turned any further. This occurs when the pointer at the underside of knob Z points at the largest number on the dial and is stopped by stop S2. When you want to control the width of the zigzag between certain minimum and maximum limits between the numbers on the dial, use a screwdriver to set stops S1 and S2 to the selected widths. Be sure to set stop S1 as far to the left as possible when a straight stitch is desired. NOTE: The zigzag regulating knob can be moved into any desired position while the machine is operating. Do not turn the zigzag regulating knob when the machine is at rest and the needle is in the material. If you do you may bend or break the needle. Turn the handwheel toward you to raise the needle out of the material before operating the regulating knob. Preparing the Machine for Rope Stitching (Model 99R-3 only) For rope stitching, the standard combination of presser foot, feed dog, and (throat) needle plate is replaced with a special set of components designed specifically for this purpose. To do this, move slide plate (S of fig. 9-47) as far to the left
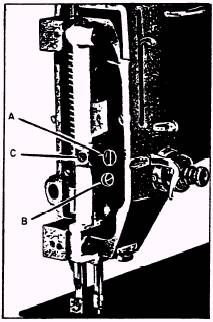
Figure 9-47.-Rope stitching. as it will go. Using a screwdriver, remove the two screws holding the needle plate (N) to the bed of the machine. Remove presser foot (P) from the presser bar and lift the needle plate off the bed. Now the feed dog becomes exposed. Loosen the two screws that attach the feed dog to its carrier, and remove the feed dog. Proceeding in reverse order, first install the special rope-sewing feed dog on the feed dog carrier, making certain that the two screws are tightened well. Next, put in place the special (throat) needle plate, and then the special presser foot, tightening all their screws securely, and close the slide plate. Adjust the stitch length and the width of zigzag to suit the rope to be sewn. Setting the Needle Bar at the Correct Height Before adjusting the height of the needle bar, make sure that the needle is pushed up into the needle bar as far as it will go. Now, remove the faceplate from the machine. Set the zigzag control knob for straight sewing and turn the handwheel toward you until the needle reaches the lowest point of its downward stroke. See that the needle enters the needle slot in the throat (needle) plate at the very center. When the needle is centered, proceed in the following manner: Remove the slide plate, needle (throat) plate and feed dog. Continue turning the handwheel toward you until the needle bar has risen approximately 3/32 inch above its lowest position. The point of the sewing hook should now be at the center of the needle at a distance approximately 3/32 inch above the eye. If adjustment should be required, loosen the setscrew (B of fig. 9-48) in the needle bar connecting stud to raise or lower the needle bar as may be necessary. Be sure to tighten the setscrew after making this adjustment. Centering the Needle in the Throat (Needle) Plate If the needle needs centering within the needle slot in the needle (throat) plate, set 239.457
Figure 9-48.-Setting needle bar. the machine for straight sewing and turn the handwheel toward you until the needle bar reaches the lowest point of its downward stroke. Loosen setscrew (C of fig. 9-48) and turn eccentric stud (A of fig. 9-48) until the needle is centered correctly. Retighten setscrew (C). Set the zigzag knob to the widest stitch position and turn the handwheel toward you. Observe the passage of the needle through the needle (throat) plate. It should pass at about an equal distance from either end of the needle slot when making the left and right zigzag stitch. If necessary, readjust the eccentric stud (A of fig. 9-48) as described before. |
 
|