Custom Search
|
|
  |
|
|
CONSEW 99R and 99R-3 SEWING MACHINE The Navy has recently acquired new model zigzag sewing machines (fig. 9-42), model 99R-3 is not shown, capable of the rope sewing needed to install the four-line release system. Two models are available-the 99R and the 99R-3. Both models are rotary hooktype machines. They are fairly conventional machines, and the operation of both is very similar to that of the machines we have already discussed. Models 99R and 99R-3 machines are identical in outward appearance; the difference is in the type of stitch they make. In model 99R, every successive stitch forms a symmetrical zigzag pattern stitch, type 304. In model 99R-3, a zigzag pattern is formed by successive pairs of stitches, type 308. Threading the 99R and 99R-3 Machines Follow the instructions below when threading the needle and bobbin on the 99R and 99R-3 sewing machines: 1. Turn the balance wheel toward you until you are able to position the needle so you can place the thread through its eye. Remember, always thread the needle toward the bobbin. In this case. you run the thread from front to back. 2. Hold the loose end of the needle thread in your left hand, turn the hand wheel toward you with your right hand until the needle moves down and up again to its highest position. 3. Pull the needle thread gently and the bobbin thread will come up with it through the hole in the needle plate. 4. Place both ends of the thread beneath and in back of the presser foot. 5. With the needle at its highest point, place the material to be sewn beneath the presser foot and fully lower the presser foot lifter lever. 6. Start sewing. Tension is the key word to good sewing. For perfect stitching, the tension of the upper and lower threads should be balanced and just sufficiently tight to lock both threads in the center of the material (look again at figure 9-16). The machine is correctly adjusted to make a perfect stitch before leaving the factory. When adjustments do become necessary, the problem is more likely to be caused by the upper thread tension, so always begin there. To adjust the upper thread tension, proceed as follows: 1. Lower the presser foot. Remember upper thread tension adjustments must be made with the presser foot down. 2. Check the upper thread tension. If it is loose, turn the tension nut (A in fig. 9-43)
Figure 9-43.-Upper thread tension. clockwise to increase the tension; if the upper thread tension is tight, turn the tension nut counterclockwise to loosen it. Adjusting the Bobbin Thread Tension When you find it necessary to adjust the bobbin thread tension, turn the tension screw (T of fig. 9-44) on the bobbin case clockwise to increase the tension, and turn the screw counterclockwise to decrease the tension. Regulating the Pressure of the Presser Foot The pressure of the presser foot should be adjusted according to the type of material being sewn. The heavier the material, the heavier the pressure. The lighter the material, the lighter the pressure. The pressure should be only heavy enough to prevent the material from rising with the needle and to enable the feeder mechanism to move the work along evenly. The pressure becomes tighter as the regulating thumbscrew is turned clockwise, and looser as the thumbscrew is turned counterclockwise (fig. 9-45).
Figure 9-44.-Bobbin thread tension.
Figure 9-45.-Adjusting the presser foot pressure.
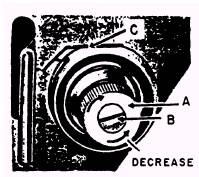
Figure 9-46.-Stitch regulator. Stitch Regulator and Reverse Sewing and Tacking For reverse sewing and tacking, proceed as follows: 1. When the number 1 on dial A of figure 9-46 is set uppermost on a vertical line, the feeder does not move the material. 2. When the dial (A) is turned counterclockwise and lever (B) is raised as far as it will go, the machine makes forward stitches, increasing in size as the dial knob is turned toward the larger numbers. 3. For reverse sewing, lower the lever (B) as far as it will go. 4. By moving the lever up and down during sewing, you can easily make forward or reverse stitches continuously and at will. You can make use of this feature for locking the thread at the start or end of seams. |
 
|