Custom Search
|
|
 
|
||
|
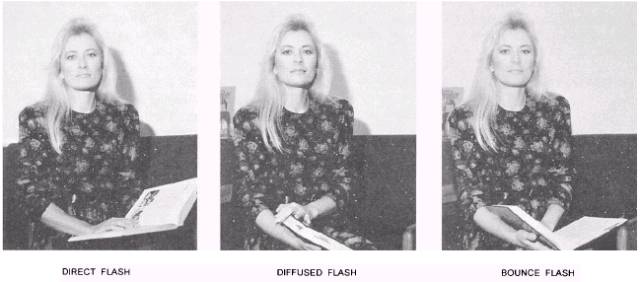
The majority of your indoor photographs will be produced using a single-flash unit. Numerous reenlistments, frockings, and promotion ceremonies are conducted indoors where the lighting conditions are unfavorable for available light photography. There are various methods in which a single flash can be used to produce high-quality professional photographs that distinguish you, the Photographer's Mate, from the amateur snapshooter. On Camera Flash A commonly used flash technique is to have the flash unit attached to the camera in synchronization with the shutter and aimed directly at a subject. An advantage of having your flash unit attached to the camera is it provides you the chance to capture the unexpected-the truly candid shot. When spontaneity sparks the action and quick-camera handling is a must, the fewer pieces of equipment you have to worry about or handle the better. Rather than two pieces of gear-the camera and the flash-you have only one-the camera with the flash attached to it; however, this technique usually produces objectionable shadows behind the subject. To help reduce the harshness of the shadows produced behind your subject when a single flash is used at the camera, place some diffusion material, such as a white handkerchief, cheesecloth, or frosted cellulose acetate, in front of the flash. Of course, diffusion reduces the intensity of the light, and the exposure has to be increased accordingly when using the manual mode on the flash unit. Most imaging facilities are equipped with flash brackets. When you are using a flash bracket, it is possible to rotate the flash when changing formats from horizontal to vertical. When shooting people in the vertical format using a flash unit, always position the flash above the lens. If the flash is below the lens, long objectional shadows are cast behind the subject, and the subject has an unnatural, eerie, sinister effect. Red Eye A result that may appear with direct flash is red eye. Red eye occurs in pictures of people and animals when the flash is used close to the optical axis of the lens and the subject is looking at the camera. Light reflecting from the blood vessels at the back of the eye causes this effect. The darker the room is, the stronger the effect, because the pupils of the eyes become more dilated. Red eye can easily be avoided by moving the flash away from the lens optical axis. Also, the effects of red eye can be minimized by turning up the room lights. Bounce Flash One of the better methods to illuminate a subject or scene with a single-flash unit is to use bounce flash. There are times when you want a very soft light in order to lessen the tonal range between highlights and shadows and to soften harsh background shadows. You can achieve this soft lighting by bouncing, or reflecting, the flash off a light-colored surface. By doing so, you are changing the narrow spot of light from a flash unit into a wide diffused area of light. When shooting color film, avoid colored walls and ceilings. They reflect their color onto the subject, causing a color cast over the entire subject area. You should use bounce flash in all
302.306 Figure 5-27. Effects of direct, diffused and bounce flash. situations where there is a 8- to 10-foot-white ceiling. Your photographs of reenlistments, frockings, awards, and so forth, will have a more pleasing effect. Most bounce flash pictures are made with the light directed at the ceiling, either above the photographer or above the subject, or somewhere between. A silhouette effect can be produced by bouncing your flash off the ceiling behind the subject. To accomplish this, aim your flash unit so most of the light bounced off the ceiling falls on the background behind the subject and calculate the exposure for the background. For the flattest bounce light, try bouncing the light off a wall behind the camera. With this lighting, you will have practically no shadows. Here, you have to calculate your exposure based on the flash-to-wall-to-subject distance. For side lighting, bounce your flash off a wall to the side of your subject. This type of lighting helps add a feeling of three dimensions to your picture. For the best control, use a large reflector designed for bounce lighting. Special-made reflectors are available that are lightweight, compact, and portable. For closeup work, the best bounce reflector is about 3 by 4 feet square. For full-length subjects, try a reflector about 6 by 6 feet. To determine the exposure for bounce flash using the manual mode on your flash, you must determine the flash-to-ceiling-to-subject distance and determine your f/stop and then open the aperture two additional f/stops. The two additional f/stops are added to compensate for loss of light due to scattering and absorption by the reflecting surface. When an automatic flash is used in the automatic mode, it is not necessary to open up two f/stops. The sensor automatically cuts off when the proper amount of light is reflected from the subject to the flash unit. When the ceiling is high or dark, a compensation to the basic exposure may be required. For effective use of the bounce-flash technique, a considerable amount of practice is required. As with any flash photography technique, identify any areas or surfaces that may be potential problems. Remember, one of the basic principles of reflected light is that the angle of incidence is equal to the angle of reflectance. Highly polished or glass surfaces should be considered before the subject is photographed. Items, such as windows, glass tabletops, glass framed photographs and polished metal, can cause glare or a hot spot in your photograph. When you are using bounce lighting techniques, hot spots of vertical surfaces are normally prevented, because the light source striking the surface is angled from above or the side; however, when you are using bounce lighting techniques, horizontal surfaces, such as glass coffee tables and overhead light fixtures, can cause a strange diffused lighting pattern in the photograph. When using a single, on-camera flash, experiment with direct, diffused, and bounce-flash techniques and determine which method provides the best results under various conditions. The method you choose to light the same subject separates you from the average snapshot shooter (fig. 5-27). |
 |
|
|
||