Custom Search
|
|
 
|
|||||||||||||||||||||||||||||||||||||||||||||||||||||||||||||||||||
|
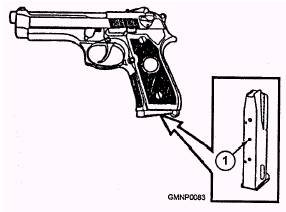
9-MM M9 SEMIAUTOMATIC PISTOL The 9-mm M9 pistol (fig. 3-8) is a single- or double-action, short-recoil-operated, semiautomatic, magazine-fed, self-loading handgun with fixed sights. The M9 is primarily designed as a personal defense side arm for guards, sentries, and boarding and landing parties. The M9 is chambered for the 9-mm cartridge. The magazine (fig. 3-9) is a staggered, steel constructed, aluminum follower and removable floor plate. It has a capacity of 15 rounds, which is more than double the traditional single-line magazine of the same length. Empty, the pistol weighs approximately 2.1 pounds. It has a maximum range of 1,962.2 yards (1,800 meters) and a maximum effective range of 54.7 yards (50 meters). Operation The M9 pistol has a short recoil system, using a falling locking block. The pressure delveloped by the expanding gases of a fired round recoils the slide and barrel assembly. After a short distance, the locking block is disengaged from the slide, the barrrel stops against the frame, and the slide continues its rearward
Figure 3-8.-9-mm M9 semiautomatic pistol. movement. The slide then extracts and ejects the fired cartridge case, cocks the hammer, and compresses the recoil spring. The slide moves forward, stripping the next cartridge from the magazine, and feeds it into the chamber. After the last cartridge has been fired and ejected, the slide and barrel assembly will remain open by the magazine follower pressing up on the slide stop lever. Disassembly Disassembly of the M9 is to be conducted according to the current 3-M Systems MRCs. Detailed disassembly is not normally conducted by
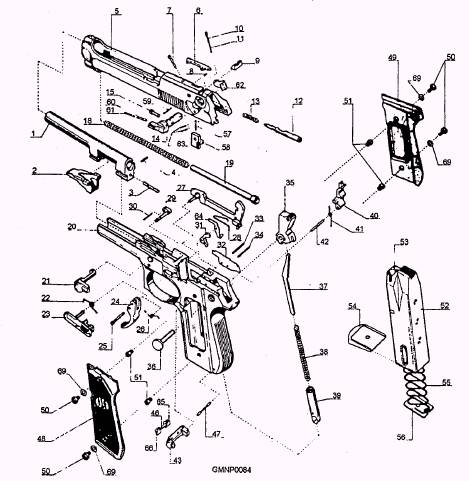
Figure 3-9.-M9) magazine. the GM armorer. General disassembly (field stripping) will only be discussed in this section. A detailed disassembly, as shown in figure 3-10
Figure 3-10.-Detailed disassembly of the 9-mm M9 pistol. Table 3-1.-Part Number Nomenclature
Figure 3-11.-disassembly lever release button. and table 3-1, is shown for parts identification. The M9 is designed for ease of field stripping under adverse conditions. With practice, field stripping can be performed in seconds. Ensure that the magazine is removed and the pistol is unloaded. The pistol can be disassembled and assembled with the safety in the ON or OFF position. For safety, and to prevent damage to the pistol, always engage the safety (ON position, warning dots covered, DOWN position) before disassembly and assembly. To field-strip the M9, hold the pistol in the right hand with the muzzle slightly elevated. With the forefinger, press the disassembly lever release button (fig. 3-11), and with the thumb, rotate the disassembly lever (fig. 3-12) downward until it stops. Pull the slide and barrel assembly (fig. 3-13) forward and remove it from the receiver assembly. |
 |
||||||||||||||||||||||||||||||||||||||||||||||||||||||||||||||||||
|
|||||||||||||||||||||||||||||||||||||||||||||||||||||||||||||||||||