Custom Search
|
|
  |
|
|
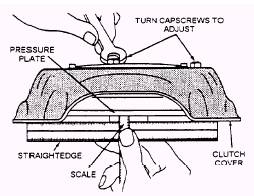
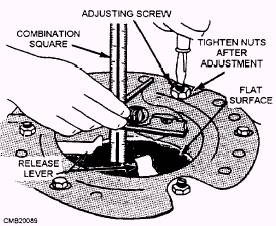
When adjustment or repair of the linkage fails to remedy problems with the clutch, the clutch must be removed for inspection. Any faulty parts should be discarded and replaced with new or rebuilt components. If replacement parts are not readily available, a decision to use the old components should be based on the manufacturer's recommendations and the maintenance supervisor. Transmission or transaxle removal is required to service the clutch. Always follow the detailed directions in the service manual. To remove the clutch in a rear-wheel drive vehicle, remove the drive shaft, the clutch fork, the clutch release mechanism, and the transmission. With a front-wheel drive vehicle, the axle shafts (drive axles), the transaxle, and, in some cases, the engine must be removed for clutch repairs. WARNING After removal of the transmission or transaxle, remove the clutch housing from the rear of the engine. Support the housing as you remove the last bolt. Be careful not to drop the clutch housing as you pull it away from the dowel pins. Using a hammer and a center punch, mark the pressure plate and flywheel. These marks are needed when reinstalling the same pressure plate to assure correct balancing of the clutch. With the clutch removed, all components are to be cleaned and inspected for wear and damage. After cleaning, you should inspect the flywheel and pressure plate for signs of unusual wear, such as scoring or cracks. A straightedge should be used to check for war-page of the pressure plate. Using a dial indicator, measure the runout of the flywheel. The pressure plate release levers should show very limited or no signs of wear from contact with the release bearing. If excessive wear, cracks, or warpage is noted on the flywheel and/ or pressure plate, the assembly should be replaced. This is also a good time to inspect the ring gear teeth on the flywheel. If they are worn or chipped, a new ring gear should be installed. NOTE Be careful how you clean the parts of the clutch. Avoid using compressed air to blow clutch dust from the parts. A clutch disc con-tains asbestos- a cancer-causing substance. While inspecting the flywheel, you should check the pilot bearing in the end of the crankshaft. A worn pilot bearing will allow the transmission input shaft and clutch disc to wobble up and down. Using a telescoping gauge and a micrometer, measure the amount of wear in the bushing. For wear measurements of the pilot bearing, refer to the service manual. If a roller bearing is used, rotate them. They should turn freely and show no signs of rough movement. If replacement of the pilot bearing is required, the use of a slide hammer puller will drive the bearing out of the crankshaft end. Before installing a new pilot bearing, check the fit by sliding it over the input shaft of the transmission. Then drive the new bearing into the end of the crankshaft. Inspect the disc for wear; inspect the depth of the rivet holes, loose rivets, and worn or broken torsion springs. Check the splines in the clutch disc hub for a "like new" condition. The clutch shaft splines should be inspected by placing the disc on the clutch shaft and sliding it over the splines. The disk should move relatively free back and forth without any unusual tightness or binding. Normally, the clutch disc is replaced anytime the clutch is tom down for repairs. Another area to inspect is the release bearing. The release bearing and sleeve is usually sealed and factory packed (lubricated). A bad release bearing will produce a grinding noise whenever the clutch pedal is pushed down. To check the action of the release bearing, insert your fingers into the bearing; then turn the bearing while pushing on it. Try to detect any roughness; it should rotate smoothly. Also, inspect the spring clip on the release bearing or fork. If bent, worn, or fatigued, the bearing or fork must be replaced. The last area to check before reassembly is the clutch fork. If it is bent or worn, the fork can prevent the clutch from releasing properly. Inspect both ends of the fork closely. Also, inspect the clutch fork pivot point in the clutch housing; the pivot ball or bracket should be undamaged and tight. When a new pressure plate is installed, do not forget to check the plate for proper adjustments. These adjustments will ensure proper operation of the pressure plate. The first adjustment ensures proper movement of the pressure plate in relation to the cover. With the use of a straightedge and a scale as shown in figure 4-11, begin turning the adjusting screws until you obtain the proper clearance between the straight-edge and the plate as shown. For exact measurements, refer to the manufacturer's service manual. The second adjustment positions the release levers and allows the release bearing to contact the levers simultaneously while maintaining adequate clearance of the levers and disc or pressure plate cover. This adjustment is known as finger height. To adjust the pressure plate, place the assembly on a flat surface and measure the height of the levers, as shown in figure 4-12. Adjust it by loosening the locknut and turning. After the proper height has been set, make sure the locknuts are locked and staked with a punch to keep them from coming loose during operations. Exact release lever height can be found in the manufacturer's service manual. Reassemble the clutch in the reverse order of disassembly. Mount the clutch disc and pressure plate on the flywheel. Make sure the disc is facing in the right direction. Usually, the disc's offset center (hub and torsion springs) fit into the pressure plate.
Figure 4-11.- Pressure plate adjustment.
Figure 4-12.- Pressure plate release lever adjustment. If reinstalling, the old pressure plate lines up the alignment marks made before disassembly. Start all of the pressure plates bolts by hand. Never replace a clutch pressure plate bolt with a weaker bolt. Always install the special case-hardened bolt recommended by the manufacturer. Use a clutch alignment tool to center the clutch disc on the flywheel. If an alignment tool is unavailable, an old clutch shaft from the same type of vehicle may be used. Tighten each pressure plate bolt a little at a time in a crisscross pattern. This will apply equal pressure on each bolt, as the pressure plate spring( s) are compressed. When the bolts are snugly in place, torque them to the manufacturer's specifications found in the service manual. Once the pressure plates bolts are torqued to specs, slide out the alignment tool. Without the clutch disc being centered, it is almost impossible to install the transmission or transaxle. Next install the clutch fork and release bearing in the clutch housing. Fit the clutch housing over the rear of the engine. Dowels are provided to align the housing on the engine. Install and tighten the bolts in a crisscross manner. Install the transmission and drive shaft or the transaxle and axle shafts. Reconnect the linkages, the cables, any wiring, the battery, and any other parts required for disassembly. After all parts have been installed, adjust the clutch pedal free travel as prescribed by the manufacturer and test-drive the vehicle for proper operation. |
 |
|
|