|
||
|
|
||
| |||||||||||||||
|
|
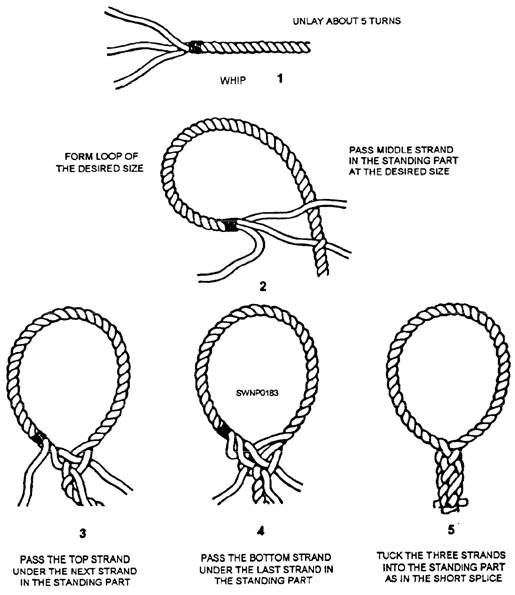
SPLICING FIBER LINE When it is necessary to join lengths of line, a splice, rather than a knot, should be used. A properly made short splice will retain up to 100 percent of the strength of the line, while a knot will retain only 50 percent. "Splicing" means the joining of two separate lines. It also means the retracing of the unlaid strand of the line back through its own strands in the standing part of the line. Four general types of splices in fiber line are commonly used in rigging work. They are the eye splice, short splice, long splice, and back splice. Once you learn how to make one type, the others should not be difficult. Eye Splice The principal use of an EYE SPLICE is to make an eye in the end of a line. The eye is useful in fastening the line to a ring or hook. It can also be made up with a thimble. A thimble is a grooved ring that may be set in the eye of a line to prevent chafing. The eye splice is estimated as being 90 percent as strong as the line itself. To make an eye splice, you UNLAY (untwist) the strands in the end of your line about five turns, and splice them into the standing part of the line by TUCKING the unlaid strands from the end into the standing part. An original round of tucks plus two more complete rounds is enough for an ordinary eye splice. With large lines, you must whip the ends of your strands before you start; otherwise, they will frazzle out and cause you trouble. Large lines must also be seized at the point where unlaying stops or you will have trouble working them. With any lineup to about 2 inches (50 mm), you can open the strands in the standing part with your fingers. With larger lines, you use the fid. A fid is a tapered and pointed tool made from maple, hickory, or other hardwood. Figure 4-23 shows you the knack of working the fid in making an eye splice. Lay your line out along the deck with the end to your right. Bend it back until your eye is the size you want it, and shove the fid through the standing part at the right spot to raise the top strand. Shove the fid through the rope AWAY from you with your right hand as you hold the line with your left. Take the raised strand with your
Figure 4-23.-Working the fid left finger and thumb and hold it up while you pull out the fid. Drop the fid, pick up the proper strand in the end, and tuck it through the raised strand from outboard TOWARD you, as shown in the figure. Your first round of tucks must be taken in proper order or you will come out all fouled up. Separate the strands in the end and hold them up, as shown in figure 4-24, view 1. The middle strand facing you always tucks first. Be sure you keep the right-hand strand (view 2) on the side of the line which is toward you. You tuck that one next, over the strand you just tucked the other one under, and under the strand just below it (view 3). Now turn the whole thing over. You can see (view 4) that you now have only one strand from the end left untucked, and only one strand in the standing part that does not already have a strand under it. Be sure you tuck your last strand also from outboard toward you, as shown in view 5. The first round of tucks is the big secret. The rest is easy. Simply tuck each strand from the end over the strand of the standing part which it is now above, and under the next strand below that one, until you have
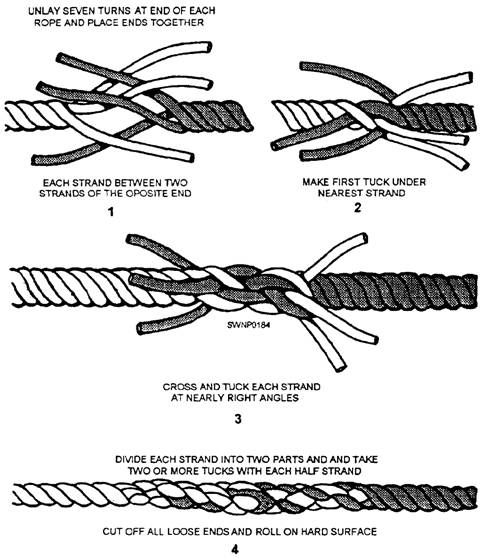
Figure 4-24.-Making an eye splice. tucked each strand twice more besides the original tuck. Three tucks to each strand in all is enough. Short Splice In a SHORT SPLICE, the ends of a line are joined together or the ends of two different lines are joined, causing an increase in the diameter of the line for a short distance. This splice should NOT be used where the increase in the diameter of the line would affect operation. One purpose for which you may find the short splice especially useful is in making endless slings. It is also used for making straps. Slings and straps are made of pieces of line with their own ends short-spliced together. Where possible, a short splice, rather than a long splice, should be used. The reason is that the short splice requires less line and can be fashioned quicker than the long splice. In making a short splice, unlay both ends of the lines about seven turns (fig. 4-25, view 1) and put a temporary whipping on each of the loose strands. The next step involves "marrying" the ends together. In marrying, the technique is to interlace the loose strands of one line with the loose strands of the other line. When this is completed properly, each loose strand should be between the two loose strands of the other line. With the strands in this manner, start making the tucks, following the principle of "over one and under one" (view 2). One side of the splice car be made with three tucks, and then the other side will be made identically. Three complete tucks of each
Figure 4-25.-Making a short splice. strand should be sufficient to ensure a safe splice (view 3). As a finishing touch, cut off all loose ends and roll and pound the splice on a hard surface (view 4). Long Splice In a LONG SPLICE, either the ends of a line are joined together or the ends of two different lines are joined without increasing the diameter of the line. The strength of a properly made long splice will be equal to that of the line itself. The long splice is ideal for joining two lines where the line will be run over pulleys in a block. A short-spliced line would not serve this purpose since the diameter of the line at the point of splicing is larger than that of the remaining portion and may not pass over the pulleys in the block properly. The long splice also has a neater appearance than the short splice. To make a long splice, unlay the ends about 15 turns and arrange the strands as shown in figure 4-26, view 1. Using two opposing strands, begin unlaying one and follow immediately laying its opposing strand tight into the left groove (fig. 4-26, view 2). Be sure you choose the correct pairs of strands for opposites. This is important. To determine the correct pair, try laying one of the tucking ends into the opposite standing line. The strand that this tucking end tends to push out and replace will be the correct opposing strand. In the process of replacing one strand with its opposing tucking end, keep a close watch on the marriage back at the starting place. If the other loose tucking ends are allowed too much freedom, they will divorce themselves from the original marriage. This creates quite a puzzle for the splicer due to the fact that the lines do not fit up correctly, and no matter which two strands are chosen, the splicer seems to end up with a stranger between them or else the last tucking ends have two strands between them. Therefore, it is important to keep the marriage intact when replacing
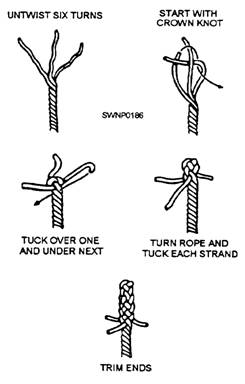
Figure 4-26.-Making a long splice. one strand with another. Cut off all the remainders of the ends close up, then roll and pound the line so the tucks will settle in tight. As soon as you have gone far enough with the first tucking end to have its end left to make an overhand knot and two tucks, stop and tie the ends together. This procedure must be done in the correct direction; the ends must stand out away from the standing part, not alongside. Now, select two more opposing strands from the marriage in the same manner as before. Be careful to pick the correct two strands. Proceed to unlay and replace (DOWN TIGHT) as you did the first pair-this time in the opposite direction. When the proper place is reached, tie a knot (view 3). You now have two opposing strands with which you have nothing to do but make an overhand knot. If at this point there happens to be a standing strand running between them, a wrong choice has been made in choosing opposing strands (pairs) during one of the first two steps. The solution is to bring one or the other of these first two back and redo it with the correct pair. When completed, the splice should look similar to the example shown in view 4. After all three overhand knots have been correctly tied, then start tucking all the loose ends over one and under one, twice each. Cut off all the remainders of the ends close up, then roll and pound the line so the tucks will settle in tight. When completed, the splice will look like view 4. Back Splice In a BACK SPLICE, the strands at the end of a line are spliced back into its own strands. This splice is used to prevent a line from unlaying or unraveling when an enlargement at the end of the line is not objectionable. The back splice starts from a crown knot. The procedure for making aback splice is shown in figure 4-27. After you have hauled the crown down tight by heaving on each of the three strands, proceed to lay up the back splice. This merely requires splicing the three loose strands back into the line, following the
Figure 4-27.-Making a back splice same principle as with the eye and short splice-over one and under one. Because the back splice leaves a lump in the line, it should not be used where there is a possibility of the enlarged end hanging up, as might be the case if it were run through hoisting blocks. SPLICING NYLON LINE Nylon line can hold a load even when many strands are abraded. Normal] y, when abrasion is local, the line may be restored to use by cutting away the chafed section and splicing the ends. Chafing and stretching do not necessarily affect the load-carrying ability of nylon line. The splicing of nylon line is similar to that of manila; however, friction tape is used instead of seizing stuff for whipping the strands and line. Because it is smooth and elastic, nylon line requires at least one tuck more than does manila. For heavy loads, a back tuck should be taken with each strand. |
|
Privacy Statement - Press Release - Copyright Information. - Contact Us - Support Integrated Publishing |