|
||
|
|
||
| |||||||||||||||
|
|
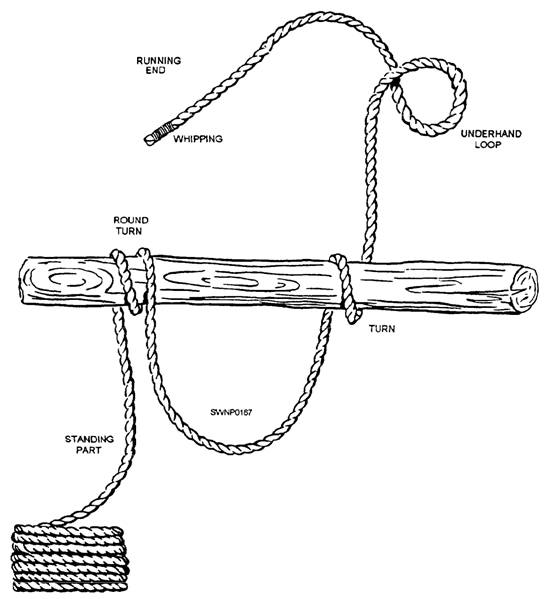
KNOTS, BENDS, AND HITCHES The term knot is usually applied to any tie or fastening formed with a cord, rope, or line. In a general sense, it includes the words bends and hitches. Line Parts A BEND is used to fasten two lines together or to fasten a line to a ring or loop. A HITCH is used to fasten a line around a timber or spar, so it will hold temporarily but can be readily untied. Many ties, which are strictly bends, have come to be known as knots; hence, we will refer to them as knots in this discussion. Knots, bends, and hitches are made from three fundamental elements: a bight, a loop, and a round turn. Observe figure 4-8 closely and you should experience no difficulty in making these three elements. Note that the free or working end of a line is known as the RUNNING END. The remainder of the line is called the STANDING PART. NOTE: A good knot is one that is tied rapidly, holds fast when pulled tight, and is untied easily. In addition to the knots, bends, and hitches described in the following paragraphs, you may have need of others in steelworking. When you understand how to make those covered in this chapter, you should find it fairly easy to learn the procedure for other types. Overhand Knot The OVERHAND KNOT is considered the simplest of all knots to make. To tie this knot, pass the hose end of a line over the standing part and through the loop that has been formed. Figure 4-9 shows you what it looks like. The overhand knot is often used as a part of another knot. At times, it may also be used to keep the end of a line from untwisting or to form a knob at the end of a line.
Figure 4-8.-Elements of knots, bends, and hitches
Figure-Eight Knot The FIGURE-EIGHT KNOT is used to form a larger knot than would be formed by an overhand knot in the end of a line (fig. 4-10). A figure-eight knot is used in the end of a line to prevent the end from slipping through a fastening or loop in another line. To make the figure-eight knot, make a loop in the standing part, pass the running end around the standing part, back over one side of the loop and down through the loop, and pull tight. Square Knot The SQUARE KNOT, also called the REEF KNOT, is an ideal selection for tying two lines of the same size together so they will not slip. To tie a square
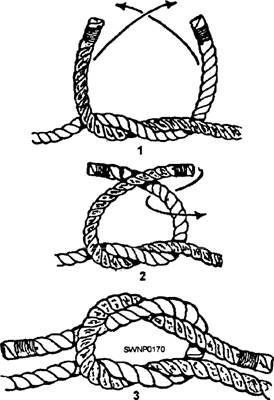
Figure 4-10.-Figure-eight knot knot, first bring the two ends of the line together and make an overhand knot. Then form another overhand knot in the opposite direction, as shown in figure 4-11. NOTE: A good rule to follow for a square knot is left over right and right over left. When tying a square knot, make sure the two overhand knots are parallel. `his means that each running end must come out parallel to the standing part of its own line. If your knot fails to meet this test, you have tied what is known as a "granny." A granny knot should NEVER be used; it is unsafe because it will slip under strain. A true square knot instead of slipping under strain will only draw tighter. Sheepshank The SHEEPSHANK is generally thought of as merely a means to shorten a line, but, in an emergency, it can also be used to take the load off a weak spot in the line. To make a sheepshank, form two bights
Figure 4-11.-Square knot. (fig. 4-12, view 1). Then take a half hitch around each bight (views 2 and 3). In case you are using the sheepshank to take the load off a weak spot, make sure the spot is in the part of the line indicated by the arrow in view 2. Bowline The BOWLINE is especially useful when you need a temporary eye in the end of a line. It will neither slip nor jam and can be untied easily. To tie a bowline, follow the procedure shown in figure 4-13. The FRENCH BOWLINE is sometimes used to lift or hoist injured personnel. When the french bowline is used for this purpose, it has two loops which are adjustable, so even an unconscious person can be lifted safely. One loop serves as a se at for the person, while the other loop goes around the body under the person's arms. The weight of the person keeps both loops tight and prevents the person from falling. The procedure to follow in making the french bowline is shown in figure 4-14. Spanish Bowline The SPANISH BOWLINE is useful in rescue work, especially as a substitute for the boatswain's chair. It may also be used to give a twofold grip for lifting a pipe or other round object in a sling. Many people prefer the spanish bowline to the french bowline because the bights are set and will not slip
Figure 4-12.-Sheepshank.
Figure 4-13.-Bowline.
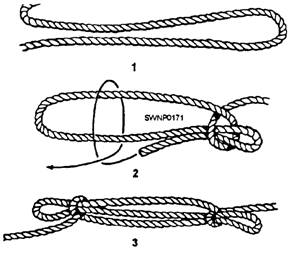
Figure 4-14.-French bowline. back and forth (as in the french bowline) when the weight is shifted. To tie a spanish bowline, take a bight and bend it back away from you (fig. 4-15, view 1), forming two bights. Then lap one bight over the other (view 2). Next, grasp the two bights where they cross at (a) in view 2. Fold this part down toward you, forming four bights (view 3). Next, pass bight (c) through bight (e) and bight (d) through bight (f) (view 4). The complete knot is shown in view 5. Running Bowline The RUNNING BOWLINE is a good knot to use in situations that call for a lasso. To form this knot, start by making a bight with an overhand loop in the running end (fig. 4-16, view 1). Now, pass the running end of the line under and around the standing part and then under one side of the loop (view 2). Next, pass the running end through the loop, under and over the side of the bight, and back through the loop (view 3).
Figure 4-15.-Spanish bowline
Figure 4-16.-Running bowline.
Figure 4-17.-Becket bend. Becket Bend An especially good knot for bending together two lines that are unequal in size is the type known as the BECKET BEND. The simple procedure and necessary instructions for tying a becket, single and double, are given in figure 4-17. Clove Hitch When it comes to bending to a timber or spar or anything that is round or nearly round, the familiar CLOVE HITCH is an ideal selection. Figure 4-18 shows how this knot is made. A clove hitch will not j am or pull out; however, if a clove hitch is slack, it might work itself out, and for that reason, it is a good idea to make a HALF HITCH in the end, as shown in figure 4-19, view 1. A half hitch never becomes a whole hitch. Add a second one and all you have is two half hitches, as shown in figure 4-19, view 2. The SCAFFOLD HITCH is used to support the end of a scaffold plank with a single line. To make the scaffold hitch, lay the running end across the top and around the plank, then up and over the standing
Figure 4-18.-Clove hitch.
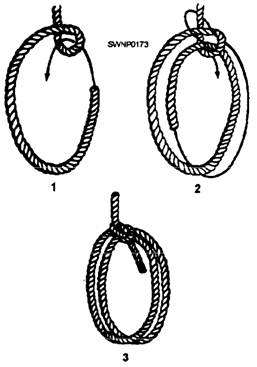
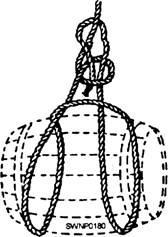
Figure 4-19.-Half hitch. part (fig. 4-20, view 1). Bring a doubled portion of the running end back under the plank (view 2) to form a bight at the opposite side of the plank. The running end is taken back across the top of the plank (view 3) until it can be passed through the bight. Make a loop in the standing part (view 4) above the plank. Pass the running end through the loop and around the standing part and back through the loop (view 5). Barrel Hitch A BARREL HITCH can be used to lift a barrel or other rounded object that is either in a horizontal or a vertical position. To sling a barrel horizontally (fig. 4-21), start by making a bowline with a long bight. Then bring the line at the bottom of the bight up over
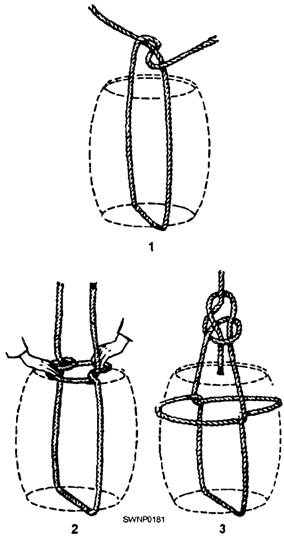
Figure 4-21.-Barrel hitch. the sides of the bight. To complete the hitch, place the two "ears" thus formed over the end of the barrel. To sling a barrel vertically, pass the line under the bottom of the barrel, bring it up to the top, and then form an overhand knot (fig. 4-22, view 1). While maintaining a slight tension on the line, grasp the two
Figure 4-22.-A vertical barrel hitch. parts of the overhand knot (fig. 4-22, view 2) and pull them down over the sides of the barrel. Finally, pull the line snug and make a bowline over the top of the barrel (fig. 4-22, view 3). |
|
Privacy Statement - Press Release - Copyright Information. - Contact Us - Support Integrated Publishing |