|
||
|
|
||
|
Page Title:
PIPE FITTING AND LAYOUT OPERATIONS |
||
| |||||||||||||||
|
|
PIPE FITTING AND LAYOUT OPERATIONS Lack of templates, charts, and mathematical formulas need not hinder you in pipe layout. In emergencies, welded pipe of equal diameter can be laid out in the field quickly and easily. By using the methods described here and a few simple tools, you can lay out branches and Y connections as well as turns of any angle, radius, and number of segments. The few simple tools required are both readily available and familiar to the Steelworker through almost daily use. A framing square, a bevel protractor with a 12-inch (20-cm) blade, a spirit level, a spring steel wraparound (or tape), a center punch, a hammer, and a soapstone will meet all needs. (A stiff strip of cardboard or a tin sheet about 3 inches [7.5 cm] wide also makes a good wraparound.) For purposes of our discussion, the long part of the framing square is referred to as the BLADE and the short part as the TONGUE. LAYOUT OPERATIONS Two methods of pipe layout are commonly used. They are the one-shot method and the shop method. The ONE-SHOT method is used in the field. With this
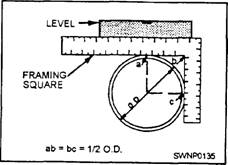
Figure 3-41.-Erection and assembly marks. method, you use hand tools and make your layout on the pipe to be cut. The one-shot method is so named because you only use it once. In the SHOP METHOD you will make templates for pieces that are going to be duplicated in quantity. As an example, a job order comes into the shop for 25 pieces of 6-inch (15-cm) pipe-all cut at the same angle. Obviously, it would be time consuming to use the one-shot method to produce 25 pieces; hence the shop method is used for laying out. Patterns can be made of template paper or thin-gauge sheet metal. The major advantage of thin-gauge sheet metal templates is when you are finished with them they can be stored for later use. Keep in mind that all pipe turns are measured by the number of degrees by which they turn from the course set by the adjacent straight section. The angle is measured between the center line of the intersecting sections of pipe. Branch connections are measured in angle of turnaway from the main line. For example, a 60-degree branch is so-called because the angle between the center line of the main pipe and the center line of the branch connection measures 60 degrees. Turns are designated by the number of degrees by which they deviate from a straight line. QUARTERING THE PIPE Inlaying out any joint, the first step is to establish reference points or lines from which additional measurements or markings can be made. This is done by locating a center line and dividing the outside circumference of the pipe into 90-degree segments, or quarters. The framing square, the spirit level, and the soapstone are used in these procedures in the following manner: Block the pipe so it cannot move or roll; then place the inside angle of the square against the pipe and level one leg. One point on the centerline is then under the scale at a distance of half the outside diameter of the pipe from the inside angle of the square (fig. 3-42). Repeating at another part of the pipe will
Figure 3-42.-Locating the top and side quarter points. locate two points and hence the center line. By this same method, the quarter points also may be located This operation is a must before any layout with the field method. If you are using a long piece of pipe and are going to cut both ends in addition to the square, you will need a piece of carpenter's chalk line with a plumb bob on each end and two 24- or 36-inch (60- or 90-cm)-flat steel rules (depending on the diameter of the pipe) to locate the top and the bottom center lines. Figure 3-43 shows a plumb bob and rules being used to locate the top and the bottom center lines. Another one-shot method of quartering pipe is to take a strip of paper and wrap it around the pipe and tear or cut the part that overlaps. The ends should touch. Remove the paper from the pipe and fold it in half, as shown in figure 3-44, view A. Then double the strip once again, as shown in view B. This will divide your strip into four equal parts. Place the strip of paper around the pipe. At the crease marks and where the ends meet, mark the pipe with soapstone and your pipe will be quartered. |
|
Privacy Statement - Press Release - Copyright Information. - Contact Us - Support Integrated Publishing |