|
||
|
|
||
| |||||||||||||||
|
|
HORIZONTAL-POSITION WELDING You will discover that it is impossible to weld all pieces in the flat position. Often the work must be done in the horizontal position. The horizontal position has two basic forms, depending upon whether it is used with a groove weld or a fillet weld. In a groove weld, the axis of the weld lies in a relative horizontal plane and the face of the weld is in a vertical plane (fig. 7-22). In a fillet weld, the welding is performed on the upper side of a relatively horizontal surface and against an approximately vertical plane (fig. 7-23).
Figure 7-24.-Horizontal welding angles.
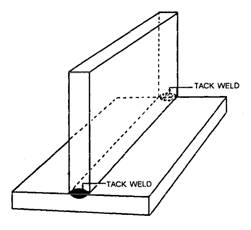
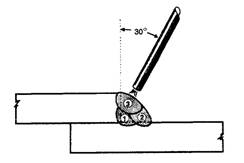
Figure 7-25.-Tack-weld to hold the tee joint elements in place. An inexperienced welder usually finds the horizontal position of are welding difficult, at least until he has developed a fair degree of skill in applying the proper technique. The primary difficulty is that in this position you have no "shoulder" of previously deposited weld metal to hold the molten metal. Electrode Movement In horizontal welding, position the electrode so that it points upward at a 5- to 10-degree angle in conjunction with a 20-degree travel angle (fig. 7-24). Use a narrow weaving motion in laying the bead. This weaving motion distributes the heat evenly, reducing the tendency of the molten puddle to sag. You should use the shortest are length possible, and when the force of the are undercuts the plate at the top of the bead, lower the electrode holder a little to increase the upward angle.
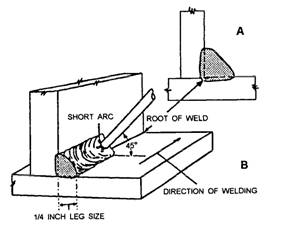
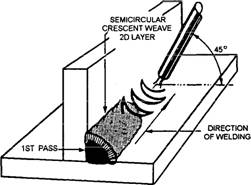
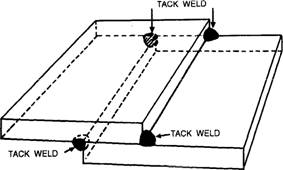
Figure 7-26.-Position of electrode and fusion area of fillet weld on a tee joint. As you move in and out of the crater, pause slightly each time you return. This keeps the crater small and the bead has less tendency to sag. Joint Type Horizontal-position welding can be used on most types of joints. The most common types of joints it is used on are tee joints, lap joints, and butt joints. TEE JOINTS.- When you make tee joints in the horizontal position, the two plates are at right angles to each other in the form of an inverted T. The edge of the vertical plate may be tack-welded to the surface of the horizontal plate, as shown in figure 7-25. A fillet weld is used in making the tee joint, and a short arc is necessary to provide good fusion at the root and along the legs of the weld (fig. 7-26, view A). Hold the electrode at an angle of 45 degrees to the two plate surfaces (fig. 7-26, view B) with an incline of approximately 15 degrees in the direction of welding. When practical, weld light plates with a fillet weld in one pass with little or no weaving of the electrode. Welding of heavier plates may require two or more passes in which the second pass or layer is made with a semicircular weaving motion, as shown in figure 7-27. To ensure good fusion and the prevention of undercutting, you should make a slight pause at the end of each weave or oscillation. For fillet-welded tee joints on 1/2-inch plate or heavier, deposit stringer beads in the sequence shown in figure 7-28.
Figure 7-27.-Weave motion for multipass fillet weld.
Figure 7-28.-Order of making string beads for a tee joint in heavy plate.
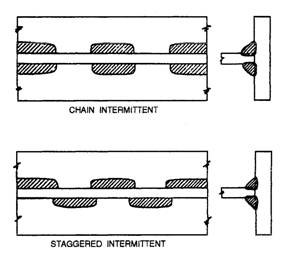
Figure 7-29.-Intermittent fillet welds. Chain-intermittent or staggered-intermittent fillet welds, as shown in figure 7-29, are used on long tee joints. Fillet welds of these types are for joints where high weld strength is not required; however, the short welds are arranged so the finished joint is equal in
Figure 7-30.-Tack welding a lap joint.
Figure 7-31.-Position of electrode on a lap joint. strength to that of a joint that has a fillet weld along the entire length of one side. Intermittent welds also have the advantage of reduced warpage and distortion. LAP JOINTS.- When you make a lap joint, two overlapping plates are tack-welded in place (fig. 7-30), and a fillet weld is deposited along the joint. The procedure for making this fillet weld is similar to that used for making fillet welds in tee joints. You should hold the electrode so it forms an angle of about 30 degrees from the vertical and is inclined 15 degrees in the direction of welding. The position of the electrode in relation to the plates is shown in figure 7-31. The weaving motion is the same as that used for tee joints, except that the pause at the edge of the top plate is long enough to ensure good fusion without undercut. Lap joints on 1/2-inch plate or heavier are made by depositing a sequence of stringer beads, as shown in figure 7-31, In making lap joints on plates of different thickness, you should hold the electrode so that it forms an angle of between 20 and 30 degrees from the vertical
(fig. 7-32). Be careful not to overheat or undercut the thinner plate edge. BUTT JOINTS.- Most butt joints, designed for horizontal welding, have the beveled plate positioned on the top. The plate that is not beveled is on the bottom and the flat edge of this plate provides a shelf for the molten metal so that it does not run out of the joint (fig. 7-33). Often both edges are beveled to forma 60-degree included angle. When this type of joint is used, more skill is required because you do not have the retaining shelf to hold the molten puddle. The number of passes required for a joint depends on the diameter of the electrode and the thickness of the metal. When multiple passes are required (fig. 7-34), place the first bead deep in the root of the joint. The electrode holder should be inclined about 5 degrees downward. Clean and remove all slag before applying each following bead. The second bead should be placed with the electrode holder held about 10 degrees upward. For the third pass, hold the electrode holder 10 to 15 degrees downward from the horizontal. Use a slight weaving motion and ensure that each bead penetrates the base metal. |
|
Privacy Statement - Press Release - Copyright Information. - Contact Us - Support Integrated Publishing |