| Tweet |

Custom Search
|
|
 
|
||
|
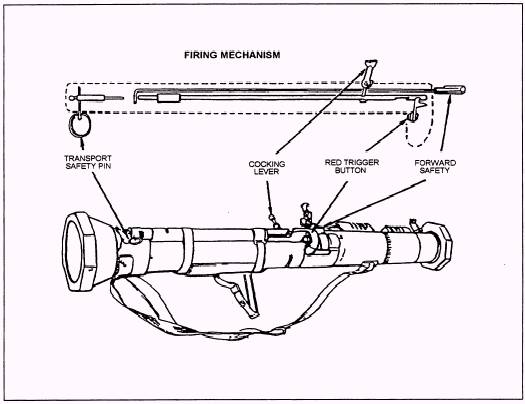
TECHNICAL DATA Figure 14-28.-Firing mechanism. CONTROLS The firing mechanism is mechanical (fig. 14-28). It includes the red trigger button, the enclosed firing rod with firing rod spring, and three safety devices. The red trigger button is located forward of the cocking lever just behind the forward safety. The weapon cannot be fired unless the three safety devices have been disengaged. 1. Transport Safety Pin (Step 1, fig. 14-29). The transport safety pin blocks the movement of the firing pin and prevents it from striking the cartridge percussion cap (not shown). To disengage the transport safety pin, pull it out and release. 2. Cocking Lever (Step 2, fig. 14-29). The cocking lever is attached to the firing rod. When the cocking lever is in the SAFE position, there is no contact between the firing rod and the trigger. To cock the AT4, push the cocking lever forward and down with the thumb of your right hand. When the weapon is cocked, the firing rod is engaged with the trigger through the hooks on the front part of the firing rod and red trigger button. 3. Forward Safety (Step 3, fig. 14-29). The forward safety is located on the forward end of the firing mechanism. The forward safety is connected to a steel rod that prevents the firing rod from striking the firing pin. The forward safety must be fully depressed and held down before the launcher can be fired. OPERATION The following procedures are used to prepare the AT4 for immediate firing: WARNING BE SURE EARPLUGS ARE IN-SERTED. KEEP WEAPON POINTED TOWARD THE TARGET. KEEP BACK-BLAST AREA CLEAR.
Figure 14-29.-Functioning of the firing mechanism. Figure 14-30.-Carrying and cradle positions. l Remove the launcher from the carrying position and cradle it in your left arm (fig. 14-30). l Remove the transport safety pin by pulling it out with your right hand and releasing it (Step 1, fig. 14-31). NOTE: Be sure that the transport safety pin is attached to the lanyard and the lanyard is attached to the launcher. If it is not, retain the transport safety pin (it must be reinserted if the launcher is not fired). l Unsnap the shoulder stop and unfold it (Step 2, fig. 14-31). l Place the launcher on your right shoulder. c Release the sights. Release the front sight by pressing down on the sight cover and sliding the cover to the rear. Release the rear sight by pressing down on the rear sight cover and sliding the cover to the front. Each sight pops up after release procedures (Step 3, fig. 14-31). |
||
|
||