| Tweet |

Custom Search
|
|
 
|
||
|
GRENADE-THROWING
PROCEDURES The two primary objectives of a hand grenade training program are to develop your proficiency in
Figure
12-9.-Methods of holding the grenade. grenade throwing and to overcome any fear that you may have of handling explosives. Consider safety first when you are determining the proper method of holding the grenade. For maximum safety and throwing comfort, cradle the grenade in your throwing hand with the safety lever held in place by that part of your thumb between the first and second joints (fig. 12-9, view A). For right-handed personnel, hold the grenade upright (fig. 12-9, view B). This positions the pull ring so you can remove it easily with the index finger of your free hand. For left-handed personnel, invert the grenade (fig. 12-9, view C) in your hand with the fingers and thumb of the throwing hand in the same position as right-handed personnel.
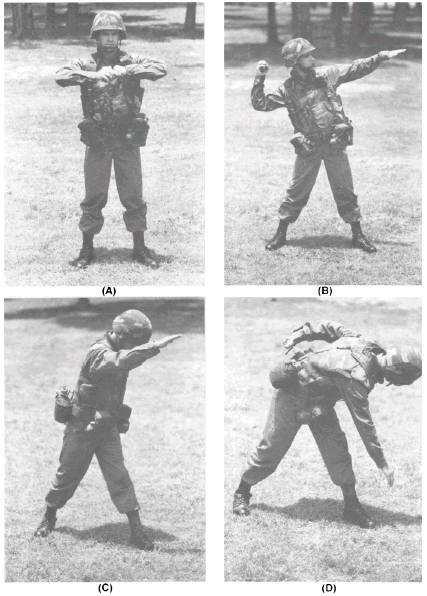
Figure 12-10.-Throwing the hand grenade. The ABC-M25A2 riot control hand grenade has an arming sleeve that serves the same purpose as the safety lever on other types of grenades. Before throwing the riot control grenade, hold the arming sleeve in place (fig. 12-9, view D) by applying constant pressure with the thumb of your throwing hand. Since few men throw in the same manner, it is difficult to establish firm throwing rules or techniques. However, there is a recommended method of throwing a grenade that can be mastered easily. By practicing the steps given below, you can develop your throwing proficiency to a point where your reaction to a target becomes immediate. 1. First, observe the target and establish the distance between your throwing position and the target area. 2. Hold the grenade at shoulder level with the grenade in your throwing hand and the index finger of your opposite hand grasping the pull ring (fig. 12-10,
Figure 12-11.-Throwing positions. view A). Remove the safety pin with a pulling, twisting motion. If the situation permits, you should observe removal of the safety pin. NOTE When the safety pin cannot be pulled out, shorten the distance between the legs of the safety pin to aid in its removal. However, if the grenade is not used, spread the legs of the safety pin for safety in carrying. 3. As you remove the safety pin, immediately look toward your target. 4. Throw the grenade with an overhead throwing motion, keeping your eyes trained at all times on the target. Release the grenade somewhere forward of your body and in your general field of vision (fig. 12- 10, views B and C). In this way you take advantage of the hand-and-eye coordination inherent in most people. 5. Follow through on your throwing motion beyond the point where you released the grenade (fig. 12-10, view D). This follow-through improves distance and accuracy and relieves the strain on your throwing arm. 6. When available, duck behind cover to avoid being hit by fragments of the grenade. When no cover is available, drop to the prone position with your helmet facing in the direction of detonation. Although proper positioning techniques of throwing hand grenades are usually stressed during
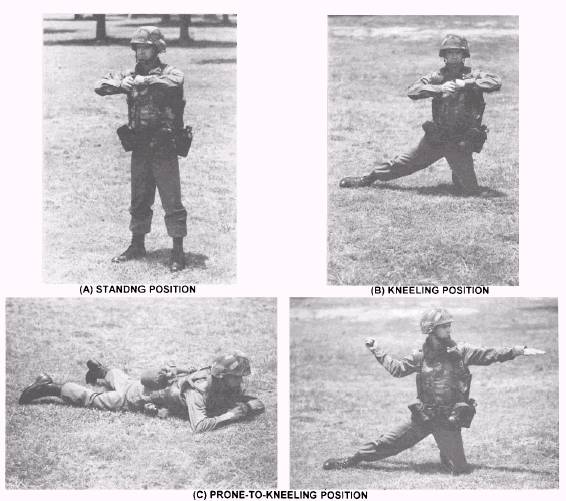
Figure 12-11.-Throwing positions-Continued. military training exercises, your position during a combat situation is dictated by the amount of available cover and the location of the target. The positions given below point out the use and limitations of each position. The STANDING POSITION (fig. 12-11, view A) is the most natural one from which to throw grenades. This position allows you to obtain the greatest possible throwing distance. To throw from this position, use the instructions listed above and shown in figure 12-10. The KNEELING POSITION (fig. 12-11, view B) reduces the distance that you can throw a grenade. Use this position when you have only a low wall, a shallow ditch, or a similar type of cover to protect you. To throw from this position, use the following instructions: 1. Using the proper grip and holding the grenade shoulder high, kneel in the most comfortable manner. 2. Throw the grenade with a natural throwing motion. Push off with your trailing foot to put more force in the throw. 3. As you release the grenade, drop to the prone position or behind available cover to reduce your exposure to fragmentation. Use the PRONE-TO-KNEELING POSITION (fig. 12-11, view C) when no cover is available and the grenade must be thrown a greater distance than is possible from the prone position. To throw from this position, use the following instructions: 1. Face the target and assume the prone position. Hold the grenade forward of your head where you can observe the grenade as you remove the safety pin. 2. After the safety pin is removed, quickly assume the kneeling position. 3. After throwing the grenade, quickly return to the prone position with your helmet facing in the direction of the target. The ALTERNATE PRONE POSITION (fig. 12- 11, view D) reduces both throwing distance and accuracy. This position should be used when you are pinned down by hostile fire and are unable to rise and engage your target. To throw from this position, use the following instructions: 1. Lie on your back with your body perpendicular to the intended line of flight of the grenade. Hold the grenade at shoulder level as in the standing position 2. Your right leg (left leg for left-handed throwers) should be cocked with your foot braced firmly against the ground. After removal of the safety pin, hold the grenade away from your body with your arm cocked for throwing. 3. With your free hand, grasp any object that is capable of giving you added leverage. This leverage will increase your throwing distance. In throwing the grenade, push off with your rearward foot to give added power to your throw. After throwing the grenade, roll over onto your stomach and press yourself flat against the ground. |
||
|
||