| Tweet |

Custom Search
|
|
 
|
||
|
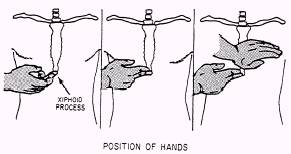
CIRCULATION Cardiac arrest occurs when the heart stops functioning. If the victim is to live, take action immediately to restore the victim's heart function. The signs of cardiac arrest include the absence of a pulse, because the heart is not beating, and the absence of breathing. A rescuer who knows how to administer CPR increases the chances of a victim's survival. CPR consists of artificial ventilation and external heart compressions. The lungs are ventilated by using the mouth-to-mouth or mouth-to-nose technique; the compressions are performed by pressing the chest with the heels of your hands. The victim should be laying faceup on a firm surface. CPR should not be attempted by a rescuer who has not been properly trained, as mentioned earlier in this chapter. To learn this technique, contact your medical education department. The rescuer must not assume that cardiac arrest has occurred solely because the victim is lying on the deck and appears to be unconscious (fig. 10-10). First, try to arouse the victim by gently shaking his shoulders and by trying to obtain a response; loudly ask, "Are you OK?" Be careful if the victim shows signs of head and spinal injuries. If there is no response, place the victim faceup on a firm surface. Kneel at a right angle to the victim, and open the airway, using the head tilt-neck lift, the head tilt-chin lift, or the jaw thrust methods previously discussed. Look for chest movement. Listen and feel for air coming from his nose or mouth for at least 5 seconds. If the pulse is absent, call for help and begin CPR. Locate the lower margin of the victim's rib cage on the side closest to you by using your middle and index fingers. Then move your fingers up along the edge of his rib cage to the notch (xiphoid process) where the ribs meet the sternum in the center of his lower chest. Your middle finger should be placed on the notch with your index finger next to it. The heel of your other hand should be placed along the midline of his sternum, next to your index finger. You must keep the heel of your hand
Figure 10-10.-One-rescuer CPR decision tree. Figure
10-11.-Xiphoid process.
Figure
10-12.-Interlocking fingers to help keep fingers off the chest wall. off the xiphoid process (fig. 10-11). A fracture in this area could lacerate the liver. Place the heel of one hand directly on the lower half of the sternum two fingers up from the notch and the heel of the other on top of the first hand. Interlock your fingers or extend them straight out, and KEEP THEM OFF THE VICTIM'S CHEST! (See fig. 10-12.) With your elbows locked, apply vertical pressure straight down to depress the sternum (adult) from 1 1/2 to 2 inches. Then release the pressure, keeping the heels of your hands in place on his chest. This process compresses the heart between the sternum and the victim's back thus pumping blood to the vital parts of the body. When you use the proper technique, a more effective compression will result, and you will feel less fatigue. Ineffective compression occurs when the elbows of the rescuer are not locked, he is not directly over the sternum, or his hands are improperly placed on the sternum. When one rescuer performs CPR, the ratio of compressions to ventilations is 15 to 2, and it is performed at a rate of 80 compressions per minute. Vocalize "l, and 2, and 3," and so forth, until you reach 15. After 15 compressions, you must give the victim 2 ventilations. Continue for four full cycles of 15 compressions and 2 ventilations. Then take 5 seconds to check for the carotid pulse and spontaneous breathing. When there are still no signs of recovery, continue CPR. If a periodic check reveals a return of pulse and respiration, discontinue CPR; but closely monitor the victim's pulse and respirations, and be prepared to start CPR again, if required. When a pulse is present but no respiration, continue to give the victim one ventilation every 5 seconds and check his pulse frequently. Before moving on to the next technique, let us review the following steps for one-rescuer CPR: 1. Determine whether the victim is conscious. 2. Open the airway (it maybe necessary to remove the airway obstruction). 3. Look, listen, and feel. 4. Ventilate for four cycles. 5. Check his pulse-if none, call for help. 6. Begin the compression-ventilation ratio of 15 to 2 for four complete cycles. 7. Check again for a pulse and breathing. If no change, continue the compression-ventilation ratio of 15 to 2 until the victim is responsive, until you are properly relieved, until you can no longer continue because of exhaustion, or until the victim is pronounced dead by a medical officer. The diagrams in figures 10-13 and 10-14 show the step-by-step methods discussed in this chapter, and it serves as a good review. |
||
|
||