| Tweet |

Custom Search
|
|
 
|
||
|
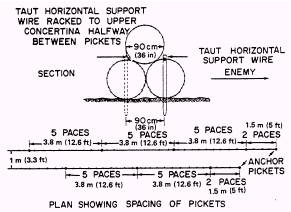
This fence consists of two lines of concertinas serving as a base, with a third line resting on top, as
Figure
8-23.-Triple standard concertina fence.
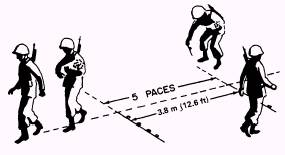
Figure
8-24.-Laying out long pickets for triple concertina fence. shown in figure 8-23. All lines are installed with staggered joints. Each line is completed before the next is started, so a partially completed concertina entanglement presents some obstruction. It is erected quickly and is difficult to cross, cut, or crawl through. A 984-f60t section of this fence is a platoon task normally requiring less than 1 hour. There are two operations in building this fence: (1) carrying and laying out pickets and concertina rolls and installing concertina fence and (2) opening and installing concertinas. Phase
One For the first operation, divide the working party into three groups of approximately equal size: one to lay out all concertina fence, one to install all concertina fence, and one to lay out all concertina rolls.
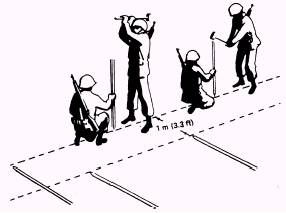
Figure
8-25.-Installing front-row pickets for triple concertina fence.
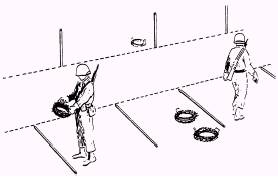
Figure
8-26.-Laying out concertina. The first group lays out front-row long pickets of concertina fence at 5-pace intervals on the line of the fence (fig. 8-24) with points of pickets on line and pointing toward the enemy. The rear-row long pickets are then laid out on a line 3 feet to the rear and opposite the center of interval between the front-row long pickets. An anchor picket is laid out at each end of each line, 5 feet from the end long picket. The second group installs pickets beginning with the front row (fig. 8-25). As in other fences, eyes of screw pickets are to the right. Concave faces of U-shaped pickets are toward the enemy. The third group lays out concertinas along the rows of pickets (fig. 8-26). In the front row, one roll is placed at the third picket and one at every fourth picket thereafter. Sixteen staples accompany each front-row
Figure
8-27.-Installing concertina.
Figure 8-28.-Joining concertina. concertina. In the second row, two rolls are placed at the third picket and two at every fourth picket thereafter. As each roll is placed in position, its binding wires are unfastened but are left attached to the hoop at one end of the roli. Phase
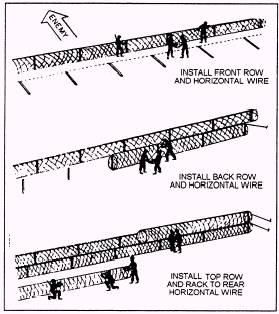
Two As they complete the first operation, organize all men in four-man parties (fig. 8-27) to open and install concertinas, beginning at the head of the fence. The sequence shown in general in figure 8-27 is as follows: 1. Open the front-row concertinas in front of the double line of pickets and the other two in the rear. 2. Lift each front-row concertina, in turn, and drop it over the long pickets; then join concertina ends, as shown in figure 8-28. 3. Fasten the bottom of the concertina to the ground by driving a staple over each pair of end hoops: one over the bottom of the coil at each long picket and one at the one-half and one-fourth points of the 12.5-foot picket spacing. Securing the front concertina to the ground is essential and must be done before installing another. concertina in the rear unless the enemy side of the entanglement is sure to be accessible later. 4. Stretch a barbed-wire strand along the top of each front row and fasten it to the tops of the long pickets, using the top-eye tie for screw pickets. Stretch these wires as tightly as possible to improve the resistance of the fence against crushing. 5. Install the rear-row concertina as described above for the front-row concertina. 6. Install the concertina in the top row (fig. 8-27), fastening the end hoops of 50-foot sections with plain, steel-wire ties. Begin this row at sections with plain, steel-wire ties. Begin this row at a point between the ends of the front and rear of the lower rows, thus breaking all end joints. 7. Rack the top concertina to the rear horizontal wire at points halfway between the long pickets. If there is safe access to the enemy side of the fence, similarly rack the top concertina to the forward horizontal wire. |
||
|
||