| Tweet |

Custom Search
|
|
 
|
||
|
FIELD-STRIPPING THE RIFLE The individual Seabee is authorized to disassemble the M16 to the extent termed field-stripping. Field-stripping is done without supervision and is adequate for normal maintenance. As the weapon is disassembled, lay out the parts on a table or other clean
Figure 3-11.-Pressing out receiver pivot pin.
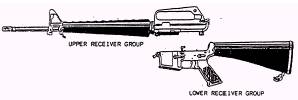
Figure 3-12.-Upper and lower receiver groups. surface in the order of removal from left to right. This makes reassembly easier because you can assemble the parts in the reverse order of disassembly. The steps infield-stripping are as follows: 1. Remove the sling, and place the rifle on a table or flat surface, muzzle to the left. 2. Turn the weapon on its right side, keeping the muzzle to the left. Press the takedown pinto the right (fig. 3-9) until the upper receiver swings free of the lower receiver (fig. 3-10). CAUTION The takedown pin does not come out of the receiver. 3. Press out the receiver pivot pin (fig. 3-11). Separate the upper and lower receiver groups (fig. 3-12), and place the lower receiver group on the table. CAUTION The receiver pivot pin does not come out of the receiver.
Figure 3-13.-Removing bolt carrier from receiver.
Figure 3-14.-Removing the charging handle.
Figure 3-15.-Pressing out the firing pin retaining pin with the tip of a
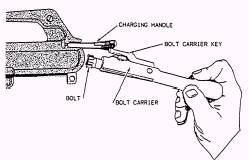
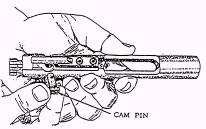
cartridge. 4. Pickup the upper receiver group, keeping the muzzle to the left. Grasp the charging handle; press in on the latch and pull it to the rear (fig. 3-7) to remove the bolt carrier from the receiver. Grasp the bolt carrier and pull it from the receiver (fig. 3-13). When the bolt carrier is removed, the charging handle frills free of its groove in the receiver (fig. 3-14). Place the receiver on the table. 5. Press out the firing pin retaining pin (fig. 3-15) to disassemble the bolt carrier group. Elevate the front of the bolt carrier, and allow the firing pinto drop from its well in the bolt (fig. 3-16). Rotate the bolt until the cam pin is clear of the bolt carrier key. Remove the cam pin by rotating it 90 degrees (one-quarter turn) and
Figure 3-16.-Removing the firing pin.
Figure 3-17.-Removing the cam pin.
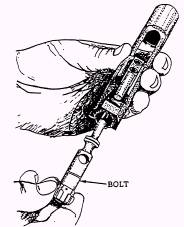
Figure 3-18.-Removing the bolt from the bolt carrier. lifting it out of the well in the bolt and bolt carrier (fig. 3-17). After the cam pin is removed, the bolt can be easily removed from its recess in the bolt carrier (fig. 3-18).
Figure 3-19.-Removing the buffer assembly and action spring. Remove the extractor by first pushing the extractor pin out with the firing pin. Then, while maintaining pressure on the rear portion of the extractor with your index finger, withdraw the firing pin from the extractor pinhole. Release the pressure from the extractor and remove. The extractor should be disassembled only when necessary for cleaning. Disassembly of the extractor should be supervised. Since the extractor pin is quite small, handle it with care to prevent loss or damage. NOTE: Do not remove the extractor spring from the extractor. If the spring falls out of its recess, the battalion armorer should replace it. 6. Push in on the buffer assembly, using the index finger of the left hand. With the nose of a cartridge or some similar object, push down on the buffer retainer (fig. 3-19, view A). To remove the buffer assembly, press the hammer downward past the cocked position. After the body of the buffer assembly has cleared the hammer, you can withdraw the action spring from the lower receiver (fig. 3-19, view B). NOTE: The action spring is under pressure; therefore, take care when you are removing it. Step 6 should be performed only when absolutely necessary for care and cleaning. Figure 3-20 shows the Ml6A1 service rifle field-stripped after you complete the above steps. |
||
|
||