| Tweet |

Custom Search
|
|
 
|
||
|
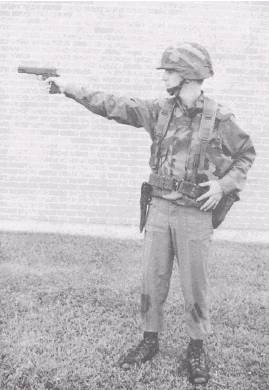
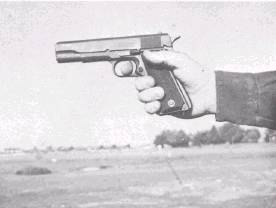
Aiming the Pistol Aiming the pistol consists of combining proper sight alignment with the correct aiming point to obtain a correct sight picture. SIGHT ALIGNMENT.- Sight alignment is best defined as placing the front and rear sights into correct alignment with the eye. For a correct sight alignment, you must center the front sight in the rear sight, bringing the top of the front sight exactly level with the top of the rear sight (fig. 3-52). Connect sight alignment is essential for accuracy. It is particularly important with the pistol because of the short sight radius (about 6 1/2 inches). For example, if a 1/10-inch error is made in aligning the front sight in the rear sight, the bullet will miss the point of aim by almost 15 inches at 25 yards of range. AIMING POINT.- The correct aiming point, when you fire at a bull's-eye target at 25 yards, is a 6 o'clock sight picture. At 15 yards, bring the aiming point well up into the black. When you fire at an "E" type of silhouette target, the aiming point is in the center of the target. CORRECT SIGHT PICTURE.- A sight picture is the pattern of the pistol sights in relation to the target as you aim the pistol. A correct sight picture combines correct sight alignment and correct aiming point (fig. 3-52). When you are aiming, your eye cannot focus simultaneously on three objects (rear sight, front sight, and bull's-eye) at different ranges. Therefore, the last focus of the eye should always be on the front sight. You will see the front and rear sights sharp and clear, but the bull's-eye will appear to be a bit hazy. If sight alignment Figure 3-53.-Standing position (pistol). is correct, the bullet will strike the bull's-eye, even if the sight picture is partially off center but still touches the bull's-eye. Since it is physically impossible to hold the weapon perfectly still, you must learn to apply trigger squeeze and to maintain correct sight alignment while the weapon is moving around the bull's-eye. This movement of the pistol is referred to as the "wobble area." You must accept this wobble area, or movement, and endeavor to keep it to a minimum. Position To position yourself properly for firing the pistol, you need to know how to grip the pistol correctly and how to position your body in relation to the target. Only the standing position will be covered in this section, because it is the one used in qualification. However, the pistol can also be fired accurately from the kneeling, crouch, and prone positions. The pistol may be gripped with either a one-hand grip or a two-hand grip. STANDING POSITION ONE-HAND GRIP.- To assume the standing position using the one-hand grip (fig. 3-53), face the target squarely and then execute an Figure 3-54.-Gripping the pistol (one hand). exaggerated half left face (about 50 degrees). Spread your feet about shoulder width apart until you stand comfortably. Your legs should be straight, but not stiff, and your hips should be level. Extend the index finger of your shooting hand and point it at the target. Adjust your stance until your finger points naturally, without muscle tension, at the center of the target. Pick the pistol up with your other hand and place it in your shooting hand. The mainspring housing should rest firmly in your palm with the grip safety pressed into the Y, formed between the thumb and forefinger. Hold your hand as high as possible on the receiver without squeezing the flesh between the hammer and grip safety. Grip the receiver firmly with the hand and fingers. Wrap the three lower fingers around the receiver, and place the trigger finger inside the trigger guard. Hold your thumb up and along the side of the pistol with enough pressure to steady the pistol and to equalize any pressure from the other side by the palm and forefinger (fig. 3-54). Once a firm grip is obtained, maintaining the same degree of firmness throughout firing is important. A change in your grip will change the location of the shot group on the target. A tight grip tends to cause the bullet to strike low and a loose grip to strike high. Keep your trigger finger away from the receiver. With a proper grip on the pistol, the muscles of your arm should be firm, but not rigid. Your arm should be straight with your wrist and elbow locked. This will prevent excessive up-and-down movement of the weapon. When the weapon is fired, the recoil will be absorbed through the arm to the shoulder. If you are in the correct position, the pistol will return to approximately the same sight picture after each shot. Figure 3-55.-Standing position (pistol), two-handed
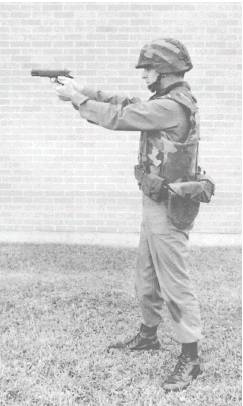
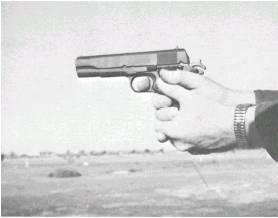
grip. STANDING POSITION TWO-HANDED GRIP.- In this position (fig. 3-55), you face the target squarely with your feet placed comfortably about shoulder width apart. Keep your legs straight without stiffness and your hips level and slightly forward. Relax the muscles of your diaphragm, and make no effort to hold in your abdomen. Grasp the pistol in the same manner as if you were firing one-handed. Next, with your free hand extended forward, palm up, place the butt of the weapon into your extended palm. Place the little finger of your shooting hand between the index and middle finger of your other hand. The thumb of your free hand is straight up alongside the pistol grip with the thumb of your shooting hand locked over the top of the other thumb. Bring the last three fingers of your other hand up and over the back of your shooting hand, locking the weapon firmly in both hands (fig. 3-56). Bring the weapon onto the center of the target by shifting your feet. MISCELLANEOUS.- In both the one-handed and two-handed positions, you position your head so that Figure 3-56.-Two-handed grip. you are looking straight out through your shooting eye. Keep your shooting arm fully extended. In the one-handed position, the shoulder of your shooting hand should be slightly raised. Turn your head in order to see the target through the sights. The ease with which your head can be turned is another determining factor in how far you must turn to the right or left. There should be no strain on the neck muscles with your head held upright. The whole position, with the exception of your shooting arm, is one which can be maintained with the least muscular effort. Your body is balanced rather than held in position. The muscles of your shooting arm and shoulder should be tightened somewhat to sustain the weight of the pistol and to maintain a correct grip. Excessive tightening of the muscles of your shooting arm and hand should be avoided. The tension in the muscles of your shooting arm and hand should be maintained after the hammer falls. This will assist in getting off your second shot quicker. Because of the differences in the body structure of individuals, the standing position will vary slightly. But regardless, your position should be relaxed and comfortable. The pistol should point at the center of the target or you will be tense while firing. If you are tense, there will be excessive muzzle movement. |
||
|
||