| Tweet |

Custom Search
|
|
 
|
||
|
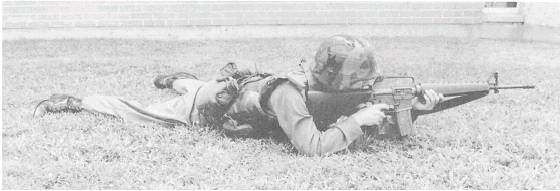
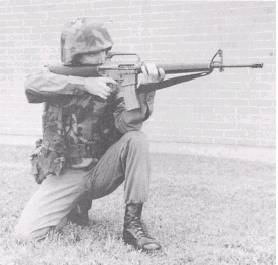
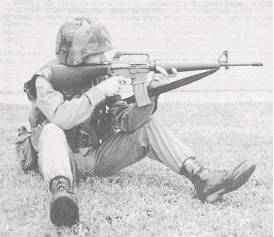
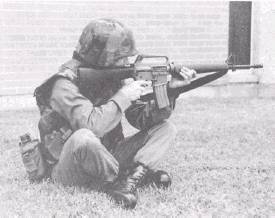
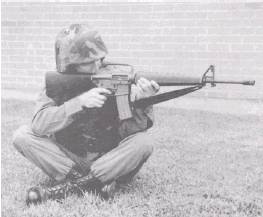
Shooting Positions A correct shooting position is essential to obtain the best results in rifle shooting. The better the position, the easier it is to hold the rifle and squeeze the trigger while the sights are properly aligned on the target. However, no degree of excellence in the position will compensate for lack of practice. You may have difficulty in assuming a connect position until sufficient practice has limbered up your muscles. Once your muscles are limber, you will find the positions both comfortable and steady. The Seabee qualification course requires you to learn and use four standard positions: prone, standing, kneeling, and sitting. These positions have been selected as a result of experience and have been found to produce excellent results with men and women of all physical types. Once you master the correct positions, you must combine sighting and aiming with your practice. Learn to get into the correct position and align the sights without moving the rifle. If the target is not properly aligned with the sights, you must move your body instead of the rifle until you obtain the proper sight picture. PRONE POSITION.- The prone position (fig. 3-43) is a steady position that is easy to assume and excellent for initial training. In the field, the position presents a low silhouette and is readily adaptable to the use of cover and support. However, observation from this position is difficult. Figure 3-43.-Prone position. Figure 3-44.-Standing position. Figure 3-45.-Kneeling position. STANDING (OFF-HAND) POSITION.- The standing position (fig. 3-44) is used to engage surprise targets that appear at close ranges. Normally, you use Figure 3-46.-Sitting position. this position when engaging targets less than 100 yards in range and when you are constantly firing and moving. KNEELING POSITION.- The kneeling position (fig. 3-45) is a natural position that can be assumed quickly. It is suitable for use on level ground or on ground that slopes upward SITTING POSITION.- There are three variations of the sitting position: open leg, cross leg, and cross ankle. The position used depends entirely on the shooter. For steadiness, the open-leg position (fig. 3-46) is second only to the prone position. This position is especially suited for use on ground that slopes downward. The other two alternate sitting positions are the cross-legged position (fig. 3-47) and the cross-ankled position (fig. 3-48). Trigger Control The most important single factor in marksmanship is trigger control. Everything about your position and aim may be perfect; but if you do not squeeze the trigger properly, your shot will not go where you aimed it. The prime consideration in trigger control is that the trigger must be squeezed smoothly, gradually, and evenly straight to the rear. Any sideward pressure, however slight, applied to the trigger during its rearward movement will likely result in a wide shot. Similarly, upward or downward pressure on the trigger will result in high or low shots. The trigger hand must grasp the stock or pistol grip firmly, but without strain, so the trigger finger will have proper support in overcoming the trigger weight. An Figure 3-47.-Cross-legged position. Figure 3-48.-Cross-ankled position. unnatural, straining grasp will cause excessive muscular tension in the hand, resulting in a tremor, that will also be transmitted to the weapon. The index finger should make contact with the trigger at the place that will best produce a movement straight to the rear. This is usually between the first joint and the tip. The trigger (index) finger must not touch the receiver or rifle. Once the sights are lined up, apply pressure on the trigger and gradually increase it until the hammer releases and the shot fires. If at any time during this process the sights drift off the target, interrupt the trigger squeeze, but maintain the pressure. When the sight picture is again correct, continue the squeeze until you fire the shot. When you fire from the standing position, coordination of trigger squeeze and proper aim is critical. The shooter must start and continue his or her squeeze only when the front sight is momentarily at rest or is slowly moving in the smallest area of the bull's-eye. An inexperienced shooter usually tends to "snap shoot" in this position; that is, he or she attempts to complete the trigger action instantly as the front sight moves across the aiming point. This invariably results in jerking the rifle and producing a wild shot. Squeezing the trigger correctly is not as easy as it may appear; the technique must be fully mastered To assist you in remembering the correct technique, the acronym, BRASS, was developed. B-BREATH. Proper breathing is essential. It will help you relax, steady your aim, and clear your vision. First, take a normal breath; then release part of it (enough to be comfortable); and hold the remainder. Do not hold your breath for more than 10 seconds before shooting. This may tense your muscles and blur your vision. If you do not shoot during this breathing period, take another normal breath and repeat the procedure. R-RELAX. You must relax. The more relaxed you are the better your shot will be. A-AIM. Concentrate on the proper sight alignment of the correct sight picture. Focus your eye on the front sight post (blade). S-SLACK. Some rifles have a certain amount of slack in the trigger. Take up this slack before starting your squeeze to the rear to fire. The M16 trigger slack is insignificant, and this step is generally omitted when firing that weapon. Knowing your weapon is important here. S-SQUEEZE. Squeeze the trigger as previously described. If you squeeze it properly, you will not know when the round will fire. This will prevent flinching, caused by anticipation of the shock, or recoil, from the exploding cartridge. |
 |
|
|
||