| Tweet |

Custom Search
|
|
 
|
||
|
FIGHTING
LOAD EQUIPMENT Fighting load equipment consists of the items shown in figure 2-2 and described below. Each item has been designed to make the job of carrying the equipment you need easier and more comfortable. There are certain rules, however, that must be followed when the equipment is to do the job for which it is intended. When the rules listed below are followed, individual loads can be carried with more ease and comfort. Rules for carrying equipment. l Keep your load as light as possible. l Know your equipment. l Assemble the equipment correctly. l Keep every item in its proper place. 1. Pistol belt (item 1 of fig. 2-2). The olive drab webbed pistol belt, M-1956, has a special ball type of fastener that makes the belt easier to put on and take off. The belt uses eyelets for attachment purposes and has sliding keepers to prevent the belt hooks from becoming unfastened after adjustment to the waist of the wearer. The pistol belt helps to carry the entrenching tool and carrier, the ammunition pouches, the canteen and cover, and the first-aid or compass case. It is issued in two sizes: medium and large. Medium is the size for waist measurements under 30 inches; large is the size for waist measurements of 30 inches or more. The proper-size belt can be adjusted to fit over all layers of outer clothing, including the armored vest. 2. Ammunition pouches (item 2 of fig. 2-2). Each small-arms ammunition pouch is 4 1/4 inches wide, 6 1/4 inches high, and 2 1/2 inches deep. Plastic stiffeners are provided in the back of each pouch, so the clips of ammunition can be easily inserted and removed. There are two attaching clips and supporting straps on the back of the pouch, so they can be fastened to the pistol belt and to the suspenders. (See fig. 2-5.) Both sides of each ammunition pouch have attachments for carrying hand grenades. The pouches are designed to carry any of the basic loads of ammunition; however, with special weapons it may be necessary to carry more ammunition than the pouches can hold. When extra ammunition is needed, bandoleers of ammo may be carried in a cross-chest manner. To place bandoleers in pouches, make a neat bundle by folding the bandoleers accordion fashion and placing them in the pouches with the bandoleer strap on the top. This method permits the bandoleer to be inserted and removed easily. 3. Suspenders (item 3 of fig. 2-2). The olive drab webbed suspenders, with the pistol belt, make up the basic individual fighting load equipment, as the remaining components are suspended from them. The suspenders can be adjusted by means of the clamp type of buckle. Suspenders are issued in three sizes: regular, long, and extra long. If you are under 68 inches tall without shoes, wear the regular size. If over 68 inches, wear the large size. If you are tall or broad chested or intend wearing them over outer garments or the armored vest or both, wear the extra large size. When you have the time, you should try them on first. 4. Entrenching tool carrier (item 4 of fig. 2-2). The entrenching tool carrier is olive drab in color and is attached to the pistol belt by means of two clips located on the back. 5. Canteen cover (item 5 of fig. 2-2). The olive drab canteen cover has either a pile or felt lining and is attached to the pistol belt by means of two clips located on the back of the cover. The canteen cover accommodates the canteen and canteen cup. During warm weather, the lining should be kept wet to help keep the water cool. The cover should be kept dry during cold weather, as the lining helps to protect the water inside from freezing. 6. First-aid case (item 6 of fig. 2-2). The olive drab first-aid case is attached to the pistol belt by means of a clip located on the back The case is closed by means of a flap that is secured by a glove type of fastener. The first-aid case is used either to carry a field dressing or an unmounted magnetic compass. The method for assembling the individual fighting load equipment is described below in the sequence normally followed. Adjusting
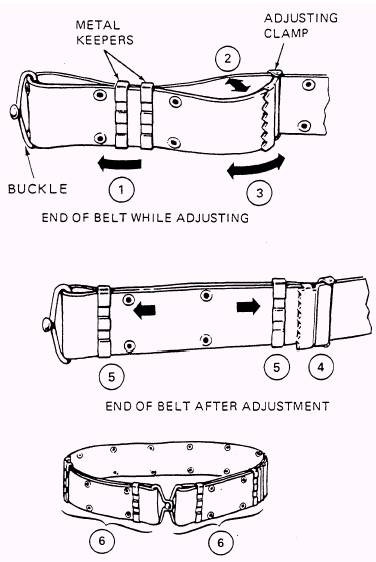
the Pistol Belt First, try on the belt for size. It should be comfortable y snug-not tight. The following six steps in adjusting the pistol belt correspond to the six actions shown in figure 2-3: 1. Push the two metal keepers between the adjusting clamp and the belt buckle toward the buckle. 2. Unlock the adjusting clamp by spreading the looped webbing apart. 3. Slide the clamp toward the belt buckle to loosen or away from the buckle to tighten.
Figure
2-3.-Adjusting the belt. 4. Squeeze the adjusting clamp to lock it in place. 5. Move the metal keepers so one is next to the adjusting clamp and the other is next to the buckle. 6. Adjust the other end of the belt the same way. Both clamps should be about the same distance from the buckle. Your belt is now ready for attaching equipment. |
||
|
||