| Tweet |

Custom Search
|
|
 
|
||
|
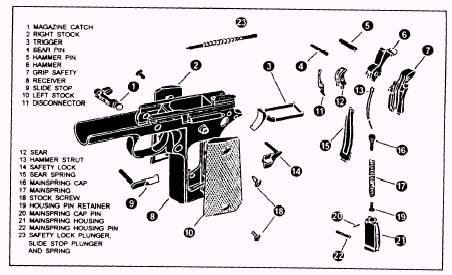
SUSTAINED RATE OF FIRE- The sustained rate of fire of a weapon is normally stated in a chart. The chart correlates the average number of rounds fired per minute with the number of minutes this rate can be sustained without damage to the weapon. LEARNING OBJECTIVES: Identify the two standard issue handguns used by the Navy. Describe the .45-cal. pistol and the steps required in disassembly and reassembly. List and describe the four safeties on the .45-cal. pistol. Describe the operation of the .38-cal. revolver and list the steps in disassembly and reassembly. There are two standard issue handguns used by the Navy today: the .45-cal. semiautomatic pistol and the .38-cal. S&W revolver. The information presented in this chapter is primarily concerned with the .45-cal. pistol and the .38-cal. S&W revolver. M1911A1 .45-CALIBER PISTOL The .45-cal, M1911A1 pistol is a recoil-operated, semiautomatic, magazine-fed, self-loading handgun with fixed sights. It is often called a .45-cal. semiautomatic pistol (SAP) or a .45-cal. autoloading Colt (the manufacturer) pistol (ACP). This text will refer to it as a .45-cal. pistol. Figure 8-3 shows the pistol with nomenclature for some of the external parts. The magazine holds seven rounds when fully loaded; one round is fired with each squeeze of the trigger. Rifling in the barrel is machined for a left-hand twist (the only Navy weapon with left-hand rifling). Empty, the pistol weighs approximately 2-1/2 pounds. It has a maximum range of a little over 1,600 yards and a maximum effective range of about 50 yards. Disassembly Care of the pistol includes daily preventive maintenance, prefiring cleaning, and postfiring cleaning. For daily maintenance the pistol need not be disassembled; but, for the prefiring and postfiring cleaning, the pistol should be disassembled. There are two phases of disassembly for the pistol: general disassembly (field-stripping) and detailed disassembly. General disassembly (fig. 8-4)
Figure 8-4.-General disassembly (field-stripping) of the .45-cal. pistol. is the disassembly necessary for normal care and cleaning, and after the weapon has been fired. This is the extent of disassembly that is generally explained to personnel such as watchstanders. The detailed disassembly of the receiver group (fig. 8-5) is the job of the Gunner's Mate during periodic cleaning and repair. Detailed disassembly is not currently called for in any 3-M system MRCs. However, it is a very good idea to perform a detailed disassembly and cleaning after heavy use, such as security force range qualifications. To do a good job of cleaning and repair, it is essential that you know the names of the parts of the weapon. The nomenclature of parts of the pistol should be learned while practicing disassembly and assembly. As each part is removed and replaced, the nomenclature is repeated until known. While studying the disassembly and assembly of the pistol, refer to the illustrations showing the parts by name and description. Become thoroughly familiar with the parts and their functions. Knowing the names of the parts will also help you understand the operation of the weapon. GENERAL DISASSEMBLY (FIELD-STRIP-PING).- Before performing any work on the pistol, remove the magazine, pull the slide to the rear, and inspect to see that the weapon is clear. Then perform the following steps: 1. Cock the hammer and put the safety lock in its up (SAFE) position. Depress the recoil spring plug and turn the barrel bushing about a quarter-turn clockwise, This releases the tension on the spring. Allow the spring to expand slowly, under control, to prevent injury or loss of parts. Turn the recoil spring plug counterclockwise and remove it from the recoil spring. Move the safety lock back down to its FIRE position. 2. Draw the slide to the rear until the halfmoon recess (on the slide) is directly above the projection on the slide stop. Push out the slide stop from right to left. 3. Turn the pistol upside down and draw the receiver to the rear, disengaging it from the slide. Lay the receiver down. 4. Draw the recoil spring and its guide to the rear and out of the slide. 5. Take the barrel bushing out of the slide by turning it counterclockwise as far as it will go, then lifting up. 6. Lay the barrel link forward and pull the barrel out of the muzzle end of the slide. 7. Take out the firing pin by pressing on the rear of the firing pin with any pointed object until you can slide out the firing pin stop. Keep your fingers over the firing pin, allowing the spring tension to ease; then lift both firing pin and spring from the slide.
Figure 8-5.-Detailed disassembly of the .45-cal. pistol receiver group. 8. Pry the extractor out of the rear of the slide. Assembly To reassemble the weapon, perform the disassembly procedures in reverse order. You want to remember that all pins go in from left to right. Safeties There are three safety features and one positive safety on the .45-cal. pistol. The three safety features are the half-cock notch, the grip safety, and the disconnector. The positive safety is the safety lock (sometimes called the thumb safe). The safety lock positively locks the slide in the forward position. In addition, a stud on the safety lock (fig. 8-6, view A) blocks the shoulders of the sear to prevent any movement of the sear out of the full-cock notch of the hammer. The half-cock notch is the notch just above the full-cock notch. It has a lip, which prevents movement of the sear from that notch when pressure is applied to the trigger. (See fig. 8-6, view B.) The grip safety (fig. 8-6, view C) indirectly stops any movement of the sear by blocking trigger movement. If the trigger cannot be actuated, the sear cannot move and the hammer will not fall. The disconnector and sear (fig. 8-6, view D) prevents firing unless the slide is fully forward and locked. Any time the slide is not fully forward, the nose of the disconnector is forced downward. In this condition the disconnector spade does not contact the sear when the trigger is pulled. When the trigger is pulled, the disconnector will be pushed to the rear; but the sear remains in position, holding the hammer to the rear. When the slide is forward, the disconnector rides up into a recess on the underside of the slide. The spade of the disconnector (dark area) bears against lugs on the sear. When the trigger is pulled, the trigger yoke pushes back against the disconnector spade, which transmits the motion to the sear, rotating the sear nose out on the full-cock notch of the hammer, and the weapon fires. |
 
|
|
|
||