Custom Search
|
|
 
|
||
|
EDITING AUDIOTAPE LEARNING OBJECTIVE: Identify the method used to edit audiotape. One of the advantages of working with reel-to-reel audiotape is that you can edit program material easily. You can remove mistakes and unwanted material from your program to from a cohesive, polished product. The editing process also will allow you to adjust the run time of a program by shortening or lengthening a taped segment. In addition, you may add taped material to another taped program through the editing process. EDITING PROCESS The most common method of editing audiotape is for the unwanted material to be cut out. Although this method has been in place since the introduction of magnetic recording tape many years ago, the "cut and splice" technique is still the preferred editing method of the broadcast industry. The manual reel-to-reel tape edit is simple, requires no expensive or exotic equipment, and depending on the skill of the editor, can produce a clean and extremely accurate edit. Finding Edit In/Out Point You can edit tape manually by taking the following steps: 1. Thread the tape onto the recorder, then place the recorder into the playback mode. 2. To get a better idea of what and how much editing you will need to do, preview the material. This will save considerable time when editing. You can plan your edits by listening to the order of topics or subject items as they occur on the tape. listen for and note statements that may be in poor taste, against policy or unnecessary. Be aware of items that do not maintain continuity or that are illogical. Consider editing out long pauses that do not add to the program. Time the material to see how you can adjust the program length.
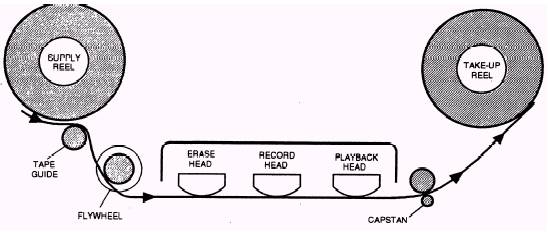
Figure 13-11. - Reel-to-reel tape recorder head sequence.
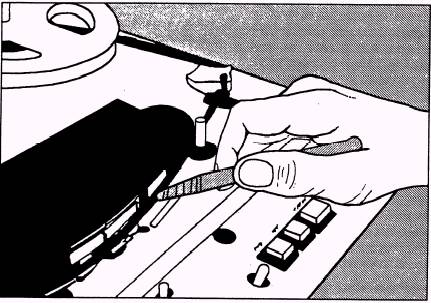
Figure 13-12. - Marking the edit in point on the playback head. 3. Locate the segment of material you want to edit. To do this, you will be concerned with one of three tape heads on the machine. With few exceptions, the tape head sequence (from left to right) is erase, record and playback (fig. 13-11). If there is material that needs editing or if the tape does not meet the timing requirements, listen to the audio and find the point where you want to start your edit. Slowly wind and rewind the tape manually to find the exact edit in point. Make a vertical mark on the audiotape at the edit in point in the center of the playback head (fig. 13-12). You can do this easily by using a china marker (grease pencil). Make sure you limit your mark to the surface of the tape stray marks on the tape head could damage it. 4. Find and mark the edit out point using the same procedure as for locating and marking the edit in point. When you mark the edit in and out points, always allow for natural pauses (breathing). If only the bad audio is edited out, there will be an abnormally long pause left on the tape at the point of the splice. Cut and Splice Once you have located and marked the edit points, you can cut out the desired edited material. To do this, you need a sharp razor blade, an edit block and a roll of audio splicing tape. If the editing block is not permanently mounted on the base of the recorder, set up the block so that the
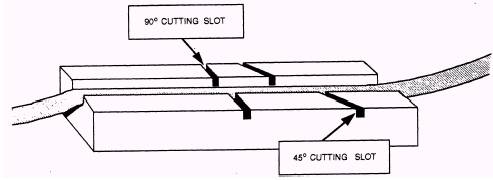
Figure 13-13. - Audiotape editing block.
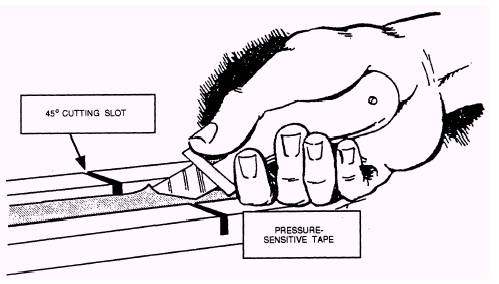
Figure 13-14. - Applying splicing tape. 45-degree cutting slot is to the right of the 90-degree slot, as shown in figure 13-13. Cut and splice the tape using the following procedure: 1. Rewind the tape to the edit in point. Make sure you unwind enough tape to be placed into the editing block. Press the tape, oxide (dull) side down, into the edit block so it is held in place by the grooved slots of the block 2. Center the marked edit in point over the 45-degree cutting slot in the edit block, as shown in figure 13-13. NOTE: The 45-degree slot is most frequently used, because it is a stronger bonding edit than one made from a 90-degree vertical cut. The 45-degree angle cut also reduces the chance of an audible popping sound at the edit point during playback. 3. Cut the tape carefully with a razor blade, using the diagonal slot as a guide. Remove the tape on the left side of the cut. 4. Place the recorder into the edit mode and push STOP once you find the edit out point. Unwind enough tape to locate the edit out point and center it over the 45-degree cutting slot. Cut the tape carefully at the edit mark with a razor blade. 5. Once you make the final cut, remove the loose tape from the left side of the cut and set it aside until you check the edit and run time of the program. You may need to splice in this section later. 6. Push the remaining tape ends together in the edit block so there is no gap or overlap. Join the two ends using a piece of 7/32-inch splicing tape about one inch in length (fig. 13-14). Press the splicing tape firmly over the cut. NOTE: Always use tape manufactured for audiotape splicing. Any other types of tape may damage the tape heads. Review the Edit After you complete the edit, review it to make sure it meets the requirements of your station. Use the following procedure: 1. Review the edit by first removing the audiotape from the splicing block and examining it for defects. If a defect is present, remove the splicing tape and repeat the edit. 2. Rethread the tape onto the recorder and play the edited segment. Listen for popping or clicking sounds. Also, pay attention to the continuity and aesthetics of the program. Make sure conversations flow smoothly and the content of the message is not changed or destroyed. Be alert for policy violations and adherence to time requirements. If you note any problem areas, repeat the editing process as needed. 3. Once you are satisfied with the finished product, label it according to the procedures of your detachment and give the tape to your supervisor. |
 |
|
|
||