Custom Search
|
|
 
|
||
|
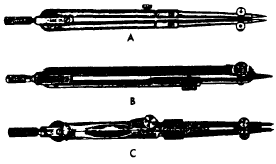
Maintenance of Compasses and Dividers Figure 2-17 shows the three shapes in which compasses and dividers are made: round, flat, and bevel. Figure 2-18 shows two types of pivot joints commonly found on compasses and dividers. When you select compasses and dividers, test them for alignment by bending the joints and bringing the points together. New instruments are factory adjusted for correct friction setting. They rarely require adjustment. A small jewelers screwdriver or the screwdriver found in some instrument sets (fig. 2-15H) is used for adjusting most pivot joint instruments. Instruments that require a special tool should be adjusted by skilled instrument repairmen. Pivot joint compasses and dividers should be adjusted so that they may be set without undue friction. They should not be so rigid that their
Figure 2-17.-Shapes of compasses and dividers: (A) Round; (B) Flat; (C) Bevel.
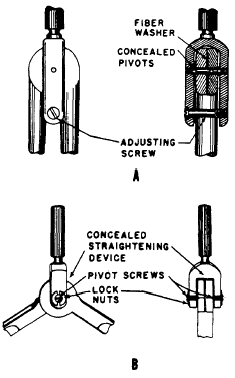
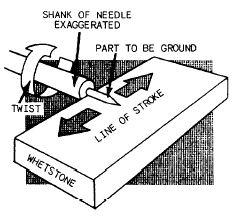
Figure 2-18.-Sections of pivot joints. manipulation is difficult, nor so loose that they will not retain their setting. Divider points should be straight and free from burrs. When the dividers are not in use, the points may be protected by sticking them into a small piece of soft rubber eraser or cork. When points become dull or minutely uneven in length, make them even by holding the dividers vertically, placing the legs together, and grinding them lightly back and forth against a whetstone. (See fig. 2-19, view A.) Then hold the dividers horizontally and sharpen each point by whetting the outside of it back and forth on the stone, while rolling it from side to side with your fingers (fig. 2-19, view B). The inside of the leg should remain flat and should not be ground on the stone. The outside of the point should not be ground so that a flat surface results. In shaping the point, be careful to avoid shortening the leg. Needles on compasses and dividers should be kept sharpened to a fine taper. When they are pushed into the drawing, they should leave a small, round hole in the paper no larger than a
Figure 2-19.-Divider maintenance: (A) Evening the legs of dividers; (B) Sharpening divider needlepoints. pinhole. Since the same center is often used for both the compasses and dividers, it is best that needles on both be the same size. If the compass needle is noticeably larger, grind it until it is the correct size. To make a compass needle smaller, wet one side of the whetstone and place the needle with its shoulder against this edge. Then grind it against the whetstone, twirling it between your thumb and forefinger (fig. 2-20). Test it for size by inserting it in a hole made by another needle of the correct size. When it is pushed as far as the shoulder, it should not enlarge the hole. The screw threads on bow instruments are delicate. Because of this, you should take care never to force the adjusting nut. Threads must be kept free from rust or dirt. If possible, it is best to keep drawing instruments in a case, since the case protects them from damage from falls or unnecessary pressures. Then, too, the lining of the case is usually treated with a chemical that helps prevent the instruments from tarnishing or corroding. To protect instruments from rusting when they are not in use, clean them frequently with a soft cloth and apply a light film of oil to their surface
Figure 2-20.-Shaping a compass needle. with a rag. Joints on compasses and dividers should not be oiled. When the surface finish of instruments becomes worn or scarred, it is subject to corrosion; therefore, a knife edge or an abrasive should never be used to clean drafting instruments. |
||
|
||