Custom Search
|
|
 
|
||
|
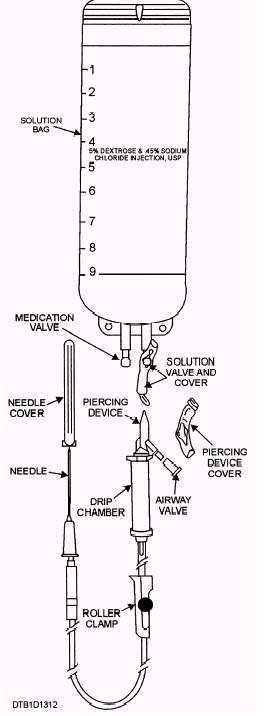
INTRAVENOUS INFUSION OF FLUIDS.\ Parenteral therapy is the nonoral (not by mouth) administration of fluids (e.g., intravenous infusion of fluids). This therapy may be required when a casualty loses a large quantity of body fluids as a result of injury and shock. To halt and reverse shock, lost fluids must be replaced. If a casualty cannot take fluids by mouth, or is unable to take enough by mouth, a medical or dental officer may administer fluids by other means. Ordinarily, you will not be involved with the intravenous administration of fluids, but in a mass casualty situation, you may be required to assemble, insert, and maintain intravenous therapy equipment either under the supervision of a medical or dental officer, or on your own. Intravenous therapy, commonly called an IV, refers to the administration of fluids, drugs, or blood directly into the circulatory system by way of a vein. When whole blood is administered, the technique is called transfusion. When sterile fluids (blood volume expanders) are administered, the technique is called infusion Intravenous infusion is used in the field for three major reasons: To add fluid volume to the circulatory system when there is an imbalance or depletion of normal body fluids, as in hemorrhage or burns. To establish and maintain life support for a casualty whose condition is questionable, and it is felt that the person might deteriorate. To provide an access for the administration of medications. There are basically four types of fluids used for infusion in the field: D5W, 5 percent dextrose and sterile water, given in cases where the IV is used to establish a lifeline or a medication route. N.S., or normal saline, which is 0.09 percent sodium chloride in sterile water, and used for irrigation of wounds. Lactated Ringers, a solution of electrolytes isotonic (having equal pressure as blood, so that it will not destroy red blood cells when injected into the blood stream) is used for trauma cases, burns, and hemorrhagic shock. Dextran, a blood plasma substitute containing large molecules of glucose, used in serious hemorrhage cases. The equipment used is in sterile disposable sets, as shown in figure 13-12. The equipment set contains: 1. The solution to be infused. 2. The IV itself, consisting of the piercing device cover, piercing device, airway valve, drip chamber, roller clamp, tubing, needle, and needle cover. 3. Some sets may contain auxiliary equipment such as an arm board, antiseptic solution, tape to secure the IV tubing, a tourniquet, and gauze pads to cover the insertion site. Preparing the Solution.-The medical officer will choose the solution and needle for the infusion procedure. The solution comes in a plastic bag that must be connected to the sterile, disposable infusion set. Connect the bag to the infusion set using the following procedures: 1. Open the infusion set, close the roller clamp on the tubing, and put the infusion set aside. 2. Remove the solution bag from the wrapper. Ensure that the expiration date has not passed. Check the solution by holding the bag up to the light. The solution should be clear. The solution cannot be used if it is cloudy or if it contains any sediment or mold. Squeeze the bag and check for small leaks. If there is
Figure 13-12.\Plastic solution bag and sterile disposable infusion set. anything wrong with the solution or the bag, inform the medical officer. Get a new bag and discard the old one. 3. Hold the medication valve under your thumb as shown in figure 13-13. Remove the cover from the solution valve. Make sure not to touch the end of the solution valve, as this will contaminate it. Continue to
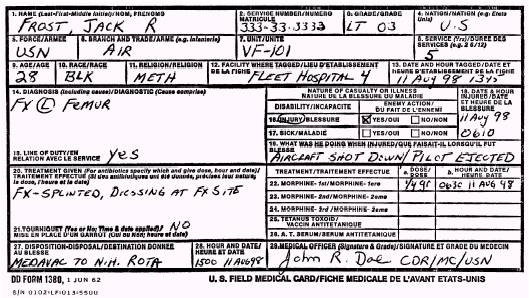
Figure 13-13.\Holding the solution bag. hold the medication valve under your thumb, so that the medication valve does not come into contact with the solution valve. 4. Remove the cover from the piercing device. Insert the piercing device into the solution valve on the bag. 5. Invert the solution bag and hang it on a rack at least 30 inches above the casualty's head. 6. Remove the airway valve at the top of the drip chamber on the infusion set. 7. Press and release the sides of the drip chamber. This will pump the solution into the chamber. Continue until the chamber is one-half full. 8. Grasp the end of the needle cover and uncover the needle. CAUTION Do not touch the needle or the bottom lip of the needle cover. 9. Hold the needle so the point is down, and then open the roller clamp. Allow the air solution to flow through the tubing until the tubing is filled and all air bubbles are expelled. 10. Close the roller clamp, and then put the cover back on the needle. Inserting An IV.\To infuse an IV solution, perform the following procedures: 1. Choose the insertion site, usually one of the veins in the forearm. Apply a constricting band to the casualty's upper arm. The constricting band should be just tight enough to stop blood flow in the vein. It should not be so tight that it cuts off blood flowing in the arteries. 2. You may have to immobilize the casualty's arm. This is done by placing an armboard under the arm and securing the board with bandages above the tourniquet and at the wrist. 3. Locate the vein. This can often be done visually because the tourniquet helps the vein to stand out. Or you can have the casualty clench and unclench the fist several times. As the casualty does this, examine the insertion site with your fingers to detect the vein by touch. It may also help to slap the skin over the vein with your fingers. 4. After locating the vein, thoroughly clean the insertion site with an alcohol sponge. 5. The next step is venipuncture, the piercing of the vein with the needle. Usually a medical officer will do this. However, if you are in a mass casualty situation and if you have had training in venipuncture, the medical officer may direct you to insert the needle. To insert the needle: a. Remove the protective cover from the needle. Do not touch the needle. b. Hold the needle so it points toward the casualty's upper arm. One side of the needle is beveled, or slanted. Usually, the needle is inserted in the vein with the beveled side up. The only exception to this would be if the casualty's veins are very small. c. Hold the needle firmly. The tip of the needle should be directly over the vein. The needle should be at about a 10- to 20-degree angle with the skin. d. Place the thumb of your free hand about 2 inches beyond the insertion site and stretch the skin tight. e. Pierce the skin with the needle, and then immediately lower the needle so it is almost parallel with the skin. Exerting slight upward pressure to the needle, slowly and steadily push it forward through the top wall of the vein. Still exerting slight upward pressure, very slowly and very carefully advance the needle along the top wall of the vein for a distance of about 1 inch. The upward pressure will cause the vein to rise slightly. Do not exert downward pressure, as the needle could puncture the bottom wall of the vein. 6. Secure the needle in place with one or two strips of adhesive tape. Make a loop in the tubing and then secure the tubing in place with adhesive tape. 7. Adjust the roller clamp on the tubing for the proper flow rate, as directed by the medical officer. You can determine the flow rate by observing the drip chamber for 1 minute. The usual flow rate is 40 to 60 drops per minute. 8. While the fluid is being infused, the officer may have you monitor the casualty. Try to keep the casualty still, so the patient doesn't dislodge the needle. Observe the drip chamber on the infusion set to see that the fluid flows properly. If there is any irregularity in the flow rate or if the fluid stops flowing, inform the officer at once. When the solution bag is almost empty, inform the medical officer. Be on the lookout for any of the following reactions and report them to the officer immediately: Casualty shivers or shows signs of being chilly. Those hopelessly wounded or dead on arrival. Casualty's pulse rate increases. Casualty's color changes. Signs of swelling around the needle insertion site. 9. When the casualty has received enough fluid, the officer may direct you to remove the infusion set. To do this, close the roller clamp on the tubing. Remove the tape used to hold the needle and tubing in place. Place an alcohol sponge over the needle insertion site, and withdraw the needle. After withdrawing the needle, press the alcohol sponge over the insertion site until bleeding stops. 10. Discard the solution bag and the infusion set. They cannot be reused. TRANSPORTING AN IV CASUALTY.\ When the casualty is stabilized and ready to be moved, elevate the fluid container well above the level of the casualty's heart. If you are using fluid in a bag, place the bag under the patient until it can be hung up. During transporting, continue to monitor the IV to ensure that it does not become dislodged. When moving over rough terrain or heavy underbrush, you can stop the IV drip for 4 or 5 minutes, the treatment provided in the field or at the site so that medical personnel providing definitive treatment will know what emergency measures were taken and the circumstances involved. To aid in this documentation, or mass situation, it is important for you to document use the U.S. Field Medical Card. PREPARING MEDICAL TAGS.\In a combat if necessary. Strap the container to the casualty so that the needle does not become dislodged.
Figure 13-14A.\U.S. Field Medical Card (front).
Figure 13-14B.\U.S. Field Medical Card (back). This card is two-sided (figs. 13-14A and 13-14B) and contains blocks for recording the casualty's personal data, the initial diagnosis, nature of the casualty, date and time of the injury, emergency medical treatment rendered, casualty disposition, and the signature of the aid person rendering the initial treatment. Make every effort to complete the card as accurately as possible. This information will be extremely helpful to the medical staff after the casualty has been transported for further medical treatment. |
 
|
|
|
||