Custom Search
|
|
 
|
||
|
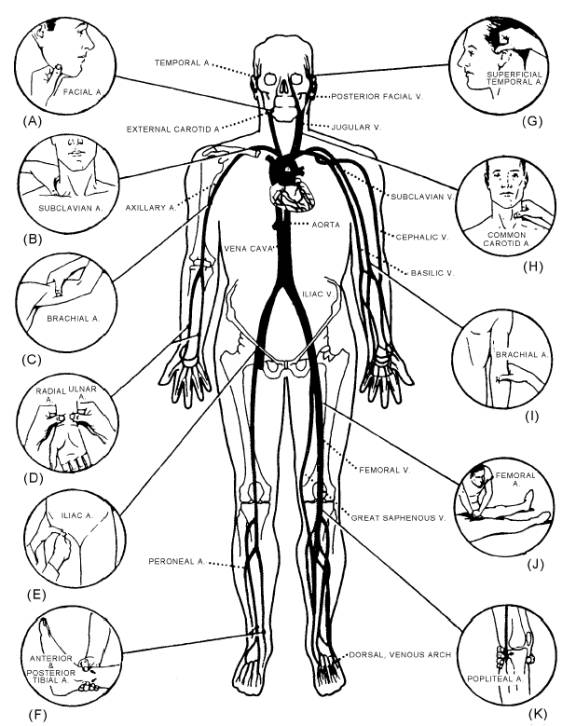
Pressure Points Bleeding can often be temporarily controlled by applying hand pressure to the appropriate pressure point. A pressure point is the spot where the main artery to an injured part lies near the skin surface and over a bone. Apply pressure at this point with the fingers (digital pressure) or with the heel of the hand. No first aid materials are required. The object of the pressure is to compress the artery against the bone, thus shutting off the flow of blood from the heart to the wound. There are 11 principal points on each side of the body where hand or finger pressure can be used to stop hemorrhage. These points are shown in figure 4-27. If bleeding occurs on the face below the level of the eyes, apply pressure to the point on the mandible. This is shown in figure 4-27A. To find this pressure point, start at the angle of the jaw and run your finger forward along the lower edge of the mandible until you feel a small notch. The pressure point is in this notch. If bleeding is in the shoulder or in the upper part of the arm, apply pressure with the fingers behind the clavicle. You can press down against the first rib or forward against the clavicle; either kind of pressure will stop the bleeding. This pressure point is shown in figure 4-27B. Bleeding between the middle of the upper arm and the elbow should be controlled by applying digital pressure to the inner (body) side of the arm, about halfway between the shoulder and the elbow. This compresses the artery against the bone of the arm. The application of pressure at this point is shown in figure 4-27C. Bleeding from the hand can be controlled by pressure at the wrist, as shown in figure 4-27D. If it is possible to hold the arm up in the air, the bleeding will be relatively easy to stop. Figure 4-27E shows how to apply digital pressure in the middle of the groin to control bleeding from the thigh. The artery at this point lies over a bone and quite close to the surface, so pressure with your fingers may be sufficient to stop the bleeding. Figure 4-27F shows the proper position for controlling bleeding from the foot. As in the case of bleeding from the hand, elevation is helpful in controlling the bleeding. If bleeding is in the region of the temple or the scalp, use your finger to compress the main artery to the temple against the skull bone at the pressure point just in front of the ear. Figure 4-27G shows the proper position. If the neck is bleeding, apply pressure below the wound, just in front of the prominent neck muscle. Press inward and slightly backward, compressing the main artery of that side of the neck against the bones of the spinal column. The application of pressure at this point is shown in figure 4-27H. Do not apply pressure at this point unless it is absolutely essential, since there is a great danger of pressing on the windpipe, thereby choking the victim. Bleeding from the lower arm can be controlled by applying pressure at the elbow, as shown in figure 4-27I. As mentioned before, bleeding in the upper part of the thigh can sometimes be controlled by applying style="mso-spacerun: yes"> digital pressure in the middle of the groin, as shown in figure 4-27E. Sometimes, however, it is more effective to use the pressure point of the upper thigh, as shown in figure 4-27J. If you use this point, apply pressure with Figure 4-27.-Pressure points. Bleeding between the knee and the foot may be controlled by firm pressure at the knee. If pressure at the side of the knee does not stop the bleeding, hold the front of the knee with one hand and thrust your fist hard against the artery behind the knee, as shown in figure 4-27K. If necessary, you can place a folded compress or bandage behind the knee, bend the leg back, and hold it in place by a firm bandage. This is a most effective way of controlling bleeding, but it is so uncomfortable for the victim that it should be used only as a last resort. You should memorize these pressure points so that you will know immediately which point to use for controlling hemorrhage from a particular part of the body. Remember, the correct pressure point is that which is (1) nearest the wound, and (2) between the wound and the main part of the body. It is very tiring to apply digital pressure, and it can seldom be maintained for more than 15 minutes. Pressure points are recommended for use while direct pressure is being applied to a serious wound by a second rescuer. Using the pressure-point technique is also advised after a compress, bandage, or dressing has been applied to the wound, since this method will slow the flow of blood to the area, thus giving the direct pressure technique a better chance to stop the hemorrhage. The pressure-point system is also recommended as a stopgap measure until a pressure dressing or a tourniquet can be applied. Elevation Splints Later in this chapter we will go into the subject of splinting in greater detail. |
 |
|
|
||