Custom Search
|
|
 
|
||
|
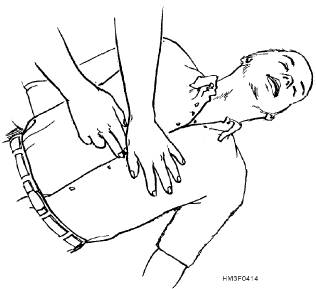
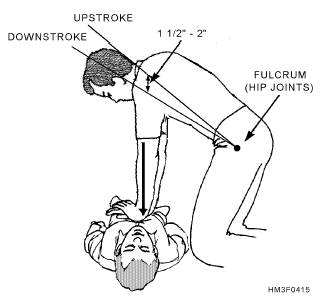
Gastric Distention Sometimes during artificial ventilation, air is forced into the stomach instead of into the lungs. The stomach becomes distended (bulges), indicating that the airway is blocked or partially blocked, or that ventilations are too forceful. This problem is more common in children but can occur with adults as well. A slight bulge is of little worry, but a major distention can cause two serious problems. First, it reduces lung volume: the distended stomach forces the diaphragm up. Second, there is a strong possibility of vomiting. The best way to avoid gastric distention is to position the head and neck properly and/or limit the volume of ventilations delivered. NOTE: THE AMERICAN RED CROSS (ARC) STATES THAT NO ATTEMPT SHOULD BE MADE TO FORCE AIR FROM THE STOMACH UNLESS SUCTION EQUIP-MENT IS ON HAND FOR IMMEDIATE USE. If suction equipment is ready and the patient has a marked distention, you can turn the patient on his side facing away from you. With the flat of your hand, apply gentle pressure between the navel and the rib cage. Be prepared to use suction should vomiting occur. CIRCULATION A rescuer knowing how to administer cardiopulmonary resuscitation (CPR) greatly increases the chances of a victim's survival. CPR consists of external heart compression and artificial ventilation. External heart compression is performed on the outside of the chest, and the lungs are ventilated by the mouth-to-mouth, mouth-to-nose, mouth-to- stoma, or mouth-to-mask techniques. To be effective, CPR must be started within 4 minutes of the onset of cardiac arrest. The victim should be supine on a firm surface. CPR should not be attempted by a rescuer who has not been properly trained. If improperly done, CPR can cause serious damage. It must never be practiced on a healthy individual. For training purposes, use a training aid instead. To learn this technique, see your yes"> medical education department or an American Heart Association-or American Red Cross-certified Hospital Corpsman, nurse, or physician. One-Rescuer CPR DETERMINING PULSELESSNESS.-Once the airway has been opened, check for the carotid pulse. The carotid artery is most easily found by locating the larynx at the front of the neck and then sliding two fingers down the side of the neck toward you (fig. 4-13). The carotid pulse is felt in the groove between the larynx and the sternocleidomastoid muscle. If the pulse is present, ventilate as necessary. If the pulse is absent, locate the sternum and begin chest compressions. PROPER POSITIONING OF HANDS ON STERNUM.-To locate the sternum, use the middle and index fingers of your lower hand to locate the lower margin of the victim's rib cage on the side closest to you (fig. 4-14). Then move your fingers up along the edge of the rib cage to the notch where the ribs meet the sternum in the center of the lower chest. Place your middle finger on the notch and your index finger next to it. Place the heel of your other hand along the midline of the sternum next to your index finger. Remember to keep the heel of your hand off the xiphoid (tip of the sternum). Afracture in this area may damage the liver, causing hemorrhage and death. CHEST COMPRESSIONS.-Place the heel of one hand directly on the sternum and the heel of the other on top of the first. Interlock your fingers or extend them straight out and KEEPTHEMOFFTHE VICTIM'S CHEST! Effective compression is accomplished by locking your elbows into position, straightening your arms, and positioning your shoulders directly over hands so that the thrust for each chest compression is straight down on the sternum. See figure 4-15. The sternum should be depressed approximately 1 1/2 to 2 inches (for adults). Release chest compression pressure between each compression to allow blood to flow into the chest and heart. When releasing chest compression pressure, remember to keep your hands in place on the chest. Not only will you feel less fatigue if you use the proper technique, but a more effective compression
Figure 4-13.-Locating the carotid pulse.
Figure 4-14.-Proper position of hands on the sternum for
chest compressions.
Figure 4-15.-Proper position of the rescuer. PERFORMANCEANDREASSESSMENTOF CPR.-When one rescuer performs CPR, the ratio of compressions to ventilations is 15 to 2, and it is performed at a rate of 80 to 100 compressions per minute. Vocalize: "one and, two and, three and,..." until you reach 15. After 15 compressions, you must give the victim two slow ventilations (1 1/2 to 2 seconds). Continue for four full cycles. Quickly check for the carotid pulse and spontaneous breathing. If there are still no signs of recovery, continue CPR with compressions. Reassess the patient every few minutes thereafter. If a periodic check reveals a return of pulse and respiration, discontinue CPR and place the victim in the recovery position. Continue monitoring the victim and be prepared to restart CPR . |
||
|
||