Custom Search
|
|
 
|
||
|
Objective Examination The objective examination is a comprehensive, hands-on survey of the patient's body. During this examination, check the patient's vital signs and observe the signs and symptoms of injuries or the effects of illness. When you begin your examination of the patient, you should heed the following rules: 1. Obtain the patient's consent (if the patient is alert). 2. Tell the patient what you are going to do. 3. Always assume trauma patients have a spinal injury, especially unconscious trauma patients, unless you are certain you are dealing with a patient free from spinal injury (e.g., a medical patient with no trauma). HEAD-TO-TOE SURVEY.-The head-to-toe survey is a systematic approach to performing a physical examination. This survey is designed so nothing important is missed during the examination of the patient. There may be variations in the head-to-toe survey depending on local guidelines. Traditionally, the examination is started with the head. However, most medical authorities now recommend that the neck be examined first in an effort to detect possible spinal injuries and any serious injury to the trachea that may lead to an airway obstruction. During the head-to-toe survey, you should look for discolorations, deformities, penetrations, wounds, and any
unusual chest movements; smell for any unusual odors coming from the patient's body, breath,
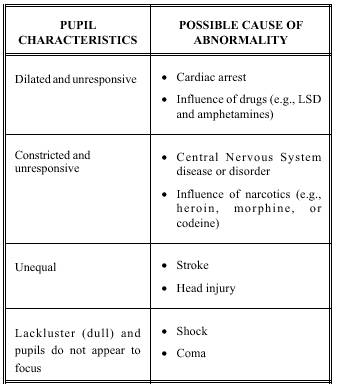
or clothing. Begin the survey by kneeling at the side of the patient's head. Quickly take an overview of the patient's body (i.e., general appearance, demeanor, behavior, skin color and characteristics, etc.), then perform the 26 steps described in the following sections. Step 1.-Check the cervical spine for point tenderness and deformity. To perform this procedure, gently slide your hands, palms up, under both sides of the patient's neck. Move your fingertips toward the cervical midline. Check the back of the neck from the shoulders to the base of the skull. Apply gentle finger pressure. A painful response to this pressure is point tenderness. If there are signs of possible spinal injury, such as midline deformities, point tenderness, or muscle spasms, stop the survey and provide stabilization of the head and neck. NOTE: If a rigid cervical collar is to be applied, make sure you have examined the posterior, anterior, and sides of the neck before applying the collar. Step 2.-Inspect the anterior neck for indications of injury and neck breathing. This procedure consists of exposing the anterior neck to check for injury and to detect the presence of a surgical opening (stoma) or a metal or plastic tube (tracheostomy). The presence of a stoma or tracheostomy indicates the patient is a neck breather. Also, if you have not already done so in the primary survey, check for a medical identification necklace. A necklace may state the patient has a stoma or tracheostomy. Look for signs of injury, such as the larynx or trachea deviated from the midline of the neck, bruises, deformities, and penetrating injuries. Also, check for distention of the jugular vein. If the jugular vein is distended, there may be an airway obstruction, a cervical spine injury, damage to the trachea, or a style="mso-spacerun: yes"> serious chest injury. All of these conditions require immediate medical care. After the anterior neck is inspected and if a spinal injury is suspected, apply a rigid cervical or extrication collar. If the patient is unconscious, assume the patient has a spinal injury. Step 3.-Inspect the scalp for wounds. Use extreme caution when inspecting the scalp for wounds. Pressure on the scalp from your fingers could drive bone fragments or force dirt into wounds. Also, DO NOT move the patient's head, as this could aggravate possible spinal injuries. To inspect the scalp, start at the top of the head and gently run your gloved fingers through the patient's hair. If you come across an injury site, DO NOT separate strands of the hair. To do this could restart bleeding. When the patient is found lying on his back, check the scalp of the back of the head by placing your fingers behind the patient's head. Then slide your fingers upward toward the top of the head. Check your fingers for blood. If a spinal or neck injury is suspected, delay this procedure until the head and neck have been immobilized. Furthermore, if you suspect a neck injury, DO NOT lift the head off the ground to bandage it. NOTE: You may find upon inspection that the patient is wearing a hairpiece or wig. Hairpieces and wigs may be held in place by adhesive, tape, or permanent glue, so DO NOT remove them unless you suspect profuse bleeding. Attempting removal may aggravate injury or restart bleeding. Step 4.-Check the skull and face for deformities and depressions. As you feel the scalp, check for depressions or bony projections. Visually examine facial bones for signs of fractures. Unless there are obvious signs of injury, gently palpate the cheekbones, forehead, and lower jaw. Step 5.-Examine the patient's eyes. After examining the face and scalp, move back to a side position. Begin your examination of the eyes by looking at the patient's eyelids. Do not open the eyelids of patients with burns, cuts, or other injuries to the eyelid(s). Assume there is damage to the eye and treat accordingly. If eyelids are not injured, have patients open their eyes. To examine the eyes of unconscious patients, gently open their eyes by sliding back the upper eyelids. Keep in mind, pressure applied to the eyelid may cause further injury. When the eye has been opened, visually check the globe of the eye. Step 6.-Check the pupils for size, equality, and reactivity. Using a penlight or flashlight, examine both eyes. Note pupil size and if both pupils are equal in size. Also, see if the pupils react to the beam of light. Note a slow pupil reaction to the light. Look for eye movement. Both eyes should move as a pair when they observe moving persons or objects. NOTE: Check unconscious patients for contact lenses. Prompt removal of contact lenses is recommended. If removal of the lens is impractical, close the patient's eyes so the contact lenses stay lubricated. Table 4-1 lists pupil characteristics you may encounter and the possible causes of abnormalities. Step 7.-Inspect the inner surfaces of the eyelids. Step 8.-Inspect the ears and nose for injury and the presence of blood or clear fluids. Without rotating the patient's head, inspect the ears and nose for cuts, tears, or burns. Use a penlight to look in the ears and nose for blood, clear fluids, or bloody fluids. Blood in the ears and clear fluids (cerebrospinal fluid) in the ears or nose are strong indicators of a skull fracture. Also, check for bruises behind the ears, commonly referred to as Battle's sign. Bruises behind the ears are strong indicators of skull fracture and cervical spine injury. Burned or singed nasal hairs indicate possible burns in the airway. Step 9.-Inspect the mouth. Look inside the mouth for signs of airway obstruction that may not have been observed during the primary survey (e.g., loose or broken teeth, dentures, and blood). When you inspect the mouth, remember not to rotate the patient's head. Step 10.-Smell for odd breath odors. Place your face close to the patient's mouth and nose and note any unusual odors. A fruity smell indicates diabetic coma or prolonged vomiting and diarrhea; a petroleum odor indicates ingested poisoning; and an alcohol odor indicates possible alcohol intoxication.
Table 4-1.-Listing of Pupil Characteristics and the Possible
Cause of Abnormality Step 12.-Examine the chest for possible fracture. Before you begin examining the chest for fractures, warn the patient that the examination may be painful. Begin your examination by gently feeling the clavicles (collarbones). Next, feel the sternum (breastbone). Then examine the rib cage by placing your hands on both sides of the rib cage and applying gentle pressure. This process is known as compression. If the patient has a fracture, compression of the rib cage will cause pain. Finally, slide your hands under the patient's scapulae (shoulder blades) to feel for deformities or tenderness. Point tenderness, painful reaction to compression, deformity, or grating sounds indicate a fracture. If air is felt (like crunching popcorn) or heard (crackling sounds) under the skin, this indicates that at least one rib is fractured or that there is a pneumothorax (punctured lung). You may also observe air escaping the chest cavity and the wound when the patient has a punctured lung. |
 
|
|
|
||