gently manipulates the point of an explorer around the inside edge of the band. This contours the marginal ridge of the restoration and removes the excess amalgam around the matrix band. The assistant will pass the dentist hemostats or cotton forceps to remove the wedge if one was placed. With the thumb or finger over the occlusal surface of the restoration and matrix band, the outer and inner nuts are turned counterclockwise to loosen the retainer from the band. After the retainer is removed, the remaining band is carefully removed. A loose end of the band is grasped with the hemostats or cotton forceps and gently rocked back and forth until the band comes out of the interproximal space. Remove the band from the other interproximal space in the same manner.
PIN AMALGAM SET
Extensive decay or a cusp fracture results in the loss of a major portion of the tooth structure. To restore such a tooth to its former healthy condition, the dentist may choose to rebuild the tooth. If the tooth is a posterior one, the dentist may use the pin amalgam technique. For a pin amalgam restoration, the dentist uses specific instruments. The pin amalgam instruments are packaged in kits in which pin burs (drills), self-threading pins, and pin (hand) wrenches are precision matched. It is extremely important to keep the set together since there are a large variety of types and sizes. The pins are placed with a hand wrench in the tooth preparation to anchor the amalgam or restorative material in place (fig 4-32). A pin bender is frequently used to bend or slightly adjust the position of inserted pins. Follow the manufacturer's instructions before handling these materials.
FOUR-HANDED DENTISTRY
The goal of four-handed dentistry is to allow the dentist and assistant to function as a team in a seated position with maximal efficiency and minimal strain. Four-handed dentistry, as it has been developed, not only increases productivity, but also reduces stress and fatigue on the provider and assistant. Four-handed dentistry can be used in all of the specialty areas, and in operative dentistry. It is discussed here because instrument exchanges in operative dentistry require you to perfect this task. To be an effective dental assistant in four-handed dentistry, you must know the correct zones and positions that you are in and where you are in relation to the patient and dentist. Also correct passing and receiving of instruments and materials to the dentist is a task that must be practiced to work efficiently with the dentist.
ZONES AND POSITIONS
The position of the patient is determined by the procedure to be performed. Most dental treatment is provided with the patient in the supine position. Once the patient has been seated, the dentist and the assistant should place themselves in the proper positions for treatment. These positions are best understood by relating them to a clock. In the clock concept, an imaginary circle is placed over the dental chair, with the patient's head at the center of the circle. The circle is numbered like a clock with the top of the circle at 12 o'clock. The clock, as shown in figure 4-33, is divided into four zones of operation:
Static zone
Assistant's zone
Transfer zone
Operator's zone
The use of these zones is the key to the efficient implementation of the principles of four-handed dentistry. For right-handed dentists, seated to the right of the patient, the operator's zone is between 8 and 11 o'clock, and the assistant's zone is between 2
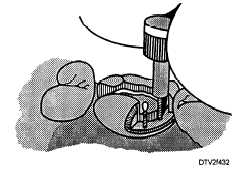
Figure 4-32. - Using a hand wrench to place pins in a tooth preparation.
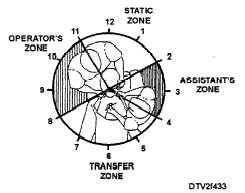
Figure 4-33. - Zones of operation for four-handed dentistry.
Continue Reading