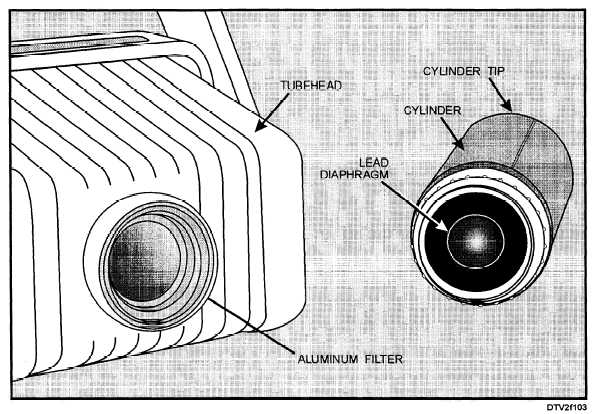
Figure 1-3. - Tube head and cylinder (short cone).
The X-ray beam passes from the aluminum filter through an opening in a lead diaphragm, which restricts the beam to 2.6 inches at the cylinder tip. There are two commonly used cylinder lengths. A tube head with an X-ray source to cylinder end distance of 8 inches is referred to as a "short cone" machine, while a tube head with an X-ray source to cylinder end distance of 16 inches is referred to as a "long cone" machine. It is essential that the technician knows the X-ray source to cylinder end distance in order to set the appropriate exposure settings.
The tube head is attached to an extension arm. The extension arm is movable, allowing you to adjust the position of the tube head for each patient.
CONTROL PANEL
The operational controls on the control panel are covered in the discussion on the operational check.
OPERATIONAL CHECK (WITHOUT PATIENT)
At the beginning of each workday, you should activate the X-ray machine to ensure that it is working properly. This operational check is conducted without a patient in the chair. In order to check the machine, you must be thoroughly familiar with its operation. Read the manufacturer's instructions carefully.
Throughout this discussion of the operational check, refer to figure 1-4. The steps of procedure are:
1. Energize the control panel. The control panel shown in figure 1-4 has three push buttons in the upper left corner. By depressing either the 10 mA or the 15 mA pushbutton, you will energize the machine and select the milliampere setting at the same time. Once the button is depressed the "power on" light will glow amber, indicating that the system is turned on. (A setting of 10 mA is normally used for intraoral radiographs.)
NOTE: Some machines have separate master on/off switches. On these machines, you should FIRST activate the master switch, and then select the milliamperes (10 mA or 15 mA) setting. A 10 mA setting is used for most dental radiographs. Some units use a combination master on/off switch and mA selector to energize the machine.
2. Set the tube head selector. On units with multiple tube head capabilities, depress the pushbutton that corresponds to the tube head to be used, normally
Continue Reading