|
||
|
|
||
| |||||||||||||||
|
|
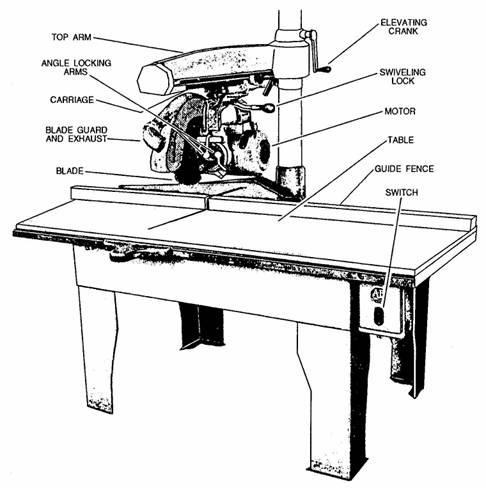
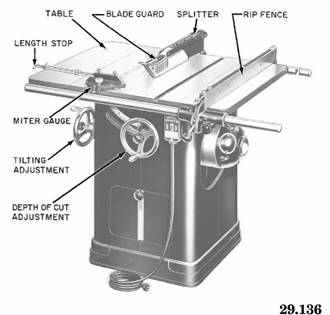
SHOP TOOLS As a Builder, you might be assigned to a shop. Therefore, you will need to know some of the common power tools and equipment found there. Shop Radial Arm Saw Figure 3-1 illustrates a typical shop radial arm saw. The procedures used in the operation, maintenance, and lubrication of any shop radial arm saw are found in the manufacturers' operator and maintenance manuals. The safety precautions to be observed for this saw are found in these same manuals. The primary difference between this saw and other saws of this type (field saws) is the location of controls. Tilt-Arbor Table Bench Saw A tilt-arbor table bench saw (figure 3-2) is so named because the saw blade can be tilted for cutting bevels by tilting the arbor. The arbor, located beneath the table, is controlled by the tilt handwheel. In earlier types of bench saws, the saw blade remained stationary and the table was tilted. A canted (tilted) saw table is hazardous in many ways; most modern table saws are of the tilt-arbor type. To rip stock, remove the cutoff gauges and set the rip fence away from the saw by a distance equal to the desired width of the piece to be ripped off. The piece is placed with one edge against the fence and fed through with the fence as a guide. To cut stock square, set the cutoff gauge at 90 to the line of the saw and set the ripping fence to the outside edge of the table, away from the stock to be cut. The piece is then placed with one edge against
Figure 3-1.-A shop radial arm saw.
Figure 3-2.-Tilt-arbor bench saw. the cutoff gauge, held firmly, and fed through by pushing the gauge along its slot. The procedure for cutting stock at an angle other than 90 (called miter cutting) is similar, except that the cutoff gauge is set to bring the piece to the desired angle with the line of the saw. For ordinary ripping or cutting, the saw blade should extend above the table top 1/8 to 1/4 inch plus the thickness of the piece to be sawed. The vertical position of the saw is controlled by the depth of cut handwheel, shown in figure 3-2. The angle of the saw blade is controlled by the tilt handwheel. Except when its removal is absolutely unavoidable, the guard must be kept in place. The slot in the table through which the saw blade extends is called the throat. The throat is contained in a small, removable section of the table called the throat plate. The throat plate is removed when it is necessary to insert a wrench to remove the saw blade. The blade is held on the arbor by the arbor nut. A saw is usually equipped with several throat plates, containing throats of various widths. A wider throat is required when a dado head is used on the saw. A dado head consists of two outside grooving saws (which are much like combination saws) and as many intermediate chisel-type cutters (called chippers) as are required to make up the designated width of the groove or dado. Grooving saws are usually I/S-inch thick; consequently, one grooving saw will cut a 1/8-inch groove, and the two, used together, will cut a 1/4-inch groove. Intermediate cutters come in various thicknesses. Observe the following safety precautions when operating the tilt-arbor table bench saw: Do not use a ripsaw blade for crosscutting or a crosscut saw blade for ripping. When ripping and crosscutting frequently, you should install a combination blade to eliminate constantly changing the blade. Make sure the saw blade is sharp, unbroken, and free from cracks before using. The blade should be changed if it becomes dull, cracked, chipped, or warped. Be sure the saw blade is set at proper height above the table to cut through the wood. Avoid the hazard of being hit by materials caused by kickbacks by standing to one side of the saw. Always use a push stick to push short, narrow pieces between the saw blade and the gauge. Keep stock and scraps from accumulating on the saw table and in the immediate working area. Never reach over the saw to obtain material from the other side. When cutting, do not feed wood into the saw blade faster than it will cut freely and cleanly. Never leave the saw unattended with the power on. |
|
Privacy Statement - Press Release - Copyright Information. - Contact Us - Support Integrated Publishing |