Custom Search
|
|
  |
|
|
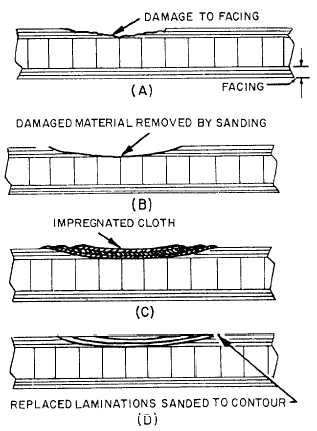
Repairing Surface Damage The most common types of damage to the surface are abrasions, scratches, scars, dents, cuts, and pits. Minor surface damages may be repaired by applying one or more coats of room-temperature catalyzed resin to the damaged area. More severe damages may be repaired by filling with a paste made from room-temperature resin and short glass fibers. Over this coated surface, apply a sheet of cellophane, extending 2 or 3 inches beyond the repaired area. After the cellophane is taped in place, start in the center of the repair and lightly brush out all the air bubbles and excessive resin with your hand or a rubber squeegee towards the outer ridge of the repair. Allow the resin to cure at room temperature, or if necessary, the cure can be hastened by the use of infrared lamps or hot sandbags. After the resin has been cured, remove the cellophane and sand off the excess resin; then, lightly sand the entire repaired area to prepare it for refinishing. PLY DAMAGE (SANDWICH LAMI-NATES). When the damage has penetrated more than one ply of the cloth in sandwich-type laminates, the repair may be made by using the scarfed method, shown in figure 14-8. This repair is made in the following manner: Clean the area thoroughly, and then sand out the damaged laminate plies, as shown in
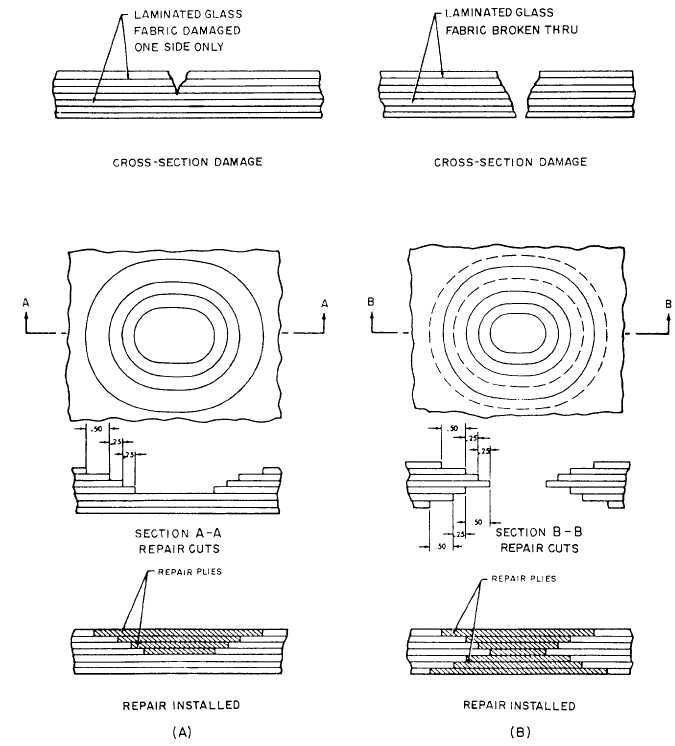
Figure 14-8.Ply repair (scarfed method). resin, and apply the contoured pieces of resin-impregnated cloth, as shown in view C of figure 14-8. Tape a sheet of cellophane over the built-up repair and work out the excess resin and air bubbles. Cure the repair in accordance with the resin manufacturers instructions, and then sand the surface down (if necessary) to the original susrface of the facing. PLY DAMAGE (SOLID LAMINATES). Ply damage to solid laminates may be repaired by using the scarfed method described for sandwich-type
Figure 14-9.Repair of solid laminates (stepped method). When the entire wall has been penetrated, as shown in figure 14-9, view B, one-half of the damaged plies should be removed from one side and the replacement buildup completed; then, repeat removal and buildup procedure on the opposite side. If the damage occurs over a relatively large or curved area, make up a plaster mold that conforms to the contour and extends 1 inch past the damage, and insert it in the damaged area when repairing the first half of the plies. When the stepped method of repair is used, the dimensions should be maintained as illustrated. In areas that have become delaminated, or that contain voids or bubbles, clean with MEK and determine the extent of the delamination; and then drill holes at each end or on the opposite sides of the void by using a No. 55 drill bit, extending through the delaminated plies. Figure 14-10 shows the procedure for repair of delaminated plies. Additional holes may be needed if air entrapment occurs when you inject the resin. Use a hypodermic needle or syringe and slowly inject the appropriate amount of resin until the void is filled and the resin
Figure 14-10.Delaminated ply repair. flows freely from the drilled holes. After the voids are completely tilled, bring the area down to proper thickness by working the excess resin out through the holes, and then cure and refinish. |
|
|
|